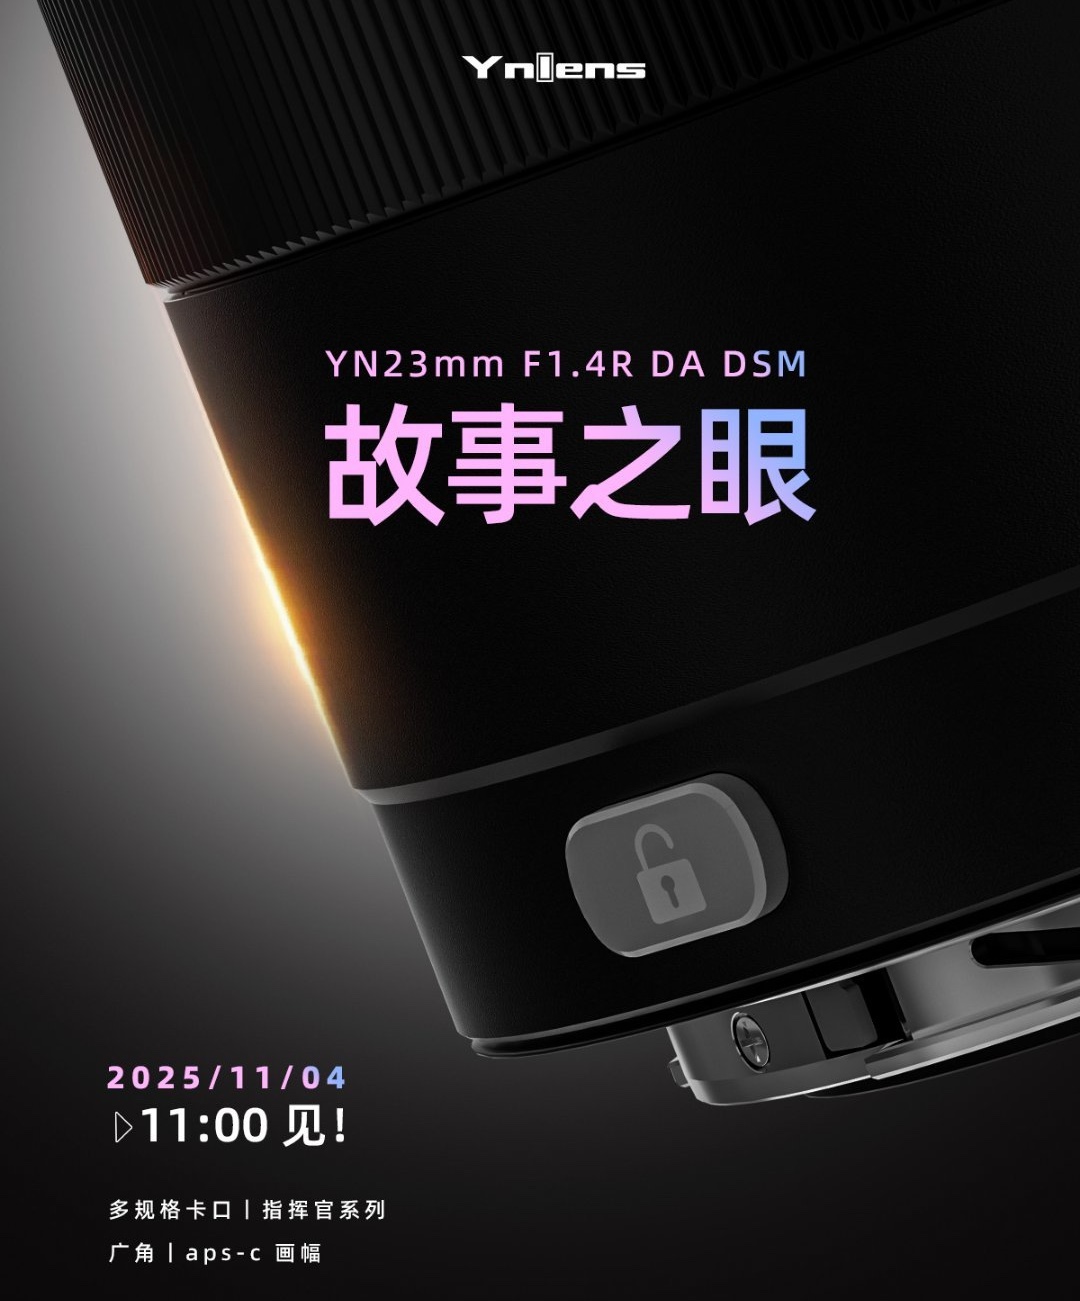
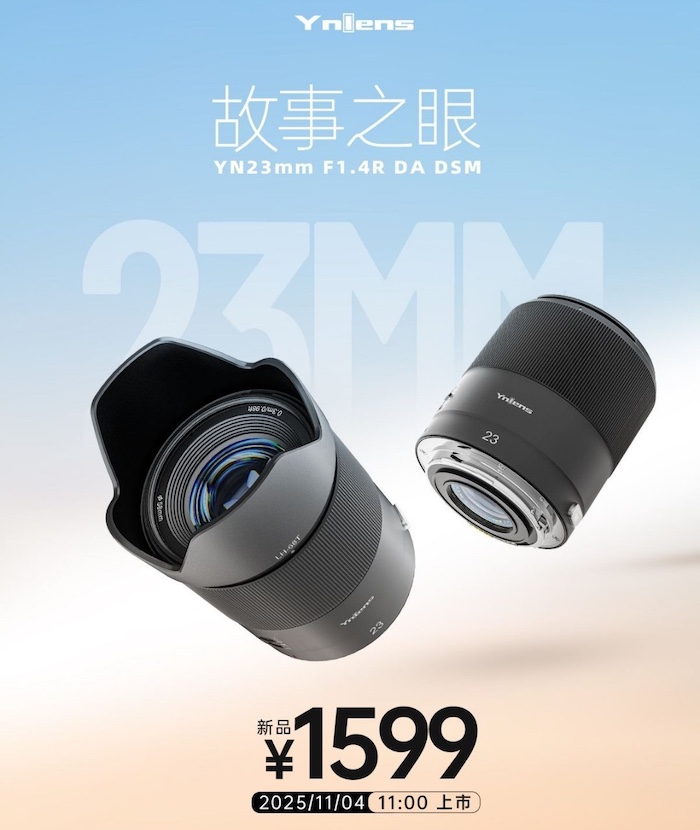
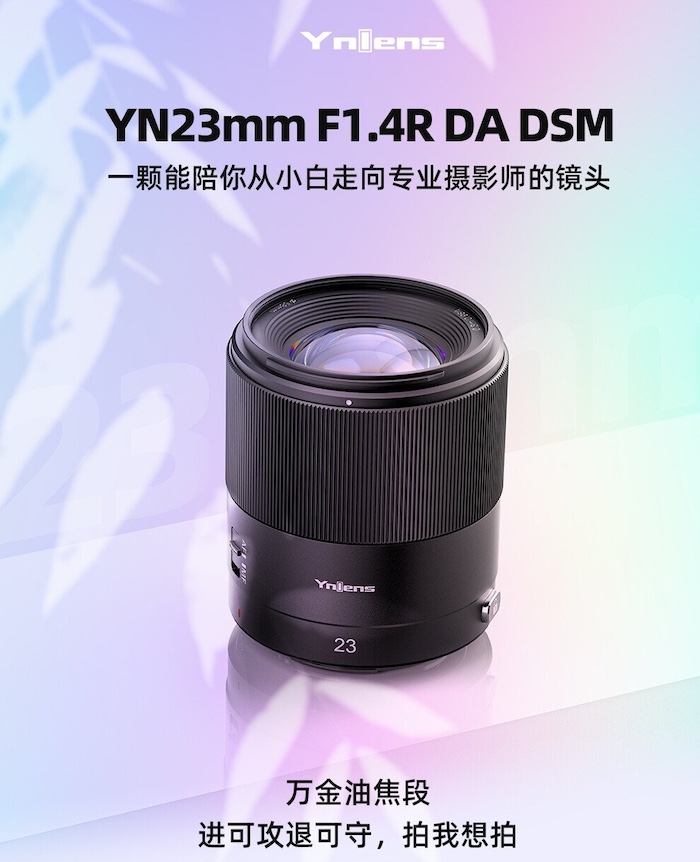
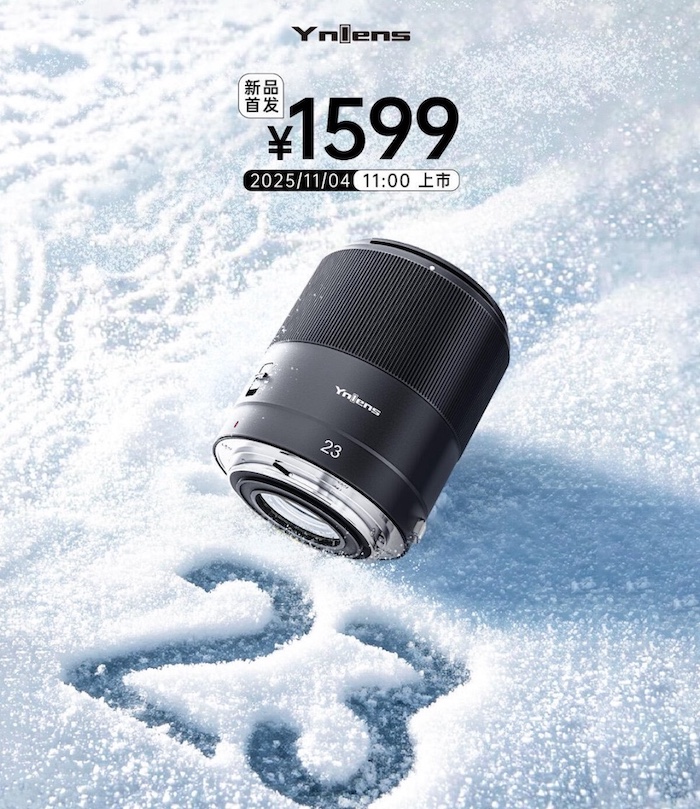
The previously rumored Fujifilm X Half digital compact camera with diptychs feature is now officially announced. The Fujifilm X-Half is a compact digital camera inspired by half-frame film cameras. Compact and lightweight, the camera is based on Fujifilm’s classic designs. It features a 1-inch back-illuminated sensor, a fixed 32mm f2.8 (35mm equivalent) prime lens, and a rear LCD with a 3:4 aspect ratio, optimised for vertical shooting. Alongside the camera is a new dedicated X Half companion app, designed to enhance the viewing and sharing of your images.
When you use DPReview links to buy products, the site may earn a commission.
Sample gallery
This widget is not optimized for RSS feed readers. Please open this article's permalink in a browser to view this content.
All product photos: Richard Butler
The Fujifilm X half is a JPEG-only compact camera with a fixed focal length and a vertically orientated sensor, designed to mimic the experience of shooting with a half-frame film camera. It prioritises fun over technical excellence.
Key features
Vertical 18MP, 8.8 x 11.7mm CMOS sensor
32mm equiv F2.8 lens
JPEG-only output
2-in-1 mode combining sequential shots into a 3:2 image
Tunnel-style optical viewfinder
Film Camera mode simulates the film camera experience
10 Film Simulations
18 Filters
Twin touchscreen interface
Date stamp option
880 shot per charge rating when using OVF
'Film advance' lever
Direct printing to Instax printers
The obvious reference point will, no doubt, be Fujifilm's own X100 series cameras, and we doubt Fujifilm will dislike the comparison, given their popularity. But, whereas the X100 cameras look a lot like miniature Leicas, the cute, boxy X half looks more like a scaled-down Rollei 35.
The X half will have a recommended price of $849 and will be available in black, charcoal or silver. There's no obvious precedent for a camera like this and the uncertainty around the cost of importing items from China into the US makes it a little hard to make sense of, but it seems like a lot for a camera that's putting more effort into being fun than functional.
The Fujifilm X half is a fixed-lens camera built around an 8.8 x 11.3mm sensor. Those dimensions may not sound familiar but it's essentially a 4:3 crop from a 20MP 3:2 Type 1 sensor, turned on its side.
So, when Fujifilm talks in terms of half frame, it's talking about the 3:4 shooting experience you get from shooting half a frame of 135 film, not about mimicking the same capture area that would give.
It has a 10.8mm F2.8 prime lens, and that sensor's 2.94x crop factor means this gives a 32mm equivalent field of view and an F8.2-equiv maximum aperture.
Flicking the film advance lever just after you've taken a shot (or when you're reviewing an image in playback mode) lets you combine that shot with the next one you take.
Left image: Provia film sim | F2.8 | 1/800 sec | ISO 200 Right image: Provia film sim | F2.8 | 1/1600 sec | ISO 200 Photos: Richard Butler
You can shoot individual 3:4 vertical images, swiping on the Film Simulation window on the back of the camera to change your virtual film stock. Alternatively, if you flick the film advance lever after taking a shot, you can combine your previous and next images to create a side-by-side diptych. Both individual images are saved to the memory card, in addition to the combined version.
Film Camera mode
The X half is best understood through its Film Camera mode. Engage the mode and you'll be asked how many exposures you want on your virtual film: 36, 54 or 72. If those second two numbers look unfamiliar, remember that this is styling itself as a half-frame camera, so you can fit 72 shots on a '36 exposure' film.
"Once you start shooting, you'll have to use the film advance lever after each shot: the camera won't take another photo until you do"
When in film camera mode, you lose the live view on the back of the camera and have to compose via the optical viewfinder. You also lose the ability to swipe to change Film Simulation or filter: you're using a single roll of 'film,' after all.
And, once you start shooting, you'll have to remember to use the film advance lever after each shot: the camera won't take another photo until you do.
Once you've taken all your photos, you can connect your camera to the app and transfer the photos, at which point you get to see a contact sheet and watch the images 'develop.' That contact sheet image, complete with sprocket holes, frame numbering (with the images numbered as 01, 01A, 02, 02A and so forth), can also be downloaded.
If you lose interest in a project before the end of the roll, you can double-tap the film window screen and the camera will 'rewind' the roll, leaving you with a partially-complete film strip. Fujifilm also warns that removing the memory card or the battery can result in film camera mode being abandoned.
Filters and Film Simulations
One of the X half's main selling points is likely to be Fujifilm's film simulation modes, and the camera includes ten of the most popular ones.
Provia / Standard
Velvia / Vivid
Astia / Soft
Classic Chrome
Reala ACE
Classic Neg.
Nostalgic Neg.
Eterna / Cinema
Acros (with Red, Yellow or Green filter)
Sepia
The X half also has a range of Filter modes, including Toy Camera, Vignetting, Light Leak, Halation and Expired Film. These give more extreme looks than the film simulations, but include some fun options such as giving the expired film mode a green or red tint, or the light leak mode that applies a one of a selection red/yellow bursts across each image at random, which are only visible in the final image. Filters can't be combined with Film Simulation modes.
ISO and Autofocus
The camera's base ISO is 200 and there are three pre-defined Auto ISO settings, you choice is essentially whether the camera stops at ISO 800, 3200 or 12,800.
In terms of autofocus, you have a choice of two AF area modes: a large central point or an AF area that can be moved to one of nine positions. There are eye and face detection options on top of this, and the camera will prioritize faces in your scene, regardless of the AF position.
Autofocus is somewhat laggy and distinctly slow, though, so we found the camera to be much more dependable in AF-S mode. This is not a camera for action or moving subjects, really.
Video
The X half can shoot up to 1080/24 footage at up to 50Mbps, captured in a 3:2, 1080 x 1440 format. It can also shoot 2x slowmo footage. These video clips can be combined with still images in 2-in-1 diptychs, output as 2160 x 1440px MOV files. There's a 3.5mm-to-USB-C lead in the box that lets you use an external mic with the camera, if you insist.
Body and handling
The X half is small, boxy and really rather cute: both its size and looks attract attention. It's also pretty well built. It feels like a lot of it is plastic but it's thick enough that the camera doesn't feel flimsy. It's small enough to fit in a coat pocket, despite the protruding lens.
The lens has an aperture ring around it, controllable in whole stops and with an 'A' position at one end, passing control back to the camera body. There is no other control dial on the camera, so there's no way to gain 1/3EV control of the aperture.
The camera's shutter tops out at 1/2000 sec, so in bright light you'll need to remember to stop down; especially if you're using the viewfinder, where there's nothing to indicate that your shots will be overexposed.
The lens is covered with a soft plastic lens cap. It's not the prettiest or most convenient feature, but ends up highlighting a benefit to the lens design: it doesn't change length. As such you never have to worry about stripping the gears or damaging a motor if you turn the camera on in your pocket or with the cap still attached.
The top of the camera is decidedly simple: a large exposure comp dial, that photo advance lever and an power switch, which releases the level from its stowed position. There's also a cold shoe slot in the middle of the camera. We're not really sure why.
The whimsy continues on the back, with a film-window-style rounded LCD panel that displays the currently active Film Simulation mode or Filter effect. It's a touchscreen, so you can swipe up or down to change mode (unless you're in Film Camera mode).
Next to this is the main display, a small, portrait-orientation 2.4" 640 x 480px touchscreen. In regular shooting mode this shows a live view display, just as you'd expect. Swiping your finger across the screen brings up one of four menus.
Swipe right
Swipe down
Swipe right
Swipe up
Swipe left
Swiping down gives you the choice between connecting to a smartphone and entering Film Camera mode.
Swiping right lets you select whether you're in Film Simulation or Filter mode. There are icons at the bottom of the screen to let you determine which of these modes applies to stills or video shooting. You don't select which of the simulations of filters you're using, just which mode the camera is in.
Swiping up brings up a quick menu, detailing eight of the camera's core settings:
Exposure mode (P, S, A, M)
Image size (L, M, S)
Face/Eye detection setting
Portrait enhancer
Focus mode (MF, AF-C, AF-S)
Self-timer (2s, 10s, Off, Continue)
Grain (Roughness / Size)
White balance
Finally, swiping left brings up the camera's main menu. It's a much-simplified variant of the one from other Fujifilm cameras, divided up into seven catagories: Shooting settings, Movie settings, IQ settings, AF/MF settings, Audio settings, Set up and Networking/USB settings. These catagories are navigated by swiping up and down on the film window, next to the main LCD.
The film advance lever
One of the only physical controls on the whole camera is the film advance lever. In normal camera mode its job is to engage 2-in-1 diptych mode, in Film Camera mode it acts as the film advance lever it mimics. Push the lever in towards the body in normal shooting mode and the camera will show you the last image you took, while the lever is held in. Again, we're not entirely sure why.
Battery
The X half takes the same NP-W126S battery as Fujifilm's other small cameras. It's a relatively large battery for such a small camera, making up something like 1/7th of the camera's volume. This helps power the camera to a rating of 880 shots per charge, if you use the OVF. We've not seen a figure for shooting with live view.
This is enough that you'll essentially never have to worry about charging the battery. The camera can charge over its USB-C socket, so all you need to do is remember to plug it in from time-to-time.
Initial impressions
The Fujifilm X half is, objectively, a profoundly silly camera. It is, after all, a digital camera with a film advance lever. But that's not to say it's a joke, necessarily.
Whether you think the X half is cute and fun or utterly ridiculous is likely to come down to what you think of its Film Camera mode. If you like the creative challenge and playfulness of a mode where you have to shoot a whole virtual roll's worth of images before 'developing' them on your phone, then you might well really enjoy the X half.
If you find the idea preposterous, worry about it only being able to produce JPEGs, or find yourself thinking 'it's basically half of Four Thirds, doesn't that make it 1/8th frame?' then it's fair to say this isn't the camera for you.
Even without using Film Camera mode, the ability to combine images (with a choice of dividers and widths) prompts you to think about pairs of images that will go well together.
Left image: Provia film sim | F2.8 | 1/125 sec | ISO 640 Right image: Provia film sim | F2.8 | 1/125 sec | ISO 640 Photos: Richard Butler
The X half will inevitably ride on the coat-tails of the hugely successful X100 series, but whereas that camera was beloved both by established photographers and newcomers enraptured by its stylish aesthetic and attractive color response; the X half's pull is likely to be much stronger for the latter group.
"Expecting you to crank the non-existent film forward is inherently ridiculous, but entertainingly so"
The pictures aren't great and the camera is distinctly laggy in most of the things it does. If you're coming from a modern mirrorless camera, it might be a bit of a shock. If you've been buying old compacts on eBay, you'll probably feel right at home. And it seems likely that this is the intended audience for this camera: someone who appreciates a small camera with a sense of fun.
Because yes, the Film Camera mode is fun. Expecting you to crank the non-existent film forward is inherently ridiculous, but entertainingly so. Likewise the idea of a retro-feeling compact camera that can deliver Fujifilm's Film Simulation colors is a delightful prospect, even with the X half's drawbacks.
It's hard to get a sense, from pictures, of just how small the X half is. It's not much bigger than the palm of my hand.
Our main concern is the price, though. Even after a surge of inflation that's left us all a little unsure how much our money is now worth, $849 feels like a lot for something so playfully flirting with frivolity. And, on our production camera, albeit with non-final firmware, the lagginess and autofocus speed risks taking some of that joy out of the experience.
The X half doesn't take itself too seriously, and that doesn't in itself make it a joke, but we worry its price tag risks being a punch-line that falls rather flat.
Please do not reproduce any of these images on a website or any newsletter/magazine without prior permission (see our copyright page). We make the originals available for private users to download to their own machines for personal examination or printing (in conjunction with this review); we do so in good faith, so please don't abuse it.
Sample gallery
This widget is not optimized for RSS feed readers. Click here to open it in a new browser window / tab.
When you use DPReview links to buy products, the site may earn a commission.
Perhaps unsurprisingly for such a well-established line of cameras, the design study for the new camera looks an awful lot like its predecessor.
Image: Ricoh
Ricoh has announced the development of the GR IV, the latest in its long-running and much-loved series of fixed lens compact cameras. An HDF version with built-in highlight diffusion filter will also be offered.
Both cameras will feature a new lens as well as a new sensor and processor, the company says. Ricoh says the GR IV will have a sensor with 25.74 million effective pixels, which is likely to mean the same 26MP BSI chip used in Sony's a6700.
It highlights the core values of the GR series as being "high image quality, quick response and portability," but also says it also includes "the changes and refinements demanded to meet emerging user needs."
Key features:
25.74MP APS-C sensor
18.3mm F2.8 lens (28mm equiv) with 2EV ND
New lens with seven elements in five groups (3 asph)
5-axis image stabilization
1/4000 sec - 30 sec shutter*
53GB internal storage and UHS-I Micro SD card slot
3.0" 1.037M dot LCD
FullHD video at up to 60p
109.4 x 61.1 x 32.7mm
262g with memory card and battery
*as in the GR III, the shutter will top-out at 1/2500 sec at F2.8, offering 1/4000 at F5.6 and beyond
The specs released don't include any mention of a flash: a detail the company said it was wrestling over, when we spoke to them in February.
Ricoh says production of the GR III will end in July 2025, with the successor model due in "autumn 2025." Production and marketing of the GR IIIx will continue for now.
Currently under development: the RICOH GR IV, the latest model of the GR series of high-end digital compact cameras, designed to be the ultimate snapshot camera
TOKYO, May 22, 2025 — RICOH IMAGING COMPANY, LTD. is pleased to announce the development of the RICOH GR IV — the latest model of the GR-series high-end compact cameras.
Over a history of nearly three decades (since the introduction of the film camera, RICOH GR1 in 1996), and two decades (since the introduction of the first digital-format GR DIGITAL in 2005), the GR series has always kept the basic concept of pursuing the essential values of a camera: high image quality, quick response and portability. At the same time, the series has always incorporated the changes and refinements demanded to meet emerging user needs. Because of this, GR-series models have been preferred by many photographers, particularly professionals and highly experienced amateurs.
Currently under development, the RICOH GR IV inherits the basic GR-series concept, while also incorporating totally new components, including a newly designed lens, a new image sensor and a new imaging engine, to further upgrade image quality. It also features more advanced communications functions and is compatible with a new application designed for smart devices to improve operability and functionality.
Based on this new GR IV, another GR-series model featuring an HDF (Highlight Diffusion Filter) is also under development.
Designed to be the ultimate snapshot camera in the history of the GR series, the RICOH GR IV is a totally new breed of camera, one which will satisfy every photographer’s demands and expectations
Note: The exterior design sample of the RICOH GR IV, currently under development, will be showcased at GR SPACE in Tokyo, Beijing and Shanghai, beginning on Saturday, May 31, 2025.
The production and shipment of the RICOH GR III, currently on the market, are scheduled to be discontinued this July, due to difficulty in procuring of parts and components. However, the production and marketing of the RICOH GR IIIx will be continued for the time being.
Overview of the product under development
Model name: RICOH GR IV
Launch date: Scheduled to be launched in Autumn 2025
The HDF model is scheduled to be released after winter 2025.
GR WORLD (application for smart devices)
Launch date: Scheduled to be released soon
Supported models: All GR-series models released after the RICOH GR I
Camerainsider insider reported on X that a new GR camera (Ricoh GRIV?) will be announced this week. Camerainsider has generally been correct in the past when reporting on upcoming cameras and lenses, but they were also wrong on several occasions. Stay tuned for updates.
There's no denying the convenience of using a smartphone camera for travel photography. While dedicated cameras offer advantages regarding quality and flexibility, lugging around an often clunky extra device isn't always ideal. You'll likely have your phone with you anyway, so you might as well pack a few accessories to help you get the most out of it for documenting your travels.
Grip
Photo: ShiftCam
Smartphone grips provide a more camera-like experience for holding your phone, making them more comfortable while putting your hand in a more natural position for taking photos. Made by brands like ShiftCam, Ulanzi and even Leica, some rely on magnets to connect to your phone, while others are more complete cases.
Beyond making your phone easier to hold, most smartphone grips also solve additional problems you may come across when using your phone for travel photography. They typically provide a dedicated shutter button, making it faster and easier to take photos. Many offer a built-in battery, giving your phone more power for your adventures. The full case designs also give your phone a bit more protection.
Power bank
Image: Anker
If you aren't using a grip with a built-in battery, you'll want to make sure you have a portable power bank. After all, using your camera frequently can burn through the battery fast. There are endless options available, with many that are compatible with wireless charging. However, that method won't charge your phone as fast or as efficiently. Instead, you may want to keep a cord on you (or, even better, choose a power bank with one built-in) for those times you need power fast.
Lenses
Anamorphic lenses can be a fun way to create a new perspective.
Photo: Dale Baskin
Most phones offer two or three different cameras with unique fields of view (what you'll see of the scene). Those don't always do what you need or want, though. Adding a lens to your smartphone can unlock new possibilities. Smartphone lenses come in many styles, including macro, telephoto, ultra-wide-angle and anamorphic. They can be useful for getting a fresh perspective or giving you more creative control.
Be aware that if you opt for cheap smartphone lenses, you'll be throttling your phone's quality quite a bit. Sandmarc, Moment, Beastgrip, PolarPro and SmallRig are some brands that make quality options worth investing in.
Microfiber cloth
Image: Spudz
Your phone goes through a lot throughout the day. Smartphone cameras seem to attract smudges, which will impact your photo quality. While you could use your shirt to wipe off the camera, that's not always effective and can risk scratching the lens. Instead, keep a microfiber cloth handy to keep your phone's cameras sparkly clean when it's time to take photos.
Tripod or mount
Photo: Peak Design
A tripod or some sort of mount will be a handy addition if you like to be in your photos or take photos in dark conditions. You could opt for a full-size tripod for maximum height, or a tabletop one if you don't want to deal with something so large. Peak Design even makes one that essentially sits flat against the back of your phone, so you can leave it attached without thinking much about it. There are also suction cup mounts or other accessories that allow you to put your phone in places that a tripod may not work, but still let you go hands-free.
Bluetooth remote
Photo: Moment
On top of a tripod or mount, a Bluetooth remote will make your life easier for group photos or selfies. That way, you won't need to rush in front of the phone after setting the timer, or keep going back and forth to take more images. Some watches can function as remotes as well, so you may not need to buy a dedicated device, either.
Final thoughts on smartphone travel accessories
If you're sticking with your smartphone for travel photography, you likely don't want to bring a bunch of extra stuff along. However, a few key accessories can help you get more out of your phone, while still saving you space and weight compared to a dedicated camera and the accessories that you'd need for that.
The winners of the World Food Photography Awards sponsored by Bimi have been announced, highlighting food photography across the globe. Yotam Ottolenghi, a renowned chef, restaurateur and food writer, revealed the winners at an event at the Mall Galleries, London. The awards showcase a diverse range of images across more than 25 categories, including ones dedicated to street food, cakes, innovation, drinks, food prep, photojournalism, harvest and much more.
This year's contest saw more than 10,000 entries from 70 countries. The submissions were judged by an extensive panel that included photographers, magazine editors, creative directors, film directors, food retailers and chefs. The best overall winner earned a £5000 prize, along with an exhibition at the Mall Galleries, London. Category winners also have the opportunity to have their work displayed in the exhibition and each receives a trophy. There are individual prizes for each of the different categories as well.
Category: Overall winner and Food for the Family supported by the Felix Project
Photographer: Xiaoling Li/World Food Photography Awards sponsored by Bimi®
Title: The Elderly Having Delicious Food
Photographer's description: In an early spring afternoon in Shuangliu Ancient Town, Sichuan Province, China, five elderly ladies in their eighties sit together. Wearing colourful jackets and wool hats, they happily eat the famous Sichuan snack 'Spring rolls’. A wrap of thin homemade dough, filled with cucumber, carrot and shredded scallions, drizzled with green mustard, Sichuan pepper, red oil, sweet sauce, and sprinkled with sesame seeds. They are “setting up a Dragon Gate formation” - an expression used in China to refer to neighbourhood friends coming together to chat, gossip and share stories. Food makes these people happy; they enjoy a beautiful and joyful life.
Bring Home the Harvest
Category: Bring Home the Harvest
Photographer: Chang Jiangbin/World Food Photography Awards sponsored by Bimi®
Title: Net Fish in Water Fields
Photographer's description: After the rice harvest, the river water filled the paddy fields, and at some point, some fish from the river ended up here too. After school, the two children went to the field together to catch fish with their covers. Approaching quietly, leaping vigorously, and pouncing towards the target.
Champagne Taittinger Food for Celebration
Category: Đặng Hoài Anh
Photographer: Champagne Taittinger Food for Celebration
Title: Banh Hoi Cake
Photographer's description: Banh hoi is a specialty dish in Vietnam found in many places such as Binh Thuan, Vung Tau, Ben Tre, Phu Yen, Nha Trang and Binh Dinh. The cake is made from rice flour and has an elaborate and meticulous preparation process. Banh hoi is often eaten with scallion oil, roasted meat, grilled meat and pork offal. This is an indispensable dish in holidays, death anniversaries, weddings, and ceremonies at communal houses and pagodas of the people. It is a culinary culture of the locality.
Claire Aho Award for Women Photographers
Category: Claire Aho Award for Women Photographers
Photographer: Lizzie Mayson/World Food Photography Awards sponsored by Bimi®
Title: Delfina, A Pasta Granny
Photographer's description: This is Delfina, I took her portrait as part of a bigger project documenting pasta grannies in Italy. Here, we are in the region of Lazio. On the bed is an angel hair type of pasta called Fieno di Canepina. It is technically very hard to make: Delfina rolls the pasta out, flicks a huge piece the size of the table out like a bed sheet, folds it concertina style, then slices it up finely. The best part is that she makes this huge amount then delivers it to the local church where they cook it up and feed homeless people.
Cream of the Crop
Category: Cream of the Crop
Photographer: Dorien Paymans/World Food Photography Awards sponsored by Bimi®
Title: Flour Swirl
Photographer's description: Part of the series ‘Perfectly Imperfect’ where I captured the process of baking sourdough bread while incorporating the symbolism of the Japanese Ensō sign (imperfect circle). Preparing food and photography are both mindful activities where calmness and creativity exist in the moment of creation. This makes the combination of both so magical.
Overall Winner of Errazuriz Wine Photographer of the Year
Category: Overall Winner of Errazuriz Wine Photographer of the Year (and People sub-category)
Photographer: Heather Daenitz/World Food Photography Awards sponsored by Bimi®
Title: Pinot Noir at Midnight
Photographer's description: Under the glow of a tractor’s lights, vineyard workers handpick Pinot Noir in the cool, misty midnight air at Sanford & Benedict Vineyard in Sta. Rita Hills, an American Viticultural Area (AVA) located at the western end of the Santa Ynez Valley in California's Central Coast wine region. One worker adds his contribution to the back of the tractor, a cascade of Pinot Noir falling from his picking bin.
Hotel Art Group Food Stylist Award
Category: Hotel Art Group Food Stylist Award
Photographer: Costas Millas/World Food Photography Awards sponsored by Bimi®
Title: Put All Your Pasta In One Basket
Photographer's description: Part of a wider food story concept titled Spaghetti. Traditionally styled in strands and swirls, the concept of pushing how we could capture spaghetti was the focus here. The aim was to painstakingly weave groups of spaghetti strands into this striking graphic pattern.
Jamie Oliver Youth Prize 13 -17
Category: Jamie Oliver Youth Prize 13 -17
Photographer: Indigo Larmour/World Food Photography Awards sponsored by Bimi®
Title: Early Morning Puris, Delhi, India
Photographer's description: Pooris are a staple breakfast dish in the winding alleyways of Old Delhi. Frequently cooked in huge vats of boiling oil on street corners and served with chole, a chickpea dish.
Marks & Spencer Food Portraiture
Category: Marks & Spencer Food Portraiture
Photographer: Simon Détraz/World Food Photography Awards sponsored by Bimi®
Title: Crispy Kale
Photographer's description: A drizzle of olive oil, oven at 180°C, salt and pepper, 10 minutes... delicious and so crispy!
MPB Award for Innovation
Category: MPB Award for Innovation
Photographer: Pieter D'Hoop/World Food Photography Awards sponsored by Bimi®
Title: Laundry Day
Photographer's description: Sometimes I have some weird ideas that randomly come to my mind. I had an idea of putting an octopus inside a washing machine or tumble dryer. This is one of the results.
Politics of Food
Category: Politics of Food
Photographer: Jo Kearney/World Food Photography Awards sponsored by Bimi®
Title: Afghan Refugee Women Wait for Free Bread
Photographer's description: Afghan women sit and wait for free bread handouts at the market as it's difficult for them to earn money.
Production Paradise Previously Published
Category: Production Paradise Previously Published
Photographer: Diego Papagna/World Food Photography Awards sponsored by Bimi®
Title: Sky Mushrooms
Photographer's description: Mushrooms enveloped in steam, immersed in a play of light and transparency, evoking the warmth of the kitchen like a sun in the sky.
Street Food
Category: Street Food
Photographer: Debdatta Chakraborty/World Food Photography Awards sponsored by Bimi®
Title: Ramadan Special Parantha Halwa
Photographer's description: During the Ramadan months, Kolkata turns into a foodie's paradise. Just after noon, huge ovens are lit and giant paranthas are prepared for the iftar. Not only Muslims, but people from all communities, throng around the food stalls, making it a culinary haven.
The James Beard Foundation Photography Award
Category: The James Beard Foundation Photography Award
Photographer: Luke Copping/World Food Photography Awards sponsored by Bimi®
Title: Tom Moriarty - Moriarty Meats and Cafe Bar Moriarty, Buffalo NY
Photographer's description: Tom Moriarty and his wife, Caitlin, own Moriarty Meats and its adjacent restaurant, Cafe Bar Moriarty. Moriarty Meats is a whole-animal butcher shop in Buffalo, NY, sourcing local meats and inspired by traditional European butcheries. Tom and his team work exclusively by hand.
Tiptree Cake Award
Category: Tiptree Cake Award
Photographer: Audrey Laferrière/World Food Photography Awards sponsored by Bimi®
Title: Pavlova’s Arabesque
Photographer's description: None
The Philip Harben Award for Food in Action supported by International Salon Culinaire
Category: The Philip Harben Award for Food in Action supported by International Salon Culinaire
Photographer: Diego Marinelli/World Food Photography Awards sponsored by Bimi®
Title: La Matassa. A Real Work of Craftsmanship
Photographer's description: Fresh pasta is a symbol that represents the cultural richness of the Italian territory. An image of its processing becomes a means to telling history, traditions and centuries-old passions. Matassa pasta is made in Irpinia in southern Italy with a truly exceptional technique.
World of Drinks
Category: World of Drinks
Photographer: Alessandra Bartoloni/World Food Photography Awards sponsored by Bimi®
Title: Sunshine Gin
Photographer's description: Sun, ice and a gin tonic. Condensation drips, the table’s a mess, and the afternoon heat is winning the battle. But who cares? It’s cold, it’s strong and it’s exactly what this day needed. Cheers to the simple pleasures!
The Bimi® Prize
Category: The Bimi® Prize
Photographer: Ryan Kost/World Food Photography Awards sponsored by Bimi®
Title: Buddhist Offerings
Photographer's description: Monks at a temple in Angkor Wat, Cambodia prepare traditional Buddhist offerings. This practice is deeply symbolic in Buddhism, often representing celebration, gratitude, respect and devotion to the Buddha, and the teaching and monastic community. The intricate arrangement of fruits and flowers emphasises mindfulness and respect.
Adobe is shaking up its Creative Cloud subscription tiers in North America, doing away with the current All Apps plan and introducing two tiers in its place: a 'Standard' plan, which will cost less, and a 'Pro' plan, which will cost more.
To set the stage, the current All Apps plan, which will be available until June 17th, costs $59.99 a month if you have an annual plan. As the name implies, it includes access to pretty much every Creative Cloud app, as well as 100GB of cloud storage and 1000 generative AI credits per month.
The main differentiation between the new plans is – what else – AI. Until now, Adobe's been playing things a little loose with features like Generative Fill in Photoshop and the ability to extend videos and audio in Premiere; you could use them without thinking too much about it. Now, they're getting segmented. There are "Standard" features like Generative Fill and text to vector, and "Premium" ones like generating video or audio with Adobe Firefly, using third-party models, or extending video in Premiere.
The new Creative Cloud Standard plan will give you 25 Standard credits a month; each use of a Standard feature costs one credit. With Creative Cloud Pro, you get unlimited use of standard AI features plus 4000 Premium credits. That may seem like a lot, but it's not one-credit-per-use like Standard features; for example, it costs 100 credits to generate a second of 1080p, 24fps video, 20 credits to generate an image using the company's Image Model 4 Ultra and five credits per second of audio translation.
Price per month (Annual)
Month-to-month price
Annual Price
Web / mobile apps
Cloud Storage
AI features
Current Creative Cloud All Apps
$59.99 Education: $19.99 first year, $34.99 after
$89.99
$659.88
Yes
100GB (Upgradeable)
1000 credits for standard features / month
Creative Cloud Standard
$54.99 No education options
$82.49
$599.88
Free features only
100GB
25 credits for standard features / month
Creative Cloud Pro
$69.99 Education: $29.99 first year, $39.99 after
$104.99
$779.99
Yes
100GB (Upgradeable)
Unlimited use for standard features 4000 Premium credits / month
Beyond AI, the major difference between the plans is access to the web and mobile versions of the apps. Both plans include full access to desktop apps and Acrobat on mobile and web, but with Standard you're limited to the free features for the mobile and web versions of Lightroom, Photoshop, Illustrator, Express and Fresco.
If you're currently using the All Apps plan and have an annual subscription to it, you'll automatically have the benefits of the Pro plan without the subsequent price increase until your next monthly or annual renewal date. So, for example, if you renew your annual plan on June 1st, 2025, you'll essentially have the Pro plan at the old price until June 1st, 2026. If you sign up on June 18th, 2025, however, you'll have to pick from the Standard and Pro plans.
Currently, you can only choose to renew with the Standard plan by contacting Adobe support, but the company says a self-service option is coming within the next few days.
For those on the Photography plans, there won't be any changes
For those on the Photography plans, there won't be any changes, though after June, 17th, new subscribers will get fewer monthly generative AI credits. Adobe updated the pricing for those plans in December, so it would've been surprising to see another change so soon after.
If you're outside North America, there will be a few changes to Creative Cloud plans. The company says that new subscribers to its Photography plans, single app plans, and Lightroom Mobile Premium, Photoshop Express and Illustrator on iPad subscriptions, will receive fewer monthly generative AI credits. Creative Cloud for teams Pro edition is also being rebranded as Creative Cloud Pro Plus for teams.
Apart from that, "there will be no plan, naming, or pricing changes for all other existing subscribers outside of North America at this time," according to an Adobe support document.
Skylum has teamed up with Google to unveil Luminar Photo Editor, now available for Android and ChromeOS:
Skylum Partners with Google to Expand Luminar Photo Editing to Android and ChromeOS
This launch brings Luminar’s powerful, intelligent editing capabilities to mobile and Chromebook users, offering a fresh, intuitive, and playful experience designed especially for creative photographers of any level. The interface has been carefully adapted for a wide variety of devices, including phones, tablets, Chromebooks, and foldable devices. Luminar dynamically adjusts to different screen sizes and aspect ratios, providing a consistent and comfortable workflow whether on a single-screen smartphone or a dual-screen foldable. This level of UX refinement ensures a seamless, device-aware editing experience that stands out across platforms.
Luminar stands out with its AI-powered tools that deliver professional-looking results in just a few taps, without the need for advanced photo editing skills or a desktop setup. Whether retouching a portrait, replacing a sky, or preparing Instagram-ready visuals, Luminar helps users edit with confidence, ease, and speed. With just a few clicks, users can enhance their photos and bring their creative vision to life — right from the convenience of their phone, tablet, or Chromebook.
“By bringing Luminar to Android, we’re showcasing our greatest strengths: professional‑grade imaging technology powered by an intuitive, engaging interface. It’s this unique fusion that sparks the urge to create, giving every photographer, on any device, the confidence and excitement to push boundaries and tell new visual stories.”— Ivan Kutanin, CEO, Skylum
"We're excited to collaborate with Skylum to bring its powerful AI-driven photo editing tools to the Android and ChromeOS ecosystems. This partnership showcases the potential of AI to enhance creativity and simplify complex tasks for users across different devices."— Maria Schmidt, Strategic Partnership Manager, Google
“Partnering with Google accelerates our product innovation and reinforces our position as a market leader. Together, we're committed to delivering exceptional user experiences that surpass expectations by bringing the power of Luminar to Android users worldwide.”— Kostiantyn Tymoschuk, VP of Growth, Skylum
With this release, Skylum and Google deliver a seamless, cross-platform creative experience that empowers users to focus on their artistry, not the technicalities.
Luminar Key Features:
AI-Powered Tools:
Enhance AI— A single slider intelligently adjusts up to a dozen essential settings - including shadows, highlights, contrast, tone, saturation, exposure, and detail - to improve the overall image quality instantly.
Structure AI— Brings out detail and clarity while preserving a natural look. Enhances only the necessary areas of an image without over-sharpening or introducing noise where it's not needed.
Relight AI— Gives full control over the lighting in a photo, ideal for creatively enhancing mood or correcting backlit scenes. The tool analyzes the image in three dimensions to realistically adjust foreground lighting without affecting the rest of the composition.
Atmosphere AI — Adds realistic fog, mist or haze, using content-aware and depth-based masking. The effect is applied with precision to enhance mood without covering key subjects, ensuring a natural, realistic look.
Sky AI— Automatically detects the sky in the image and replaces it seamlessly with a new one, factoring in realistic lighting and reflections, specifically on water and other reflective surfaces.
Skin AI—Smooths skin and removes blemishes with a single tap, helping portraits look polished while preserving natural texture.
Body AI —Allows subtle adjustment of the torso shape - either reducing or enhancing the volume - for a more balanced appearance. AI precisely maps key body features, ensuring natural-looking edits without distorting the background.
Core Editing Tools:
Develop: Adjust exposure, temperature, tint, smart contrast, highlights, shadows, blacks, whites, saturation, vibrance, vignette, and more.
Essential Tools: Crop, Details, Erase, Landscape Enhancer (Foliage Enhancer, Golden Hour, Dehaze), and Monochrome.
Filter collection: Robust color correction, film-inspired looks, and nostalgic tones loved by many in the photography world.
For more information and to download the app, please visit the link.
Sony released its FY2024 financial results. As usual, there is little information provided for the camera business, which is part of the Entertainment, Technology & Services Segment (ET&S Segment):
Despite the impact of the decrease in sales and the recording of additional restructuring charges in the fourth quarter ended March 31, 2025, operating income increased 2% year-on-year to 190.9 billion yen, primarily due to a reduction in operational expenses.
The interchangeable lens camera market performed well in FY24 Q4, mainly in the Chinese market which benefited from subsidies, and grew approximately 9% year-on-year on a unit basis.
During this fiscal year, we plan to operate our business conservatively, prioritizing risk mitigation, because we anticipate disruptions to markets and supply chains due to the recently adopted U.S. tariffs.
Sony has a teaser for a new camera announcement on June 2nd. I am pretty sure the short video will be removed any moment becuase it actually has a picture of a Canon camera - this is what happens when you rely on AI to do the work for you:
Finding the perfect camera for travel is often a Goldilocks scenario. You generally want something relatively small and lightweight so that it's easier to carry around. However, you still want flexibility and good image quality to capture your travels successfully. Some people bill GoPros and other action cameras as ideal options, but you may wonder if they are actually worth buying for travel.
Benefits of GoPro cameras for travel
GoPros are very compact and easy to use.
Photo: William Brawley
There are certainly qualities that make GoPros ideal for travel. First and foremost, they're tiny; it's easy to throw your GoPro in a small bag or even your pocket without having to worry about its size and weight. No matter how light you're traveling, you probably have room to bring a GoPro along.
Action cameras are designed for adventures, so they're built to be extremely durable. They can handle lots of falls, drops and bumps and are generally waterproof to depths of several meters without any extra protection, so you won't run into issues whether you accidentally drop it in a stream or purposefully take it snorkeling.
GoPros are also easy to use with minimal options in the settings menu. You can start taking photos or videos without thinking much about settings. They are relatively easy to use, even if you don't know anything about cameras. If you want something to simply point and shoot on your adventures, GoPros are a good option.
Downsides to using a GoPro as a travel camera
GoPros are good at capturing sweeping views, but not at highlighting specific subjects.
Photo: William Brawley
Unfortunately, there are also plenty of GoPro qualities that make them less than ideal for travel. First, action cameras use ultra-wide-angle lenses that capture broad, sweeping views. While they often offer multiple fields of view settings (how much of the scene is captured), even the narrowest options are still quite wide.
While that broad view is ideal for some situations, it isn't good for many others. It will make everything look further away from you, which isn't what you likely want for many travel photos or videos. Unless you can get close to your subject, or are simply trying to capture an entire scene, GoPros won't give you the images you're after. Plus, it's not the best choice if you want to take flattering portraits or selfies.
Partly because of the wide-angle lens, GoPros aren't good at capturing detail by default. They can only focus as close as 30cm (12"), have a fixed aperture and don't allow you to choose where the camera is focusing. They will essentially capture everything in the scene in focus, so you won't be able to highlight smaller details or clearly isolate your subject from the background. The latest models are compatible with a macro lens accessory that allows you to focus as close as 11cm (4.33"), but that involves an extra piece of equipment you need to buy and keep with you.
GoPros aren't going to give you very flattering selfies, but are useful for quick snaps.
Photo: Mitchell Clark
GoPros aren't good in low-light situations, partly because of their small sensors. Shooting in dim conditions will introduce a lot of noise, taking away from image quality. It will also limit when and where you can take photos or videos, which can be frustrating.
Despite their video focus, GoPros can take photographs, though they won't provide the greatest experience or image quality. Your phone will give you better results with more flexible options in terms of the look of the images as well as a more familiar field of view. After all, most phones offer multiple cameras with different focal lengths and specific modes for portraits, macro and more.
Finally, while the lack of settings makes them easier to use, it limits your control over the visual style of your images and videos. If you want to manage things like exposure and focus points to dictate the style of the image, a GoPro isn't for you.
Is a GoPro good for travel?
Photo: William Brawley
The short answer to whether GoPros (and other action cameras) are good for travel is: It depends. If your type of travel is highly adventurous and requires a durable, compact device, then a GoPro will be a good choice. Likewise, if you are mostly concerned with documenting your trips and don't want to think about settings or having control over the style of your images and videos, then bringing a GoPro on your trips would be smart.
However, if you want more control over your photographs and videos, want to capture more than broad views, need the flexibility of shooting in a variety of lighting conditions, or mostly take still photos, you're better off with a different travel camera.
Hey @Fujirumors, Here's the video clip of the upcoming Fujifilm X Half that the leaked photo is from.
Don't ask me how long it took to find this
Also sorry it's jumpy, I cropped in and tracked it myself to not dox the guy that accidentally uploaded it. pic.twitter.com/05b1uGKAai
The winners of the 2025 Milky Way Photographer of the Year contest have been announced, highlighting epic imagery of the Milky Way from around the world, and even from above it. The contest, hosted by travel photography blog Capture the Atlas, is in its eighth year.
This year, the contest received 6,000 entries from photographers of 16 different nationalities. Images spanned 25 locations around the globe, including Chile, the United States, Greece, Switzerland, Guatemala, New Zealand, Taiwan, Yemen, Chad, India, Namibia, Spain and more. Plus, an image taken from space was included in the collection for the first time. Some photos captured celestial events like a comet, a meteor shower and a lunar eclipse.
Dan Zafra, the editor of Capture the Atlas, curates the annual list based on image quality, the story behind the shot and the overall inspiration it provides. Zafra says the project's goal is to inspire people to connect with the night sky and "to encourage photographers to explore and photograph the Milky Way from new angles."
You can see all of the winning images at Capture the Atlas, along with tips on how and where to photograph the Milky Way.
Caption: I float in the Cupola, looking out the seven windows composing this faceted transparent jewel. While my mind is submerged in contemplation, my eyes gorge on the dim reflections from a nighttime Earth. There are over eight billion people that call this planet home. There are seven of us that can say the same for Space Station. What a privilege it is to be here. I used an orbital star tracker to take out the star streak motion from orbit.
Tololo Lunar Eclipse Sky by Petr Horálek
Photographer: Petr Horálek
Image title: Tololo Lunar Eclipse
Image location: Cerro Tololo Observatory, Chile
Camera settings: ISO 8000, 81 x 10 sec (single exposures stitched to panorama). Moon is result of HDR work.
Gear: Canon Ra, Sigma Art 35mm F1.8
Caption: On March 14, 2025, a total lunar eclipse occurred, especially visible over the Americas and the Pacific Ocean. I was fortunate to observe this particular eclipse from the NSF Cerro Tololo Inter-American Observatory in Chile. You can see how epic the sky was during totality, as the Moon darkened enough for the majestic Milky Way, the faint belt of Zodiacal Light, and prominent airglow to stand out.
Boot Arch Perseids by Mike Abramyan
Photographer: Mike Abramyan
Image title: Boot Arch Perseids
Image location: Alabama Hills, CA, USA
Camera settings: Sky: Mosaic of 9 images at 50mm, 92 sec, F2, ISO 400; Foreground: Mosaic of 4 images at 50mm, 92 sec, F2.8, ISO 400; Meteors: 14mm, 15 sec, F1.8, ISO 400
Gear: Sony A7IV Astromodified, Sony 50mm f/1.2 GM, Benro Polaris, Leofoto LS-324C, Sony A7IV, Sony 14mm 1.8 GM
Caption: The Perseid Meteor Shower occurs every August, raining down hundreds of meteors over a few nights. In 2024, I had planned to photograph it from the Canadian Rockies, but wildfires forced me to change my plans at the last minute. After checking wildfire maps, I found a safe haven in the Eastern Sierra Nevada.
After three full nights of capturing meteors, I created this image. Sitting on the rock is my friend Arne, who often joins me on these adventures, gazing up at the magnificent core of our galaxy. Each meteor is painstakingly aligned to its true location in the night sky. The final depiction shows all the meteors I captured, combined into one frame—as if the Earth hadn’t been rotating and all the meteors had fallen at once.
Bottle Tree Paradise by Benjamin Barakat
Photographer: Benjamin Barakat
Image title: Bottle Tree Paradise
Image location: Socotra, Yemen
Camera settings: Foreground (blue hour): 10 sec, F8, ISO 400; Sky: 5x 120 sec, F2.0, ISO 400
Gear: Sony A7IV, Sony 14mm F1.8, Sunwayfoto T2840CK, MSM Nomad
Caption: Socotra is one of my favorite places on Earth, but when it comes to a specific location, this one stands out. It doesn’t have an official name, as it’s not a destination for the few fortunate tourists who visit Socotra. After shooting there for the past four years and scouting the island, I’ve discovered hidden gems like this one, which I call Bottle Tree Paradise.
Bottle trees are unique to Socotra, a result of the island’s long isolation from the mainland. This separation allowed them to evolve distinctive features, such as their water-storing, bottle-shaped trunks, which help them survive Socotra’s harsh, dry climate. They are believed to have originated from ancient plant species that adapted to the island’s unique environment over millions of years.
Double Milky Way Arch Over Matterhorn by Angel Fux
Photographer: Angel Fux
Image title: Double Milky Way Arch Over Matterhorn
Image location: Zermatt, Switzerland
Camera settings: Both arches share the same Exif: 20mm, F5.6, 127 sec, ISO 2500; Foreground / Landscape: 15.5mm, F5, 1/5 sec, ISO 800
Gear: Nikon Z6 Astromodified (for the sky part), NIKKOR Z 20mm F1.8, Nikon Z8 (for the landscape part), NIKKOR Z 14-24mm F2.8, Benro Polaris Astro Kit, Peak Design travel tripod
Caption: This image captures the rare Double Arch Milky Way, where both the Winter Milky Way (with Orion rising) and the Summer Milky Way (with the Galactic Center) appear in the same night—a seamless transition between seasons.
Taken at 3,200 meters in the heart of winter, the night was brutally cold, testing both my endurance and equipment. This is a time blend, preserving the real positions of both arches by combining frames taken hours apart, with the foreground captured at dawn for the best detail.
Zermatt and the Matterhorn have been photographed countless times, but I aimed to create something truly unique—an image captured under conditions few would attempt. I’m incredibly proud of the effort and patience it took to bring this vision to life.
Valle de los Cactus by Pablo Ruiz
Photographer: Pablo Ruiz
Image title: Valle de los Cactus
Image location: San Pedro de Atacama, Chile
Camera settings: Sky: 9 x 240 sec, F2.8, ISO 800, 14mm; Foreground: 9 x 120 sec, F2.8, ISO 2500, 14mm
Gear: Nikon D810, Nikon Z6 A, Nikkor 14-24 F2.8 ,Rollei Gamma, Sky Watcher Star Adventurer
Caption: A panoramic shot of the Milky Way in a remote area of the Atacama Cactus Valley, known for its large concentration of cactus plants. I love this place with its countless possibilities. The panorama was taken just as the galactic center began to rise, with the spectacular Gum Nebula visible on the right.
It was an especially bright night with a breathtaking sky. The valley isn’t easy to navigate, but it’s always worth trying to find new compositions in such stunning locations beneath the night sky.
Caption: On the early morning of June 2, 2024, I summited Acatenango Volcano for the first time, hoping to witness the fiery beauty of the neighboring Volcan de Fuego against the Milky Way’s backdrop. That night, the volcano was incredibly active—each thunderous explosion reverberated in my chest, while glowing lava illuminated the dark slopes. Above, the Milky Way stretched diagonally across the sky, a mesmerizing band of stars contrasting with the chaos below. As the volcano erupted, the ash plume rose vertically, forming an acute angle of about 45 degrees with the galaxy’s diagonal path, creating a stunning visual contrast between Earth’s fury and the cosmos’ serenity.
Capturing this required a fast, wide-angle lens (f/2.8), an ISO of 3200, and a 10-second exposure to balance the volcanic glow with the starlight. The challenge was timing the shot during a new moon and aligning the right moment for the Milky Way to cross the frame next to the volcano. I used Lightroom as the editor. This image is special for its storytelling—the raw power of Volcan de Fuego meeting the tranquil expanse of the galaxy.
A Sea of Lupines by Max Inwood
Photographer: Max Inwood
Image title: A Sea of Lupines
Image location: Lake Tekapo, New Zealand
Camera settings: Sky: 30 sec, F2.0, ISO 3200; Foreground: 30 sec, F2.4, ISO 6400
Caption: The annual lupine bloom in New Zealand is spectacular, with fields of colorful flowers stretching across the Mackenzie Basin. This region, located in the heart of the South Island, is renowned for its dark skies, making the scene even more surreal at night.
I had to wait until the early hours of the morning for the wind to calm down, but eventually everything became still, and I was able to capture this image. Above the flowers, you can see the band of the outer Milky Way, alongside the constellations Orion, Gemini, and the Pleiades. Joining them are the bright planets Jupiter and Mars, with a strong display of green airglow visible along the horizon.
Diamond Beach Emerald Sky by Brent Martin
Photographer: Brent Martin
Image title: Diamond Beach Emerald Sky
Image location: Great Ocean Road, Australia
Camera settings: Sky: 13 frames x 3 rows, @ 20mm, F3.5, ISO 1600, 60 sec tracked exposures; Foreground: 13 frames x 2 rows, @ 20mm, F2.5, ISO 1600, 60 sec exposures.
Gear: Sony A7III Astromodified, Sony 20mm F1.8 G, Sky-watcher Star Adventurer 2i
Caption: With a clear night forecast and the Milky Way core returning for 2025, I set out to explore the Great Ocean Road. After a few setbacks—such as a failed composition and getting the car stuck on a sandy track—I almost gave up. However, I pushed on and found a great spot above the beach to capture the scene.
The night was full of color, with Comet C/2024 G3 Atlas and a pink aurora in the early hours, followed by the Milky Way rising amid intense green airglow near dawn. Despite the challenges, the reward of this stunning image and the memory of the view made it all worthwhile.
Blossom by Ethan Su
Photographer: Ethan Su
Image title: Blossom
Image location: Hehuan Mountain Dark Sky Park, Taiwan
Camera settings: Sky: 1 row tracked panorama at F2, 90sec, ISO 800; Foreground: 2 row panorama and focus stack, F2.8, 60 sec, ISO 6400; 65 images in total.
Gear:
Caption: After three years of waiting, the Yushan alpine rhododendrons are finally in bloom once again on Taiwan’s 3,000-meter-high Hehuan Mountain. On this special night, distant clouds helped block city light pollution, revealing an exceptionally clear view of the Milky Way. A solar flare from active region AR3664 reached Earth that evening, intensifying the airglow and adding an otherworldly touch to the sky.
Together, these rare natural events created a breathtaking scene—vivid blooms glowing softly beneath a star-filled sky.
The Night Guardians by Rositsa Dimitrova
Photographer: Rositsa Dimitrova
Image title: The Night Guardians
Image location: Easter Island, Chile
Camera settings: Blend of 2 shots: foreground: 88 sec, F3.5, ISO 3200; sky: 20 sec, F2.0, ISO 2000
Gear: Sony A7iii Astromodified, Sony GM 14mm F1.8
Caption: Easter Island had been on my bucket list for a long time, and it once seemed almost impossible to reach. On our first night there, the weather forecast looked promising, so we decided to go ahead with the tour our group had booked 4–5 months earlier. However, Rapa Nui sits in the middle of the Pacific Ocean, where the weather is notoriously unpredictable. When we woke up at 3 a.m. in our hotel, the sky was completely covered in clouds. Still, we decided to take the risk, knowing the forecast for the next few nights was even worse.
An hour later, we were frantically photographing the statues at Rano Raraku—the quarry where nearly all of the island’s 900 statues were carved—when the sky suddenly began to clear. By 5 a.m., it was completely clear, and we had less than two hours to capture all the shots we wanted. We felt incredibly lucky to be in the right place at the right time.
Evolution of Stars by Kavan Chay
Photographer: Kavan Chay
Image title: Evolution of Stars
Image location: Otago, New Zealand
Camera settings: Sky RGB: 4 frames x 3 rows, each shot at 40mm, F1.8, ISO 1250, 50 second exposures; Sky (Rho region): Stack of 10 frames, each shot at 40mm, F1.8, ISO 1250, 60 second exposures; Foreground: 4 frames x 3 rows, each shot at 40mm, F4, ISO 2000, 60 second exposures.
Gear: Nikon Z7 (astromodified), Sigma Art 40mm F1.4, Benro GX-35 ballhead, Sirui AM-254 tripod legs, Sky-Watcher Star Adventurer Pro 2i
Caption: The first image I captured from this spot is the one I feel truly kickstarted my astrophotography journey years ago. It was the first time I shot a tracked panorama using a “longer” focal length lens (50mm). The set of sea stacks provided a prominent foreground subject facing the right direction, and being a local spot relatively free of light pollution, it was the perfect location to capture the Milky Way core.
It felt fitting to try again with a few extra years of experience and an astro-modified camera, which allows for easier capture of hydrogen-alpha-rich regions of the sky (like the reddish nebulae around Zeta Ophiuchi, as seen in the image). The years of experience certainly made panoramic shooting and editing easier, though the shoot wasn’t without its challenges.
I managed to drop a tiny screw adapter in the dark, so I had to improvise a quick solution to make use of the star tracker. With a dying headlamp and the mysteries of wildlife lurking in the dark, all while the tide rapidly rose, it felt like enough adventure for a weekday night.
Winter Fairy Tale by Uroš Fink
Photographer: Uroš Fink
Image title: Winter Fairy Tale
Image location: Dobratsch Nature Park, Austria
Camera settings: Sky: ISO 800, F1.8, 90 sec, 8 panels, low exposure frames for brighter sky parts (30 sec) + lee soft 5 for stars (ISO 3200, F1.8, 20 sec); Foreground: ISO 1250, F2.2, 80s, 8 panels + multi exposure frames for lightning the hut (80 sec, 20 sec,10 sec,5 sec,2 sec,1 sec)
Gear: Nikon Z, Sigma 20mm 1.4 Dg Dn, Megadap tze21, Fornax Lightrack 2i, Sunwayfoto t3240ck, Lee soft 5 filter for stars, Focus on star mask
Caption: Undoubtedly my wildest location this winter: Austria’s Dobratsch mountain! If I had to describe it in two words, it would be a “Winter Fairytale”!
Despite a 5 a.m. work shift, I drove to Austria by 1 p.m., worried about my fitness and lack of sleep. After a 2-hour hike through the snow with a 22kg backpack and sled, the stunning views kept me energized.
Arriving at the cabin (where I had planned my winter panorama two years ago), I was greeted by untouched snow, completely free of footprints. I spent the evening exploring compositions, and this is my favorite: a panorama of the winter Milky Way with reddish nebulae, stretching above Dobratsch Mountain.
I captured the Zodiacal light and even the Gegenschein glow! The sky was magnificent, with Jupiter and Mars shining brightly. In the foreground is the cabin, where I spent 3 freezing hours (-12°C), waiting for the perfect shot of the Milky Way’s core. It turned out exactly as I envisioned—a true winter fairytale.
Echiwile Arch by Vikas Chander
Photographer: Vikas Chander
Image title: Echiwile Arch
Image location: Ennedi, Chad
Camera settings: Sky Exposure: 300 sec, F2.8, ISO 800, stack of 6; Foreground exposure: 480 sec, F2.8, ISO 800, LENR, LLL; Software: Pixinsight and Photoshop
Gear: Sony A7rV Ha modded, Sony 12-24 F2.8 GM, Rainbow Astro RST 135e
Caption: When one first Googles information about visiting Chad, the results aren’t very encouraging from a safety perspective. Nevertheless, the intrepid astrophotographer in me decided to take the chance and visit this landlocked country, specifically the Ennedi Massif in the north.
Sparsely populated and completely devoid of light pollution, the three-day drive from the capital, N’Djamena, was well worth the troubles and risks involved. The region is filled with numerous rock formations, shapes, and arches, offering an abundance of options for foreground elements to frame the dramatic night skies. Seen here is a small arch in the shape of a hoof in the Ennedi region.
Starlit Ocean: A Comet, the setting Venus, the Milky Way, and McWay Falls by Xingyang Cai
Photographer: Xingyang Cai
Image title: Starlit Ocean: A Comet, the setting Venus, the Milky Way, and McWay Falls
Image location: California, USA
Camera settings: Sky: Stack of 20 images, each at ISO 1600, F1.4, 4 sec; Foreground: Stack of 10 images, each at ISO 3200, F1.4, 20 sec
Gear: Sony A7 III (astro-modified), Sony 14mm F1.4
Caption: Capturing this image was a race against time, light, and distance. With Comet Tsuchinshan–ATLAS (C/2023 A3) making its approach, I knew I had a rare opportunity to see it with the naked eye before it faded into the cosmos. I embarked on a five-hour round trip to McWay Falls in Big Sur, one of the few Bortle 2 locations accessible along California’s coast. My window was narrow—just six precious minutes of true darkness before the Moon rose and washed out the night sky. But those six minutes were unforgettable.
In that brief span, the Milky Way arched high above the Pacific, Venus shimmered as it set over the ocean, and the comet streaked quietly across the sky—a celestial visitor gracing this iconic coastal cove. The soft cascade of McWay Falls and the stillness of the starlit ocean created a surreal harmony between Earth and sky. It was one of the most vivid and humbling naked-eye comet sightings I’ve ever experienced—an alignment of cosmic elements that felt both fleeting and eternal.