When you use DPReview links to buy products, the site may earn a commission.
Sony a7R VI | Sony FE 100-400mm F4.5 GM OSS | 320mm | F4.5 | 1/800 sec | ISO 800 Photo: Richard Butler
Alongside the a7R VI, Sony launched an ambitious new telephoto lens: the FE 100-400mm F4.5 GM OSS. It has a constant aperture through its range, internal zoom, and a wide selection of controls, making it clear that it's aimed towards professional sports and action photographers.
We were able to shoot it alongside the a7R VI, taking it to a rugby game, a bird sanctuary and the streets of New York City to test it in a variety of scenarios. And, now that we have Raw support for the a7R VI, we can provide a closer look at how the lens performs, without having to worry about what corrections the body is applying and JPEG noise reduction. You can see the results in the gallery below.
Sample Gallery
Please do not reproduce any of these images on a website or any newsletter/magazine without prior permission (see our copyright page). We make the originals available for private users to download to their own machines for personal examination or printing; we do so in good faith, so please don't abuse it.
While we typically process images for a lens sample gallery using Capture One, we used the Sony a7R VI to test the lens, which isn't currently supported by that program. We've reverted to processing these images using ACR. We've worked to use settings similar to our standard C1 recipe while also using the lens' built-in correction profile. No correction for vignetting was applied, and we'll replace the images with ones processed in Capture One when a7R VI support becomes available.
Sample gallery
This widget is not optimized for RSS feed readers. Click here to open it in a new browser window / tab.
The BBC has been sharing footage from its archives on YouTube, and one video caught our attention. The clip is from the Tomorrow's World programme, and it was originally broadcast on BBC One on February 22, 1990. In it, three broadcasters look back at some of the cameras they'd covered in the past that were meant to change photography, and how successful they ended up being.
The segment walks through different types of camera innovations, starting with a digital "video stills" camera that recorded images on floppy disks and Minolta's hybrid camera that supported film and video stills using a very bulky detachable back. They also walk through 3D cameras, autofocus and disposable cameras.
It's a fascinating look back at some of the technology that led to (and, in video stills' case, was eventually supplanted by) the digital cameras we rely on today. There are plenty of modern videos that look back at old technology, but I think it's especially interesting to see footage like this when it was contemporary and looked like it could be the future, as predicted in 1990.
The BBC also shared a separate video that looks back at when cameras first appeared on phones. It was a move by cell phone makers to boost sales, and was considered a bold move that we now know paid off big time. Interestingly, the cameras in those phones were based on technology originally developed for NASA, which you can learn more about in another video we shared.
Aiarty Image Enhancer: Restore Old Photos and Recover Blurry Faces with AI (49% Lifetime License)
Restoring old photos is rarely as simple as increasing sharpness or removing visible damage. Many photographers and families are now digitizing decades-old prints, film negatives, and family albums to preserve them before physical deterioration becomes irreversible. However, scanned family photos and aging film prints often suffer from multiple issues simultaneously, including faded colors, scratches, dust, low-resolution scans, compression artifacts, and facial detail loss accumulated through years of storage, rescanning, and digital compression.
For photographers and archive enthusiasts, the challenge is restoring clarity without destroying the original texture and character of the image. Film grain is often mistaken for digital noise, facial details become overprocessed, and low-quality scans leave limited data for accurate restoration or upscaling.
Traditional workflows still rely heavily on manual Photoshop adjustments such as denoising, retouching, sharpening, scratch removal, and color correction, especially when processing larger photo archives or film scan collections.
AI-assisted restoration tools are increasingly being used to simplify repetitive cleanup tasks within a broader editing workflow. Designed around a restoration-oriented approach rather than one-click filters, Aiarty Image Enhancer combines denoising, deblurring, face recovery, scratch cleanup, upscaling, and color correction into a single workflow pipeline while maintaining more natural-looking results.
Free lifetime upgrades and priority technical support
30-day money-back guarantee
How Aiarty Image Enhancer Fits Into Modern Photo Restoration Workflows
Rather than functioning as a one-click AI filter, Aiarty Image Enhancer is designed around a workflow-oriented approach for restoring old photos, film scans, and archived images while maintaining natural-looking detail.
A video demonstration showing real restoration results can be viewed below:
Its AI denoise and deblur tools help recover clarity from noisy or slightly soft scans without aggressively removing texture. A built-in Strength slider allows more controlled adjustments, which is particularly useful when working with film grain or older portraits where overprocessing can quickly create artificial-looking results.
The latest Face Restoration improvements focus on rebuilding blurred facial areas while preserving realistic skin texture and facial structure. For damaged prints, the integrated AI Eraser can remove dust spots, scratches, stains, fold marks, and other small distractions commonly found in archived photographs.
The software also supports AI upscaling for printing, digital archiving, and recovering low-resolution scans. Upgraded color controls help correct faded tones and yellow aging, while TIFF/DNG export support improves compatibility with Lightroom, Photoshop, and non-destructive editing workflows. Batch processing can further simplify repetitive cleanup work across multiple images or film scans.
A Practical Workflow for Restoring Old Photos
Step 1: Scan the Original Photo Properly
The quality of the restoration process still depends heavily on the original scan. For best results, scan photos at least 300dpi or higher, use TIFF when possible, avoid repeated JPEG compression, and clean the scanner surface before digitizing older prints.
Step 2: Reduce Noise and Upscale the Photo
The first stage of restoring old photos usually focuses on improving image clarity while preserving the original texture of the photo. In Aiarty Image Enhancer, denoising, detail enhancement, and AI upscaling are processed together within the same AI pipeline.
Choose a suitable AI model and upscale factor depending on your old/damaged photo restoration goal. Using x1 applies denoising and enhancement only, while higher upscale settings can help AI upscale photos from low-resolution scans and prepare restored photos for printing or digital archiving without heavily over-smoothing fine details.
Step 3: Restore Facial Details Carefully
Enable Face Restoration and choose the Fidelity mode to better preserve the original facial structure and maintain more realistic-looking results. Rather than aggressively sharpening every facial feature, Aiarty’s Face Restoration focuses on recovering eye clarity, hair detail, facial edges, and natural skin texture while avoiding an over-smoothed or artificial appearance.
Step 4: Remove Scratches, Dust, and Small Damage
Enable the AI Eraser and mask scratches, stains, fold marks, or other distracting elements. Working in smaller sections with a properly adjusted brush size generally produces more natural-looking results than masking large areas at once.
Step 5: Correct Faded Colors and Improve Contrast
With the Color option enabled, you can fine-tune temperature, tint, contrast, exposure, shadows, and other parameters to correct yellow tint, faded contrast, washed-out shadows, and uneven color fading commonly found in older photos, helping restore depth and readability without making the image look overly processed.
Step 6: Export the Restored Photo
Once restoration is complete, choose the output format, DPI, and quality settings before exporting the final image. TIFF and DNG formats are recommended for preserving image quality and maintaining compatibility with Lightroom and Photoshop workflows.
Notes for Getting Better Restoration Results
Old photo restoration results can vary depending on the condition of the original image, so small workflow adjustments often produce better outcomes.
Trying Different AI Models
Each AI model in Aiarty Image Enhancer is optimized for different enhancement scenarios.
More-Detail GAN v3: Enhances detail and sharpness while reducing blur and noise
AIGCsmooth v3: Optimized for AI-generated images and smoother surfaces
Real-Photo v3: Designed for high-quality photos with more natural detail recovery
Experimenting with different AI models can help identify which one produces the most natural-looking old photo restoration for a specific image.
Adjusting the Strength Setting
If the restored image looks slightly waxy or overprocessed, lowering the Strength value can help preserve more natural texture and finer details.
Restoring Before Upscaling
For printing or digital archiving, it is generally recommended to complete denoising and face correction before applying upscaling, as cleaner base images usually produce more stable results.
In some cases, sequential upscaling (such as 2x + 2x) may also preserve detail better than applying a direct 4x upscale in a single pass.
Using Face Restoration Selectively
Face Restoration works best on photos where facial details are still partially visible but have become soft or faded over time. Fidelity mode keeps results closer to the original image, while Rebuild focuses more on reconstructing missing facial details.
Final Thoughts
The photo restoration workflow used in Aiarty Image Enhancer helps streamline the process while preserving more natural-looking detail compared to isolated manual adjustments. By combining cleanup and enhancement into a structured sequence, it reduces repetitive Photoshop work and improves consistency across different image types.
Beyond old photo recovery, the same workflow can also improve compressed social media uploads, AI-generated images, low-quality web photos, and images prepared for posters or large-format printing.
With the anniversary promotion, users can get the Aiarty Image Enhancer Lifetime License for only $74 (up to 52% OFF) with the code “ANNIVERSARY”, including lifetime access, lifetime free updates, and a 30-day money-back guarantee with no hidden fees.
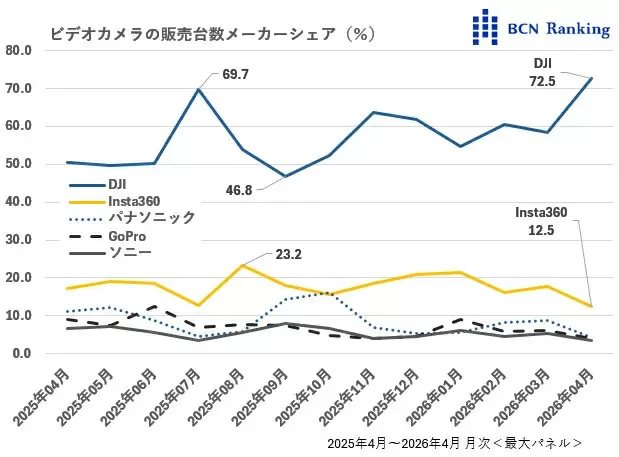
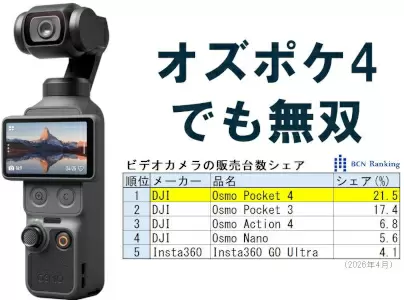
DJI currently holds a whopping 72.5% of the video camera market in Japan (Insta360 is at 12.5%):
DJI’s share of the video camera market has also risen, reaching an astonishing 72.5%, its highest ever. New products have also revitalized the entire video camera market. Sales in April increased significantly, with a 158.1% year-on-year increase in units and a 135.2% increase in sales value. This was revealed by the BCN ranking, which compiles actual sales data from 2,400 electronics retailers and online shops nationwide. (source)
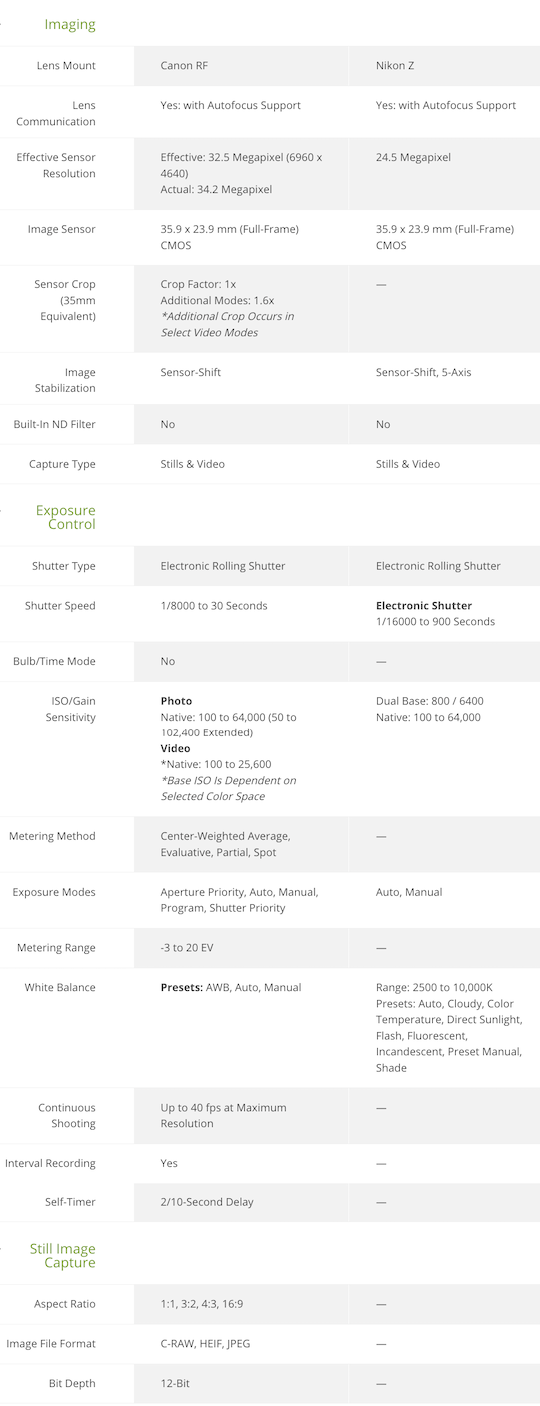
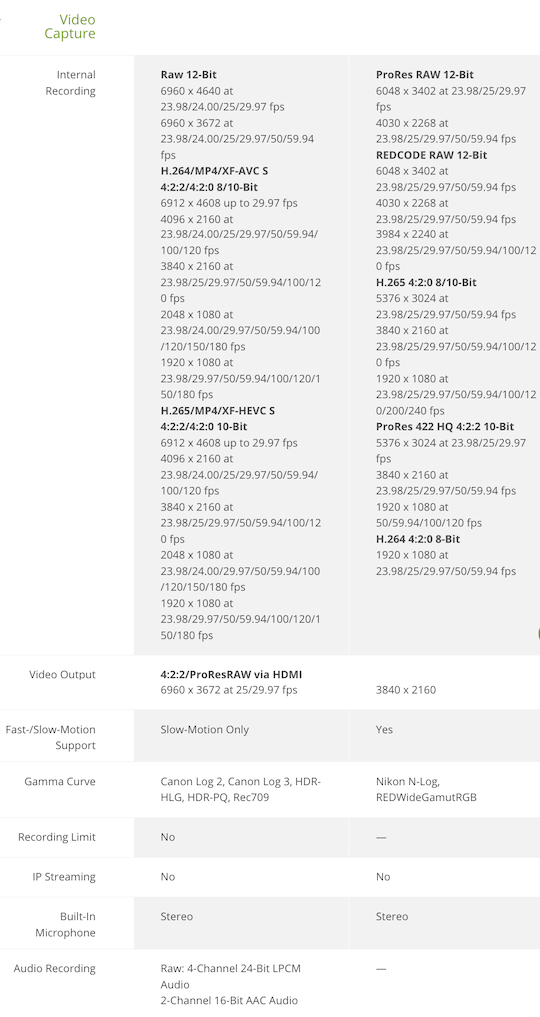
The Canon EOS R6V and Nikon ZR are both compact, full-frame, video-focused mirrorless cameras without an EVF. They prioritize internal RAW recording, strong IBIS, and run-and-gun usability in a small “cinema-style” body rather than traditional stills photography.
The Canon EOS R6V is a higher-resolution hybrid that builds on the R6 III sensor/platform with creator-friendly upgrades like active cooling and open-gate recording. The Nikon ZR is Nikon’s first Z Cinema camera, incorporating RED Digital Cinema technology for RAW recording, color science, and a more cinema-oriented design.
Key specs comparison:
Sensor & Resolution Canon: 32.5 MP full-frame CMOS (≈6960 × 4640). Nikon: 24.5 MP full-frame partially stacked CMOS (same family as Z6 III). Advantage: Canon for stills, cropping, and higher-resolution open-gate video; Nikon for potentially better readout speed/low light with its stacked design.
Processor Canon: DIGIC X. Nikon: EXPEED 7.
Video Capabilities Canon: Up to 7K 60p RAW (Cinema RAW Lite), 7K 30p open-gate (3:2 full sensor height), oversampled 4K 60p, 4K 120p, high-bitrate options, Canon Log 2/3. Active cooling fan for sustained recording without overheating. Nikon: Up to 6K 60p (R3D/NE RAW codec), ProRes RAW options, 4K 120p, 15+ stops dynamic range in Log3G10, N-Log, HLG. Dual base ISO (800/6400). Advantage: Canon for higher resolution and open-gate flexibility (great for vertical/social content); Nikon for industry-standard RED RAW workflow and color science.
Image Stabilization Both: 7.5 stops IBIS (Canon may reach 8.5 with compatible RF lenses via coordinated control). Tie: Excellent for both.
Autofocus Canon: Dual Pixel CMOS AF II with excellent subject detection (people, animals, vehicles). Nikon: Advanced subject detection (people, animals, vehicles, planes) with auto mode. Slight edge: Canon Dual Pixel is often praised for reliability in hybrid shooting, but Nikon is very capable.
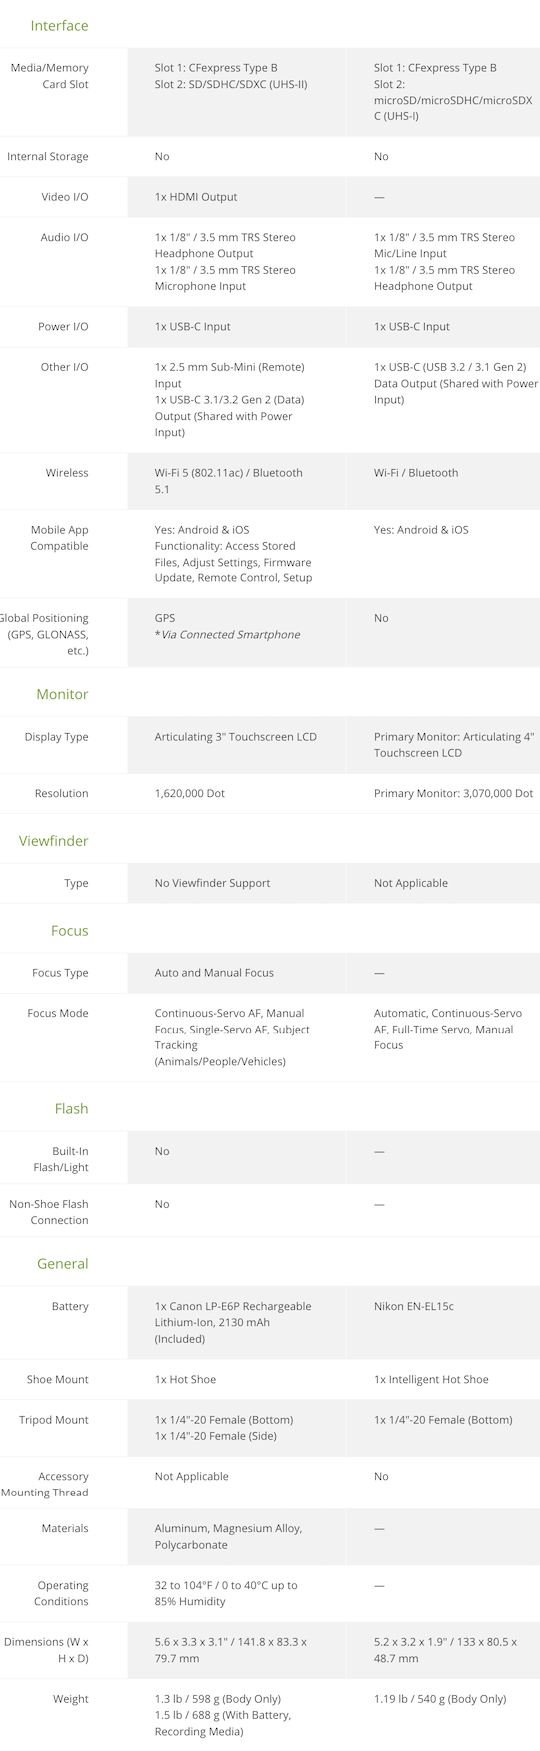
Viewfinder: Neither has a built-in EVF (both are video-first designs with optional external EVF support via hot shoe).
Audio Canon: Standard high-quality inputs. Nikon: Internal 32-bit float recording (a standout feature for clean audio without clipping worries). Advantage: Nikon.
Storage Canon: CFexpress Type B + SD UHS-II (full-size slots). Nikon: CFexpress Type B + microSD. Advantage: Canon for easier media handling.
Build & Ergonomics Both are compact and lightweight (Canon ≈688g with battery; Nikon ≈630g or lighter). Canon has a more traditional hybrid grip; Nikon has a blockier cinema-style body. Both have weather sealing and full-size HDMI on Canon (Nikon uses micro variants).
Stills Performance Canon: Stronger – up to 40 fps electronic burst, better resolution for prints/cropping. Nikon: Capable but more video-prioritized (electronic shutter only).
Battery & Power Canon: LP-E6P. Nikon: Standard Z battery. Real-world runtime depends heavily on cooling, codec, and frame rate.
Who Should Buy Which?
Choose the Canon EOS R6V if:
You want higher resolution stills + video hybrid capabilities.
Open-gate 7K recording and active cooling for long takes are priorities.
Choose the Nikon ZR if:
You value RED RAW workflow, color science, and 32-bit float audio for professional post-production.
A larger, brighter 4″ screen and compact cinema form factor matter more.
Overall: These are very close competitors aimed at similar users (creators who want full-frame RAW in a small body). The Canon edges out in resolution, cooling, and hybrid versatility; the Nikon stands out with its screen, audio innovation, and RED-backed RAW/color pipeline.
When you use DPReview links to buy products, the site may earn a commission.
We've spent the last week and a bit testing the Panasonic L10 in earnest, as it's not every day that we get a new compact camera aimed at enthusiast photographers. Abby, Dale and Mitchell sat down to discuss the camera, what it could mean for the industry and more, in the video you can see above.
If you want to take a more in-depth look at the L10, you can check our our hands-on article, our size comparison of it and the LX100 II and our initial sample gallery. And stay tuned, because our initial review of it is coming very soon.
The prompt for the photo chain is a feast for the eyes.
Photo: Dale Baskin
In case you missed it, DPReview is gearing up for our biggest redesign in 25 years. As part of that transition, we've had to temporarily pause our long-running challenge system. Despite that, we don't want to miss out on seeing all of your incredible photographs.
To help provide an outlet during this pause, and in response to a recent article on collaboration in photography, we've launched a collaborative photo chain in our forums. The prompt is simple: share one photo (new or old) that responds directly to any visual element in the most recent image.
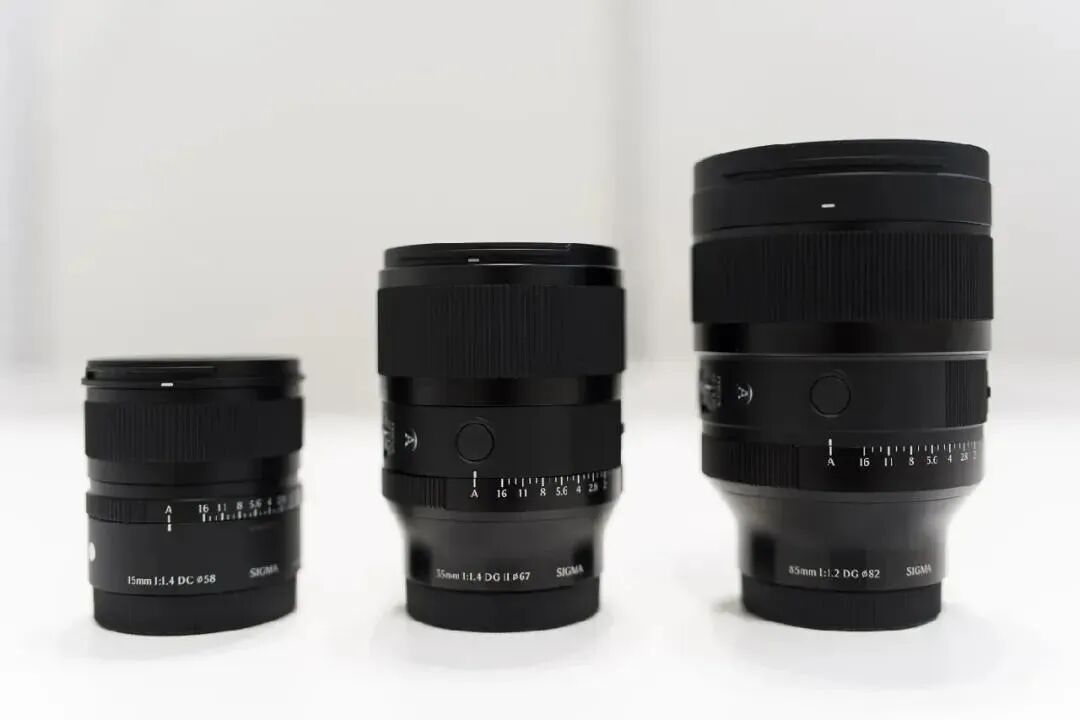
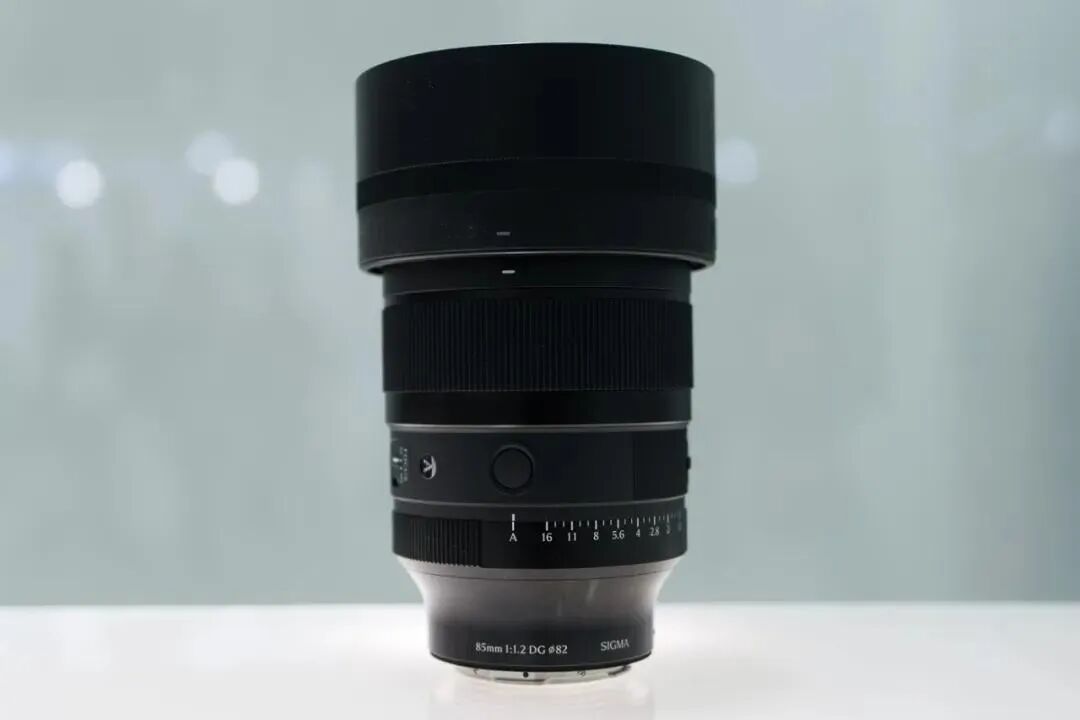
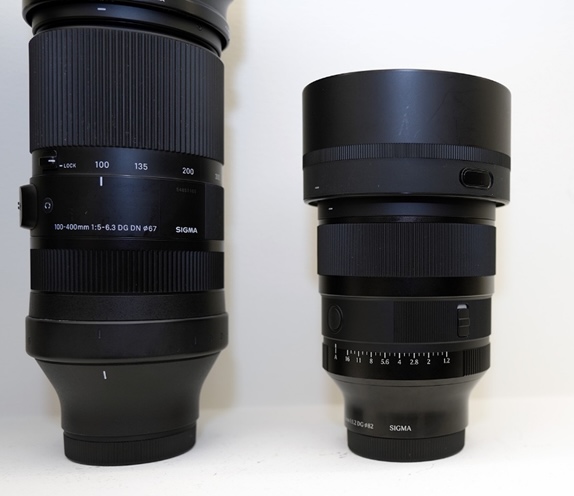
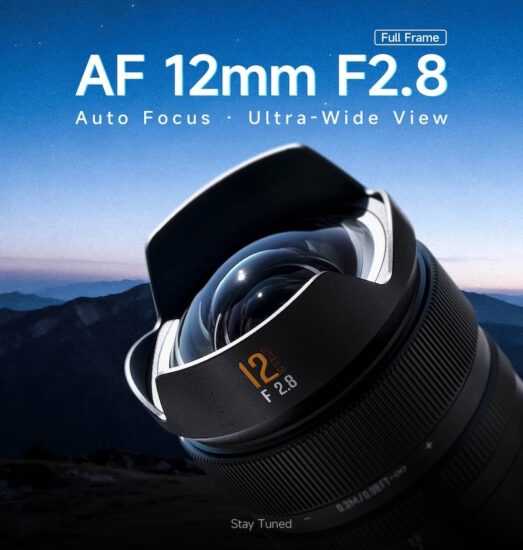
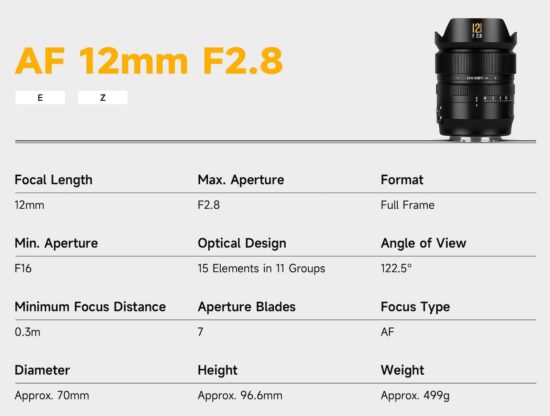
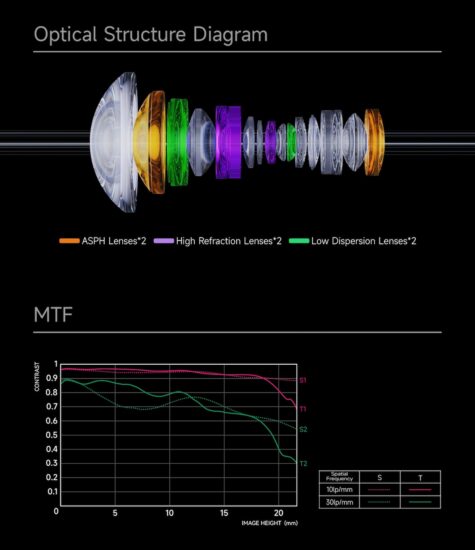
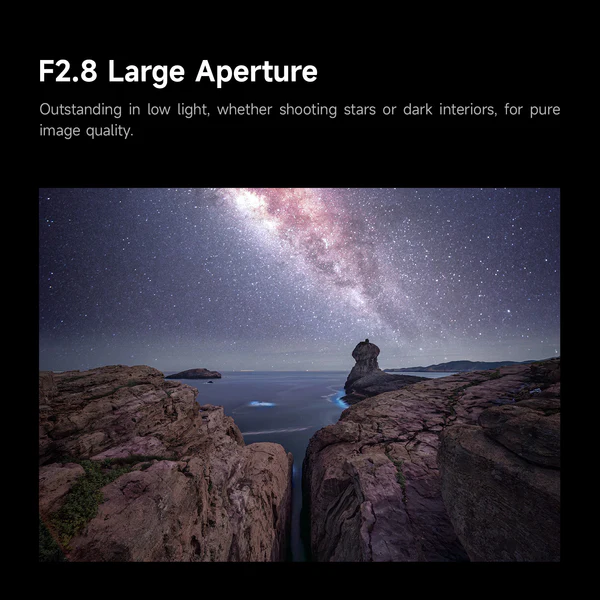
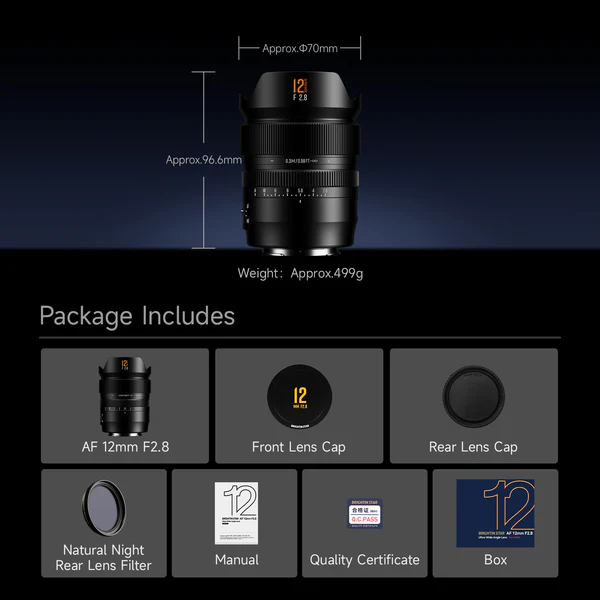
Refined Optical Excellence: 15 elements in 11 groups, featuring HRI, ED (HOYA), and ASPH lenses, with advanced IMC coating for vivid, high-contrast rendering.
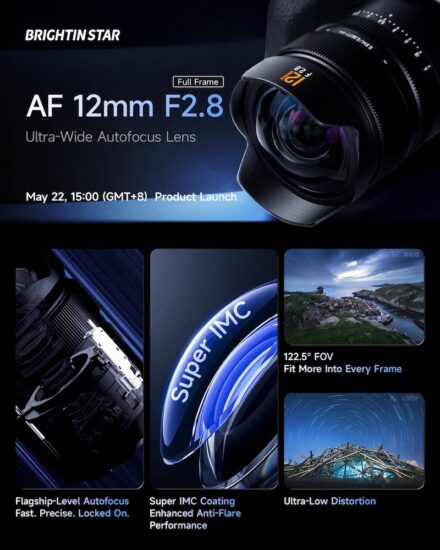
2.12mm Ultra-Wide: 122.5° field of view for landscapes, architecture, interiors, and astrophotography.
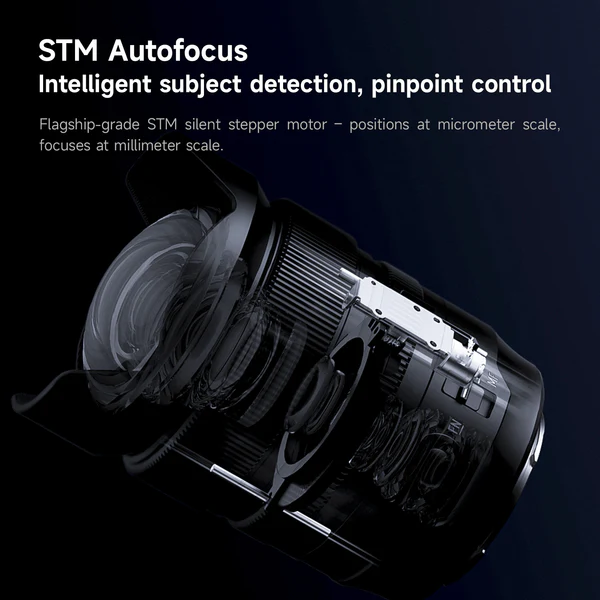
Fast STM Autofocus: Next-gen STM motor delivers fast, precise, near-silent autofocus in milliseconds.
Near-Zero Distortion: Aspherical elements ensure accurate geometry and edge-to-edge sharpness.
Intuitive Controls: AF/MF switch and customizable FN button for seamless operation.
Durable Construction: Integrated petal hood reduces flare, with rear sealing for dust and moisture resistance.
This was from one of my most recent collaborative projects, a double exposure series with a friend. Photo: Myra Holt and Abby Ferguson
If you're anything like me, photography most often feels like a solo endeavor. I typically go out to take photographs on my own. I edit alone. And, at least these days, I create images without any feedback or different perspectives.
Admittedly, all of that isolation is somewhat done on purpose. Photography for me is frequently quite personal. It can be a time for me to reflect, decompress or even work through things. Plus, as an introvert, doing things alone comes naturally.
Photography will always have a solitary side, since for many of us, that's part of the appeal. But I've been realizing that some of the most meaningful growth in my own work has come when I've let other people into the process. Thankfully, collaboration can take many forms and works well even for an introvert like me.
The number of ways to collaborate is essentially endless, so I won't be providing an exhaustive list of the possibilities here. But I will share some of the things that I have experience with and that have been meaningful for my practice.
Collaborative projects
When most people think about collaboration in photography, they likely think about projects worked on with someone else. I've previously written about using photo projects to find renewed creative motivation, but those were largely personal projects, not collaborative ones. Projects done in collaboration with others can also be very helpful for finding your creative voice again, and lead to some really cool work.
Double exposures
Two images from different rolls of our double exposure project. Photos: Myra Holt and Abby Ferguson
One ongoing collaboration I've been tackling lately is a double exposure project with a friend from graduate school. We live in different states, but we wanted a way to work on something together, so we schemed this up. We each shoot a roll of film, mail it to the other person, and shoot the roll of film again to create double exposures.
Thus far, the project has largely been about troubleshooting to get better results, so we've purposely kept the subject matter completely open. It's something we hope to narrow down and do something more specific with at some point, but for now, it's mostly just playing around. It's been a fun way to stay connected to a friend and a good excuse to get out with my camera (which I need to do, since I'm overdue in shooting a roll that she sent me).
Of course, this collaborative project requires access to film, film cameras and the means to develop and scan negatives. But the unpredictable results make it a fun way to work with someone, and it's an opportunity to have some fun with photography.
Photo challenges
One of the prompts during the photo challenge project was "fear." While I don't think this image does a perfect job of conveying that, it did get me to dust off some skills I hadn't used in a really long time, but that I really enjoy. Photo: Abby Ferguson
Another project I worked on for a while was a challenge project with a friend. Each week, we would alternate who picked the topic, and then we had to make an image with that in mind. The topics varied from broad, like black and white, to somewhat more specific, such as fear. We would typically each take more than one, sharing our top three picks at the end of the week before a new topic was selected.
When I started the project, I had been in a bit of a rut with my photography. The weekly challenge was a good way to flex my creative skills again. It pushed me to think outside the box for the first time in a while, which was refreshing and motivating. In this case, collaboration was a method for accountability, helping me to pick up my camera for something other than work on a more regular basis. I like the images I made, but it was more about the process and collaborative act than anything else.
There are plenty of variations on this type of idea, too. My local photo group is currently gearing up for a bingo challenge for our next photo walk, with a board created collaboratively as well. There are also group color hunting challenges (which the DPReview team tackled in Tokyo this year), and more. I've also seen collaborative editing ideas, from as simple as editing each other's photos to creating composite photos with elements from different people.
Shows as collaboration
Last fall, a friend put together a collaborative show to raise money for a wildlife area near us. Photo: Anthony Verdi
While not an area everyone will have interest in, group shows can be an excellent form of collaboration. I'm currently scheming up a show with two of my colleagues at the school I teach at, and last fall I participated in a group show with friends dedicated to wildlife and nature in our state.
A show could be based around a theme or simply an opportunity to show your work together, whatever it may be of or about. It could be in a formal gallery space, or maybe just the local coffee shop. No matter what, the process of planning and coordinating the show is a fantastic way to connect with others.
Seeing your images next to those created by someone else can give you a fresh perspective on your work and give you ideas for where to take it next. Plus, it's always nice to see your photographs up on the wall in some form.
Feedback as collaboration
Collaboration doesn't have to mean making something together, either. While feedback may not be the first thing people think of when it comes to collaboration, it can be a very useful form of it. Inviting someone else into the process, even after the photographs are made, can change how you understand the work and where you take it next.
Formal critiques
I have a somewhat unique experience in that I went to school specifically for photography, spanning both undergraduate and graduate degrees. As a result, I had 7.5 years of getting regular feedback on my work via critiques. In undergrad, every single project was critiqued, which meant one every couple of weeks.
"Those critiques could be difficult, but they forced me to consider how other people were reading my images."
Graduate school was less structured, since there wasn't a definitive end to projects, but there were still regular and formal group critiques. Those critiques could be difficult, but they also forced me to consider how other people were reading my images, not just what I intended when I made them.
School isn't the only place formal critiques can happen, either, so you're not out of luck if you don't go to school for photography. Some photography groups will host critiques, either in person or virtually, so it's worth checking locally. Photo conferences and expos will also often hold portfolio reviews or critiques, giving you the chance to receive feedback from experienced reviewers or significant names in the industry.
Informal feedback
My studio space in graduate school allowed for lots of impromptu discussions about my work. Photo: Abby Ferguson
While the structured critiques in graduate school were worthwhile, even better were the impromptu critiques that happened when a classmate would pop into my studio to say hi and we would end up discussing my work. They inevitably involved a mix of straightforward feedback and brainstorming on what could work better for a given piece or series.
Those casual conversations were often just as valuable as structured critiques, if not more so. They were more conversational and often served as a time for problem-solving rather than simply being told something isn't working, as can happen in a critique. They also happened in the middle of making the work, so they could help me think through problems before a project felt finished or fixed. That often meant I was more open to feedback, too.
Informal feedback is often easier to recreate outside of school than a structured critique. It can be as simple as sending a photograph to someone you trust to ask what they think or how they would suggest improving it. Or maybe inviting a friend over to flip through some of your recent images on a laptop to see if they have any suggestions. It can also be as simple as a conversation about something you're stuck on, either technically or visually. Or, you can even head to our forums to get input from our incredible community.
Learning to be open to feedback
Since leaving school, I haven’t sought out feedback nearly as much as I should, but I know how useful it can be. Formal and informal critiques have led to significant breakthroughs in my work, leading me to produce projects I'm still proud of to this day.
"If you find yourself in a position to have your work critiqued, be open to it."
If you find yourself in a position to have your work critiqued, be open to it. It can be scary, especially since not everyone knows how to deliver feedback well, but getting a glimpse into how others perceive your work can be a valuable opportunity to grow.
At the same time, staying open doesn't mean taking every comment as truth or instruction. Feedback is information, not a command. It also helps to remember that, no matter how personal the work is, the feedback is a comment on the photographs, not you as a person.
Start small
Collaboration doesn't have to feel like a chore or an overly structured project. It can be as casual or simple as trading prompts with a friend, asking someone you trust to look at a series or single image, or putting your work in conversation with another photographer's. For those of us used to working alone, even small forms of collaboration can be enough to shake something loose and open up renewed creativity and motivation.
If you have collaborated with others in meaningful ways, share those in the comments! It might give someone else an idea to try out as well. We've also started an easy collaborative project in our forums, so head over there to participate!
Zeiss is teasing “The next major advancement in lens technology”. The announcement will happen on June 2nd and will be “New horizon in Zeiss lens technology.”
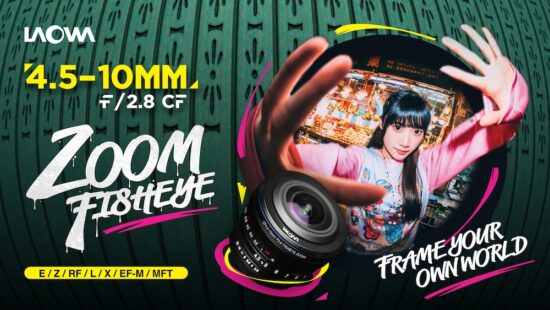
The previously reported Venus Optics Laowa 4.5-10mm f/2.8 CF APS-C fisheye zoom lens for E/Z/RF/L/X/EF-M/MFT mounts has now been officially released. The price is $399:
When you use DPReview links to buy products, the site may earn a commission.
'The Grace Project' dancer: Joy Isabella Brown
Leica M (Typ 240) | Leica Summicron-M 35mm F2 ASPH. | F11 | 1/750 sec | ISO 400 Photo: Josh S. Rose
Josh S. Rose has been capturing visceral reactions since the 1970s, when he wandered around a racetrack park as a kid to explore the event. He found himself hanging out at the photo booth and loved to watch a team develop film after each race, calling up the winners to the announcer upstairs, then hearing the crowd wildly react. His career kept him intrigued by those early moments of capturing scenes on film.
We virtually sat down with Josh to see where that early racetrack experience took him. His experiences and photos are gathered below.
This story is part of our What's in your bag? community spotlight series. The series showcases the diverse gear and photography of our community, and shares their stories of how that gear helped them to capture the perfect shot.
Leica M (Typ 240) | Leica Super-Elmar-M 21mm F3.4 ASPH. | F3.5 | 1/180 sec | ISO 100 Photo: Josh S. Rose
Meet Josh S. Rose
Home base: United States
Favorite camera and lens: Josh’s main setup centers around the Hasselblad X2D with 25mm, 38mm and 90mm f/2.5 lenses for his more artistic and environmental work. When shooting live performance and dance, he switches to the Nikon Z9 paired with 14–24mm, 24–70mm and 70–200mm zooms for speed and flexibility. A Nikon Zf stays in the bag as his everyday and backup camera.
Josh also carries and collects vintage lenses, including Leica Summicron and Super Elmar primes, a Helios and his favorite oddball lens, the vintage Nikkor 43–86mm F3.5 pre-AI zoom
Support gear: ND and polarizing filters, prism and glass filters and Loop earplugs and AirPods to stay focused and comfortable during long shoots and performances.
"My set-ups are generally based on the physical ins and outs of the shoot. I do 100–200 shoots a year, so I’m always trying to streamline without sacrificing options. If I’m parking next to a venue and starting quickly, I’ll bring a bigger hard case. If I’m flying, I pack chargers, extra batteries and other essentials. For a recent shoot with Esa-Pekka Salonen at Disney Concert Hall, the small Nomatic bag was ideal, since we were moving fast and had little time to experiment. The process is to understand the shoot first, then rely on memory of similar shoots to decide what will help most."
A lot of great equipment! What's your absolute one-pick favorite?
"My Tanner Goods Cognac SLR Camera Strap that goes on my Nikon Z9 is probably my favorite thing in my bag. In photography, as in life, there are very few things that get better over time. That strap has been with me for so many years. Like a country singer's guitar, it has been the constant companion for me. Camera bodies come and go, lenses are a bit of a commodity, even the vintage ones. But that strap only gets more and more personalized, more and more beautiful and more and more comfortable as the years pile on."
What other equipment propels your photography forward?
"For me, photography is about creative flow. I feel like I have to be on, with energy and positivity, so that I can both generate ideas and not forget anything or screw anything up. So, all non-photography things in my kit are around keeping me energized and positive, starting with food and energy drinks (I admit a bit of an addiction to C4 and Bang, which I'm quite certain are poison, but they bring me joy and focus. Also, my partner hates energy drinks, so it's sort of my little rebellion, too – shh, don't tell her)."
Ate 9 Dance Company
Leica M (Typ 240) | Leica Noctilux-M 50mm F0.95 ASPH. | F1.0 | 1/750 sec | ISO 1000 Photo: Josh S. Rose
You mentioned to us you have 10 different camera bags...
"Okay, so don't judge me, but I have at least that many bags. I like to pack specifically for any event, trip or shoot. The bag is sort of an expression of how I'm feeling that day."
"For a minimal set-up, I'll use the Luma Camera Sling 12L. When I'm feeling my inner photojournalist, I'll throw the Domke F2 over my shoulder. When I'm in a bit more creative mood, I'll throw everything into a vintage black patent leather Coast S-1 shoulder bag that I borrowed/stole from my producer. For long travel assignments, I usually go with the LowePro BP 300 backpack or, if I need more space, the Tenba Roadie Air Case. For performances, when I need the full arsenal, I go with the SKB iSeries hard case with Think Tank dividers and a lid organizer. And we haven't even gotten into my cinema cases..."
"A little travel hack I have learned over the years is to always bring a small satellite bag and stuff it inside a bigger bag. The smaller bag is great for little day trips or side quests."
A little travel hack I have learned over the years is to always bring a small satellite bag inside a bigger bag. The smaller bag is great for side trips.
How has your photography changed since you started?
"In the beginning, I tried to minimize mistakes. Because I shoot dance and movement a lot, this is exacting work, especially when you're inside – low light and fast movement is a nightmare for a camera. So, I kind of treated dance as one would sports, reaching first and foremost for clarity, focus and split-second timing. It isn't all that hard, honestly. It just takes a certain number of reps."
"What helped far more was learning how to embrace the elements of the camera in ways that break the normal image-capturing techniques, in pursuit of something less ordinary and more evocative. I use a lot of double exposure, slow shutter and dragged shutter techniques in my work. Also, I use glass filters, found framing and just about anything else to make the images feel less technical and more creative, alluring, beautiful or evocative."
Photo from 'The Grace Project'
Leica M10-P | Leica Noctilux-M 50mm F0.95 ASPH. | F4.0 | 1/500 sec | ISO 100 Photo: Josh S. Rose
What excites you most about capturing dance performance?
"My most well-known work is in dance and performance. I have traveled the world as a photographer, often with dance groups and artists. Many times, I am inside shooting a performance, but it is the most special to me when art intertwines with art."
"For example, when I get to shoot dancers and a choreography among works of art, often with live music, something special occurs in this blend of art forms that is unlike anything else. To be an artist, working in and among other artists, to me, is the dream. I just love art so much. I feel like I am always and forever a student of art."
When capturing that perfect shot, what techniques come to mind?
"The 'perfect shot' is, of course, a loaded question. I've shot what I consider three perfect shots in my life, and they were all different from each other."
"One was with the Japanese rockstar, Yoshiki. We were high up in a hotel room with a bunch of people around. It was tense as we were awaiting some kind of press event to happen. Suddenly, a window washer came rappelling down, recognized Yoshiki through the window, and they had a funny moment. I had the presence of mind to see it occurring and move myself in real time to get the shot. The complexity of the shot is insane when you consider everything that had to happen for that to play out the way it did."
'The Window, with Yoshiki'
Leica M10-P | Leica Super-Elmar-M 21mm F3.4 ASPH. | F3.5 | 1/180 sec | ISO 400 Photo: Josh S. Rose
"Another was in Qatar, in and around probably the most beautiful sculpture I've ever seen in my life: Shadows Traveling on the Sea of the Day, by Olafur Eliasson. A dance group led by Bouchra Ouizguen, for her piece Corbeaux, entered the space. It was absolutely overwhelming to me how much geometric beauty was happening all at once. It's the kind of thing that often overwhelms me, but I had gotten to the location early and spent two hours walking around and finding a composition I felt was really special. One of the dancers walked alone into the space, which I had no idea was going to happen. I happened to be present enough to remember where I had stood for that composition, and ran over to it just in time to get a shot that's still among my absolute favorites."
Photo from 'Festival In Motion, Qatar'
Leica M11 | Leica Summicron-M 50mm F2 | F5.6 | 1/2000 sec | ISO 400 Photo: Josh S. Rose
"And the other one I'm thinking of is a shot I got on stage, looking out toward the house at the famed Koch Theater with the New York City Ballet. This was just one image in a set of many that I had planned for a giant mural for The Lincoln Center. We placed the bodies in the locations and composed them perfectly. I took the shot, and then I had this incredible moment I'll never forget. It is always my instinct to keep shooting until the bell rings. I just can't turn off. I keep pushing and pushing to see if there's a better angle or a different physical shape a dancer might try. But not on this day. I had already visited this place twice before. This, to my eye, was the best shot there was. I was done. There was no more to get. I have never felt that at a shoot before. It moved me."
'NYC Tableau' for The Lincoln Center, NYC
Hasselblad X2D 100C | Hasselblad XCD 25mm F2.5 V | F8.0 | 1/20 sec | ISO 1600 Photo: Josh S. Rose
What would you say to a struggling photographer looking to break in?
"The biggest job of my life came from doing years and years of unpaid work in the field of dance. A lot of people (including family) didn't really get why I would keep shooting things without it being an official shoot where I was getting paid. Nonetheless, I stayed at it for years. Eventually, I got an artist residency, then another one, and suddenly these dominoes started falling for me."
"Find your weird, singular little passion first. And fight off the self-doubts and the disbelievers. Protect the passion like a butterfly. Don't be surprised if even your closest people don't quite get you."
Josh really enjoyed writing the content for this spotlight article and would be grateful for you to join him in discussion in the forums. Thanks, Josh, for being featured!
If you'd like to share your photography, tell us about your main camera, lens choices, key settings and strategies. Your photos and story could be featured in the next article!
Editor's note: This article continues a series, 'What's in your bag?', highlighting DPReview community members, their photography and the gear they depend on. Would you like to be featured in a future installment? Tell us a bit about yourself and your photography by filling out this form. If you're selected for a feature, we'll be in touch with next steps.
When you use DPReview links to buy products, the site may earn a commission.
Sony a7R VI | Sony FE 24-70mm F2.8 GM II @ 24mm | ISO 100 | 1/20 sec | F11 | Mech. Shutter | Edited to taste in Adobe Camera Raw Photo: Richard Butler
With the a7R VI, Sony is promising something that, historically, has been difficult to achieve: a camera that is both the fastest in the series, while offering better dynamic range than its predecessors. To help achieve this, it's using a technique that we've recently seen popularized by cameras with partially stacked sensors: combining the readouts of the camera's low and high gain steps, getting the benefits of both higher capacity and lower noise.
Looking at the dynamic range tests we shot in our studio, the results are what we've come to expect. We can see a touch less noise in the deepest shadows than with the already very good a7R V when shooting with the mechanical shutter (including in electronic front curtain mode), where the camera has enough time to do both readouts.
The sensor also performs very well in lower light, when dropping to lower ISO settings to preserve highlights, then raising your lightness in post. We see very little difference in deep shadow noise between a shot at ISO 6400, and a shot with the same exposure settings but at ISO 100, pushed 6EV in Adobe Camera Raw.
While these improvements compared to the a7R VI are measurable – we can see them in our test scene, and they'll show up on DR charts – they'll be subtler in the field. If you weren't able to capture a scene with the a7R V, the a7R VI probably won't be able to handle it either. But if you often find yourself digging into the darkest tones of your image, you'd get a little less noise with Sony's latest.
It's worth repeating that this is only for modes where the exposure is ended by the mechanical shutter. The a7R VI's e-shutter mode, which is required for its fastest burst rates, has slightly noisier shadows than the mechanical shutter mode. But again, while this shows up in our test charts, you'll likely be harder-pressed to see the difference in day-to-day use.
As an example, Richard Butler took an image of a sunset over Seattle, seen at the top of this article, where the difference between the light coming from the sun and the darkest shadows under the bridge was around 13EV. He shot the same exposure with both the mechanical shutter and electronic shutter.
Image Comparison Slider
This widget is not optimized for RSS feed readers. Please open this article's permalink in a browser to view this content.
If you really pixel-peep, you can see that there's a bit of extra noise in the e-shutter version, but the difference is almost impossible to see when viewing the whole images (which you can do in our sample gallery, where you can also download the Raws).
To keep things in perspective, though, the benefits and differences we're discussing are only in the deepest shadows of the image, and it's rare that you'll need to exploit those in situations where you'll also need your highest burst rates. If you're not using those parts of your Raws, the a7R VI's extra dynamic range won't benefit you.
Still, the R series of cameras have historically been made for the types of people who would want to do that; landscape shooters, and anyone who needs the maximum image quality and flexibility. And, as with our standard studio scene tests, our DR tests show that Sony not only avoided making sacrifices in the name of speed, but even managed to eke out some improvement. The camera's greater flexibility to capture a wider array of situations and subjects doesn't come at the cost of its peak dynamic range and IQ.
"An external power bank. For some steampunk events and science fiction conventions, I disguise my camera in other things, and I've been using external power because it often takes me 1/2 hour to remove the camera from the disguise to change the batteries."
OM System OM-1 | Olympus Zuiko Digital 14-54mm F2.8-3.5 II @ 27mm | F3.2 | 1/60 sec | ISO 2000 Image: Michael Meissner
Accessorize, accessorize, accessorize! For the latest Question of the week, we were curious about what accessories are must-haves in your camera kit or bag. You replied with everything from external power banks and filters to more exotic items like a collapsible kabuki brush and loop earplugs. Some of you even provided an entire list of things that would arguably be a great fit for a "bug-out bag".
Check out the top accessory suggestions below, then let us know in the comments which ones will make your GAS expand.
Your must-have camera accessories
A collapsible Kabuki brush for dusting off equipment.
Hike Pics: I have several collapsible kabuki brushes that I keep in my car, bags and around the studio. When I head out, a brush goes with me.
madecov: Ziplock bag with Q-tips. Sometimes you just need them to clean something off.
Jacques Cornell: Oh boy, here goes... A few items have earned permanent spots in my grab & go basic event kit:
First, an 80W USB charging block with a built-in retractable USB-C cable and USB-C and USB-A ports.
Downstream of this, a Tilta 4-battery or Limeta CR2Go (discontinued?) 2-battery charger. The Limeta has its own built-in battery, so it can recharge camera batteries without plugging into AC and can also serve as a general-purpose power bank.
A pair of retracting USB charging cables rated for 100W, with convertible USB-A/-C tips on one end and convertible USB-C/Lightning tips on the other.
Click Jacques's name above to view several additional inclusions!
"My barebones lightweight event kit."
iPhone 17 Pro Max Image: Jacques Cornell
cbf_si: In the last six months, I have mostly been shooting with adapted lenses, so my bag contains various adapters for Sony/Minolta A-mount and Canon EF-mount. I also have various macro extension tubes and reverse rings for macro photography in the bag.
Since I started taking up film photography again, various filters for B&W photography are also in the bag. Luckily, I kept my Cokin filters for the P system, which I can use with any lens using adapters.
Michiel953: Different accoutrements. A chamois, a laptop, a notebook, and a pen (sometimes two; private and business), tissues, paracetamol (just in case ;-) ), and some small things I can't remember. A Wuchuan canvas messenger bag with a Billingham insert and lots of useful pockets! It serves me well, carrying a D850 with one prime (24, 35, 58, or 85, depending on mood and plan, if any).
Vello WB-DU Universal White Balance Handheld Disc. It's worth its weight in gold for setting Custom WB in theatrical settings.
Michael Meissner: I am not a fan of OEM neck straps. I rotate between various straps depending on mood, etc. Because I shoot with multiple cameras, each camera has a different strap so I can quickly identify which camera is which. Mostly, I prefer the 1.5" straps. For lighter-weight setups, I might go to the Peak Designs Leash straps, but I'm not as much of a fan of the wider Peak Designs Slide Lite or Slide straps. All neck straps and hand straps use the Peak Designs anchor system, so I can quickly switch them or take them off. I have hand straps, but I rarely use them.
If you thought Jacques list was extensive, be sure to click on Michael's name above for his complete list!
MGradyC: Vello WB-DU Universal White Balance Handheld Disc. It's worth its weight in gold for setting Custom WB in theatrical settings and under the lighting in high school and small college stadiums and gyms.
"Right-angle viewfinder, excellent for getting right down even to the ground level."
DrHook59: I've taken to using my home-made monopod a lot recently, not just for macro (à la Mark Berkery), but also for landscapes and low-light situations... and yes, I mention it because it fits in my camera bag or a pocket and only weighs just over 300gms. It's nothing clever, but it's easy to put together and may help anyone who suffers from encroaching old age, a lack of grip, or any of the many ailments that may cause tremors; and it helps in dark places a little 😁. It's also probably the cheapest monopod out there.
Mac McCreery: Small Vanguard Vesta Aspire 25 bag holding a Pentax K3ii and DA 15, 20-40 and 70 Limited lenses. Lenspen, spare batteries, grip, remote release, a pen, and polariser. Oh, and a plastic shopping bag (it's multi-purpose). I can sit or kneel on it, wrap it around the camera bag or use it to protect the camera and lens.
A lens Flipper Versatile. Allows me to quickly access a second lens and safely swap between them without risking one lens falling.
John Crowe: Whichever camera I take, and I don't carry a backup, has its own individual case. Individual camera cases vary depending on format. These can range from a PacSafe V2 camera holster (for one of my two Sony Nex/@ systems) to Pelican Micro cases for each small-sensor (such as 'tough') camera, to cite two examples.
From here, it gets more complex, but it works.
Part of the Jeep Wrangler roll bar system is a transverse bar that goes across the vehicle just behind the bucket seats (there is no rear seat, having been replaced by a carpeted dog platform). Hanging from this transverse bar, and adjustable for location across the roll bar, are three magnetic fly-fishing net releases (which would allow a net to be pulled and then have it in hand).
edge_cl: Single most important accessory: lens Flipper Versatile. Allows me to quickly access a second lens and safely swap between them without risking one lens falling.
"RGBACL light panels for very high CRI quality."
Apple iPhone 13 Pro Max Image: Alberto Tanikawa
Alberto Tanikawa: I do a lot of still-life photography, such as knives and bourbon bottles, as well as macro and focus-stacking, so I always need to have my lights, along with mini tripods and magic arms.
RetCapt: For tightening/loosening tripod plates, I have a large-diameter washer tethered to each tripod, which is easily detachable. This gives more leverage on the slots since there is more surface area for the fingers to grasp. These washers come from the hardware store. I find that when I am trying to 'engineer' something new (fairly common), the hardware store is a great resource. That and mountaineering shops for carabiners, etc.
No matter what else I carry in my bag, a right-angle viewfinder is always with me (and almost always attached to the camera).
cyuill2007: My “must-have” accessories these days are lens hoods and extra batteries. Lens hoods minimize unwanted flare and help protect front lens elements. During a session where I end up doing a lot of shooting, I find that my newer mirrorless bodies with features like image pre-capture drain batteries much faster than my DSLRs used to. These days, I make sure I have a fully-charged extra battery whenever I am out shooting.
KPM2: No matter what else I carry in my bag, a right-angle viewfinder is always with me (and almost always attached to the camera). With this tool, it is easy to get right down even to ground level – and in doing so, you capture perspectives that are simply nice.
Keep ready for the next Question of the week to participate in this series. New questions are posted here on the homepage and in the forums every other week. We can't wait to read and share your stories!
When you use DPReview links to buy products, the site may earn a commission.
Photos: Mitchell Clark
While Panasonic's new L10 compact bears the name of a new series, its lens, sensor, and set of features make it a clear continuation of the work the company did with the LX100 II line. But these similarities also invite comparison on one of the areas where the two cameras are substantially different: size.
As I've been testing the L10, I intellectually knew it was larger than the LX100 II; a glance at the spec sheet will tell you that. The newer camera is 127 x 74 x 67mm (5.0 x 2.9 x 2.6") and 508g (17.9oz), while the older one is smaller in every dimension: 115 x 66 x 64mm (4.5 x 2.6 x 2.5") and 392g (13.8oz). But knowing those numbers didn't really prepare me for just how much more compact the LX100 II would feel once I got my hands on it.
To be clear, I don't think it'd be fair to call either camera a "pocket camera." One thing that hasn't changed is the size of the lens, which protrudes far enough off the body that even the largest of pants pockets would struggle to contain it. However, I'd say the LX100 II is just small enough that it could comfortably fit in a jacket pocket without being too much of a burden (or on a, I've been told, very in crossbody strap in warmer seasons). But while I've been able to (uncomfortably) fit the L10 in the massive drop pocket of my Patagonia R1, it's definitely approaching the size where I'd want to put it in a bag, rather than in my coat.
While the cameras use the same size sensor and same class of lens (Panasonic says it's updated it in some way, but wasn't specific), there is still a benefit to the L10's larger size. It now uses the much larger 16Wh BLK22 battery, the same one that powers the company's full-frame mirrorless cameras, like the S1RII. The LX100 II, meanwhile, uses a 7.4Wh model. The difference in longevity should be quite noticeable; the LX100 II is rated to get around 270 shots per charge using the EVF, and 340 using the LCD. The L10, meanwhile, is rated for 410 EVF shots, and 420 ones using the display.
There are other upgrades with the L10, though it's unclear what, if any, of them have to do with its size. Those are features like autofocus recognition for a variety of subjects, crop zoom, open-gate video recording, and more. It also has a fully articulating display, rather than a fixed one, and has an upgraded EVF, fixing what was one of the major complaints with the LX100 II.
There's always the possibility that the L10 isn't bigger because it has to be, but simply because Panasonic chose to make it so. It's almost exactly the same size as Fujifilm's X100 VI a camera that has proven to be slightly popular, so it's possible the company is targeting a similar target audience (which it knows for sure is willing to buy a camera that large). It may be that it started with a different concept for the L10 than it did with the LX100, partially evidenced by the fact that this camera wasn't called the LX100 III.
The size isn't the only change to the camera's build quality. When Panasonic announced the L10, it touted its "signature saffiano leather-textured finish" and "high-quality metal exterior with magnesium alloy front case." Holding the L10, it feels slightly more solid than the LX100 II, and not just because the thicker grip fills out my hand more.
The LX100 II's rubber thumb rest versus the L10's hard plastic one may be one of the biggest differentiators when it comes to feel.
The rest is a bit more of a mixed bag, though. The top plate dials and buttons feel decidedly cheaper and more plastic-y to me. The rear plate buttons aren't especially pleasing to me either, though I appreciate that they're more prominent and easier to press. I also prefer the leatherette wrap on LX100 II to the L10's; it feels grippier and softer to the touch, while the L10's essentially just feels like textured plastic.
When I took the LX100 II out of the box my coworker had shipped it in, I'd been using the L10 for a few days, and I was immediately struck by how much nicer the LX felt. I wasn't the only one with that impression. I handed my wife the LX100 II and then the L10 without any context. Upon receiving the later she immediately said "this one feels cheap." Of course, these are two subjective opinions – I'm sure some people will prefer the L10 – but we both preferred the feel of the older model.
It's not an unalloyed win for the LX100 II, though. I find the L10's aperture ring feels and sounds quite a bit nicer, though I appreciate the noticeable detent when going into and out of 'A' mode on both.
We'll be comparing these two cameras in more detail later, after we finish our initial review of the L10. But given that we have both available, and that the L10's size has become one of its more widely-discussed aspects, we felt it was worth taking the time to show what that difference looks like side-to-side.
When you use DPReview links to buy products, the site may earn a commission.
Photo: Mitchell Clark
Adobe has released its build of Camera Raw that supports the newly-announced Sony a7R VI, which allows us to process the Raw test images of our studio scene and produce Raw conversions from the samples we shot.
Our test scene is designed to simulate a variety of textures, colors, and detail types you'll encounter in the real world. It also has two illumination modes, full even light and low directional light, to see the effect of different lighting conditions.
Image Comparison
This widget is not optimized for RSS feed readers. Click here to open it in a new browser window / tab.
The Raw for our base ISO shot tells a very similar story to the JPEG: the a7R VI captures a bit more detail than its predecessor could, furthering its lead over the 45MP competition. Viewed at comparative sizes, there isn't a noticeable difference in the noise levels at ISO 100.
Thankfully, this remains the case at mid and high ISOs as well, meaning you're not paying a penalty for the increased speed and resolution compared to the a7R V. Given that the line has always been focused on image quality above speed, it's nice to see that the increased flexibility brought by the a7R VI's stacked sensor doesn't make it worse for its core audience.
Now that we can compare the two, we can also see that Sony's JPEG engine is doing a good job of including the details captured by the Raws at base ISO. At higher ISOs, it's deft enough at applying noise reduction to include most of the Raws' detail.
The ability to process Raws also lets us turn our Raws into HDR JPEGs. You can view the original on a device with an HDR-capable display to see the full effect.
Sony a7R VI | Sony FE 24-70mm F2.8 GM II | 24mm | F11 | 1/20 sec | ISO 100 | Processed in ACR Photo: Richard Butler
Be sure to also check out our sample gallery, as we've added a few new shots and reprocessed a few of the original images from it. Many of these edits involved pulling up the shadows after we shot the images to preserve highlights, exploiting this sensor's excellent dynamic range. We also have a pair of images shot at the same exposure in mechanical and e-shutter mode, to demonstrate the difference in dynamic range when the camera is reading from both of its gain steps and when it's not. We'll go into more depth on that topic in a future article.
Sample gallery
This widget is not optimized for RSS feed readers. Click here to open it in a new browser window / tab.