For Canon RF, Fuji X, Nikon Z, Sony E, and MFT mounts
Price: $190
Additional information:
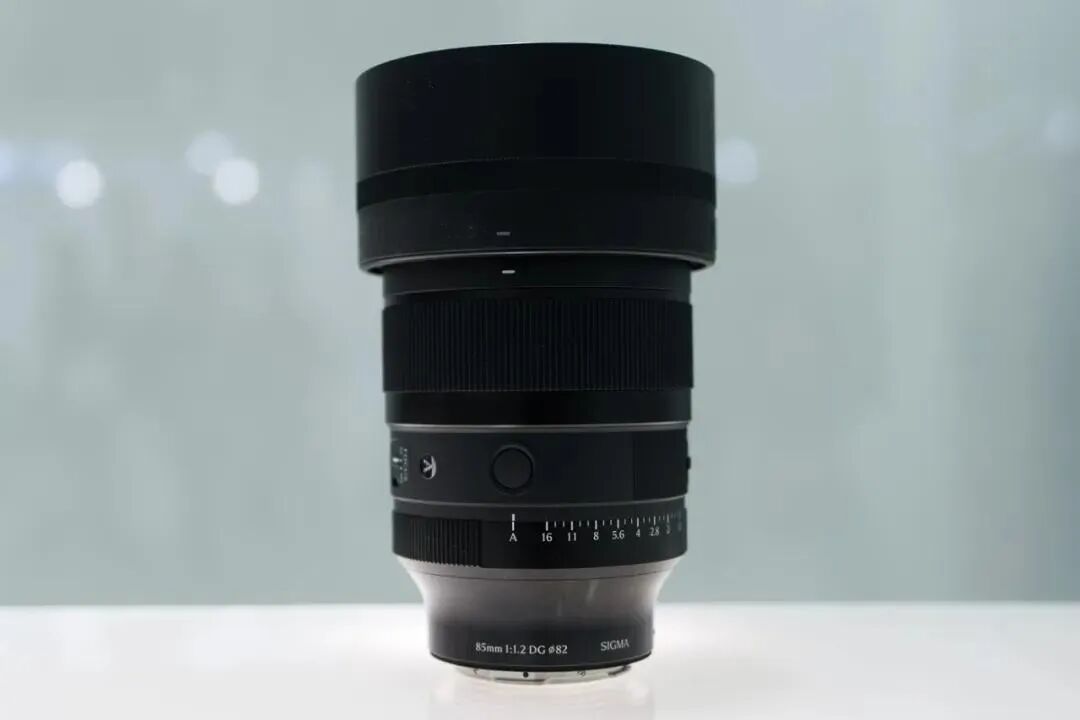
The Twist 28 draws on 19th-century Petzval optical design, which produces a sharp center of focus with a swirling blur effect in the outer portions of the frame. At 28mm, this optical characteristic applies across a wider field of view than prior Twist lenses, which photographers have used to create layered, motion-influenced images in tighter focal lengths.
Panasonic Japan issued a notice that the new Lumix L10 camera “received significantly more pre-orders than anticipated” and customers who pre-order in the future may experience delays in delivery after the release date of June 18th (pre-orders: B&H Photo | WEX Photo | Foto Erhardt):
Notice Regarding Delivery of Digital Camera DC-L10
Thank you for your continued patronage of Panasonic products.
Regarding the LUMIX “DC-L10” digital camera, scheduled for release on June 18th, we have received significantly more pre-orders than anticipated. Therefore, some customers who have already pre-ordered may not receive their product on the release date. Furthermore, customers who pre-order in the future may experience delays in delivery after the release date.
We sincerely apologize for the considerable inconvenience caused to our customers who are eagerly awaiting the product, as well as to all those involved.
We will do our utmost to meet customer expectations and deliver the product as quickly as possible, and we appreciate your understanding.
Xiaomi is gearing up to announce its next T-series phones: the 17T and 17T Pro. Ahead of the launch, the company sent us the new devices so we could check them out. We spent some time specifically shooting the Pro model to see what the camera is like. You can check out the resulting images in the gallery below.
We'll be able to share more details at launch, so stay tuned to hear more on May 28th at 3:00 PM CEST (GMT+2) / 9:00 AM EDT.
Sample Gallery
Please do not reproduce any of these images on a website or any newsletter/magazine without prior permission (see our copyright page). We make the originals available for private users to download to their own machines for personal examination or printing; we do so in good faith, so please don't abuse it.
Sample gallery
This widget is not optimized for RSS feed readers. Click here to open it in a new browser window / tab.
When you use DPReview links to buy products, the site may earn a commission.
Sony a7R VI | Sony FE 100-400mm F4.5 GM OSS | 320mm | F4.5 | 1/800 sec | ISO 800 Photo: Richard Butler
Alongside the a7R VI, Sony launched an ambitious new telephoto lens: the FE 100-400mm F4.5 GM OSS. It has a constant aperture through its range, internal zoom, and a wide selection of controls, making it clear that it's aimed towards professional sports and action photographers.
We were able to shoot it alongside the a7R VI, taking it to a rugby game, a bird sanctuary and the streets of New York City to test it in a variety of scenarios. And, now that we have Raw support for the a7R VI, we can provide a closer look at how the lens performs, without having to worry about what corrections the body is applying and JPEG noise reduction. You can see the results in the gallery below.
Sample Gallery
Please do not reproduce any of these images on a website or any newsletter/magazine without prior permission (see our copyright page). We make the originals available for private users to download to their own machines for personal examination or printing; we do so in good faith, so please don't abuse it.
While we typically process images for a lens sample gallery using Capture One, we used the Sony a7R VI to test the lens, which isn't currently supported by that program. We've reverted to processing these images using ACR. We've worked to use settings similar to our standard C1 recipe while also using the lens' built-in correction profile. No correction for vignetting was applied, and we'll replace the images with ones processed in Capture One when a7R VI support becomes available.
Sample gallery
This widget is not optimized for RSS feed readers. Click here to open it in a new browser window / tab.
The BBC has been sharing footage from its archives on YouTube, and one video caught our attention. The clip is from the Tomorrow's World programme, and it was originally broadcast on BBC One on February 22, 1990. In it, three broadcasters look back at some of the cameras they'd covered in the past that were meant to change photography, and how successful they ended up being.
The segment walks through different types of camera innovations, starting with a digital "video stills" camera that recorded images on floppy disks and Minolta's hybrid camera that supported film and video stills using a very bulky detachable back. They also walk through 3D cameras, autofocus and disposable cameras.
It's a fascinating look back at some of the technology that led to (and, in video stills' case, was eventually supplanted by) the digital cameras we rely on today. There are plenty of modern videos that look back at old technology, but I think it's especially interesting to see footage like this when it was contemporary and looked like it could be the future, as predicted in 1990.
The BBC also shared a separate video that looks back at when cameras first appeared on phones. It was a move by cell phone makers to boost sales, and was considered a bold move that we now know paid off big time. Interestingly, the cameras in those phones were based on technology originally developed for NASA, which you can learn more about in another video we shared.
Aiarty Image Enhancer: Restore Old Photos and Recover Blurry Faces with AI (49% Lifetime License)
Restoring old photos is rarely as simple as increasing sharpness or removing visible damage. Many photographers and families are now digitizing decades-old prints, film negatives, and family albums to preserve them before physical deterioration becomes irreversible. However, scanned family photos and aging film prints often suffer from multiple issues simultaneously, including faded colors, scratches, dust, low-resolution scans, compression artifacts, and facial detail loss accumulated through years of storage, rescanning, and digital compression.
For photographers and archive enthusiasts, the challenge is restoring clarity without destroying the original texture and character of the image. Film grain is often mistaken for digital noise, facial details become overprocessed, and low-quality scans leave limited data for accurate restoration or upscaling.
Traditional workflows still rely heavily on manual Photoshop adjustments such as denoising, retouching, sharpening, scratch removal, and color correction, especially when processing larger photo archives or film scan collections.
AI-assisted restoration tools are increasingly being used to simplify repetitive cleanup tasks within a broader editing workflow. Designed around a restoration-oriented approach rather than one-click filters, Aiarty Image Enhancer combines denoising, deblurring, face recovery, scratch cleanup, upscaling, and color correction into a single workflow pipeline while maintaining more natural-looking results.
Free lifetime upgrades and priority technical support
30-day money-back guarantee
How Aiarty Image Enhancer Fits Into Modern Photo Restoration Workflows
Rather than functioning as a one-click AI filter, Aiarty Image Enhancer is designed around a workflow-oriented approach for restoring old photos, film scans, and archived images while maintaining natural-looking detail.
A video demonstration showing real restoration results can be viewed below:
Its AI denoise and deblur tools help recover clarity from noisy or slightly soft scans without aggressively removing texture. A built-in Strength slider allows more controlled adjustments, which is particularly useful when working with film grain or older portraits where overprocessing can quickly create artificial-looking results.
The latest Face Restoration improvements focus on rebuilding blurred facial areas while preserving realistic skin texture and facial structure. For damaged prints, the integrated AI Eraser can remove dust spots, scratches, stains, fold marks, and other small distractions commonly found in archived photographs.
The software also supports AI upscaling for printing, digital archiving, and recovering low-resolution scans. Upgraded color controls help correct faded tones and yellow aging, while TIFF/DNG export support improves compatibility with Lightroom, Photoshop, and non-destructive editing workflows. Batch processing can further simplify repetitive cleanup work across multiple images or film scans.
A Practical Workflow for Restoring Old Photos
Step 1: Scan the Original Photo Properly
The quality of the restoration process still depends heavily on the original scan. For best results, scan photos at least 300dpi or higher, use TIFF when possible, avoid repeated JPEG compression, and clean the scanner surface before digitizing older prints.
Step 2: Reduce Noise and Upscale the Photo
The first stage of restoring old photos usually focuses on improving image clarity while preserving the original texture of the photo. In Aiarty Image Enhancer, denoising, detail enhancement, and AI upscaling are processed together within the same AI pipeline.
Choose a suitable AI model and upscale factor depending on your old/damaged photo restoration goal. Using x1 applies denoising and enhancement only, while higher upscale settings can help AI upscale photos from low-resolution scans and prepare restored photos for printing or digital archiving without heavily over-smoothing fine details.
Step 3: Restore Facial Details Carefully
Enable Face Restoration and choose the Fidelity mode to better preserve the original facial structure and maintain more realistic-looking results. Rather than aggressively sharpening every facial feature, Aiarty’s Face Restoration focuses on recovering eye clarity, hair detail, facial edges, and natural skin texture while avoiding an over-smoothed or artificial appearance.
Step 4: Remove Scratches, Dust, and Small Damage
Enable the AI Eraser and mask scratches, stains, fold marks, or other distracting elements. Working in smaller sections with a properly adjusted brush size generally produces more natural-looking results than masking large areas at once.
Step 5: Correct Faded Colors and Improve Contrast
With the Color option enabled, you can fine-tune temperature, tint, contrast, exposure, shadows, and other parameters to correct yellow tint, faded contrast, washed-out shadows, and uneven color fading commonly found in older photos, helping restore depth and readability without making the image look overly processed.
Step 6: Export the Restored Photo
Once restoration is complete, choose the output format, DPI, and quality settings before exporting the final image. TIFF and DNG formats are recommended for preserving image quality and maintaining compatibility with Lightroom and Photoshop workflows.
Notes for Getting Better Restoration Results
Old photo restoration results can vary depending on the condition of the original image, so small workflow adjustments often produce better outcomes.
Trying Different AI Models
Each AI model in Aiarty Image Enhancer is optimized for different enhancement scenarios.
More-Detail GAN v3: Enhances detail and sharpness while reducing blur and noise
AIGCsmooth v3: Optimized for AI-generated images and smoother surfaces
Real-Photo v3: Designed for high-quality photos with more natural detail recovery
Experimenting with different AI models can help identify which one produces the most natural-looking old photo restoration for a specific image.
Adjusting the Strength Setting
If the restored image looks slightly waxy or overprocessed, lowering the Strength value can help preserve more natural texture and finer details.
Restoring Before Upscaling
For printing or digital archiving, it is generally recommended to complete denoising and face correction before applying upscaling, as cleaner base images usually produce more stable results.
In some cases, sequential upscaling (such as 2x + 2x) may also preserve detail better than applying a direct 4x upscale in a single pass.
Using Face Restoration Selectively
Face Restoration works best on photos where facial details are still partially visible but have become soft or faded over time. Fidelity mode keeps results closer to the original image, while Rebuild focuses more on reconstructing missing facial details.
Final Thoughts
The photo restoration workflow used in Aiarty Image Enhancer helps streamline the process while preserving more natural-looking detail compared to isolated manual adjustments. By combining cleanup and enhancement into a structured sequence, it reduces repetitive Photoshop work and improves consistency across different image types.
Beyond old photo recovery, the same workflow can also improve compressed social media uploads, AI-generated images, low-quality web photos, and images prepared for posters or large-format printing.
With the anniversary promotion, users can get the Aiarty Image Enhancer Lifetime License for only $74 (up to 52% OFF) with the code “ANNIVERSARY”, including lifetime access, lifetime free updates, and a 30-day money-back guarantee with no hidden fees.
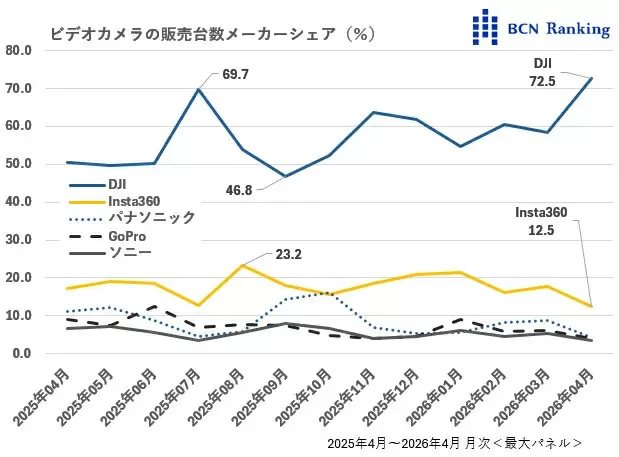
DJI currently holds a whopping 72.5% of the video camera market in Japan (Insta360 is at 12.5%):
DJI’s share of the video camera market has also risen, reaching an astonishing 72.5%, its highest ever. New products have also revitalized the entire video camera market. Sales in April increased significantly, with a 158.1% year-on-year increase in units and a 135.2% increase in sales value. This was revealed by the BCN ranking, which compiles actual sales data from 2,400 electronics retailers and online shops nationwide. (source)
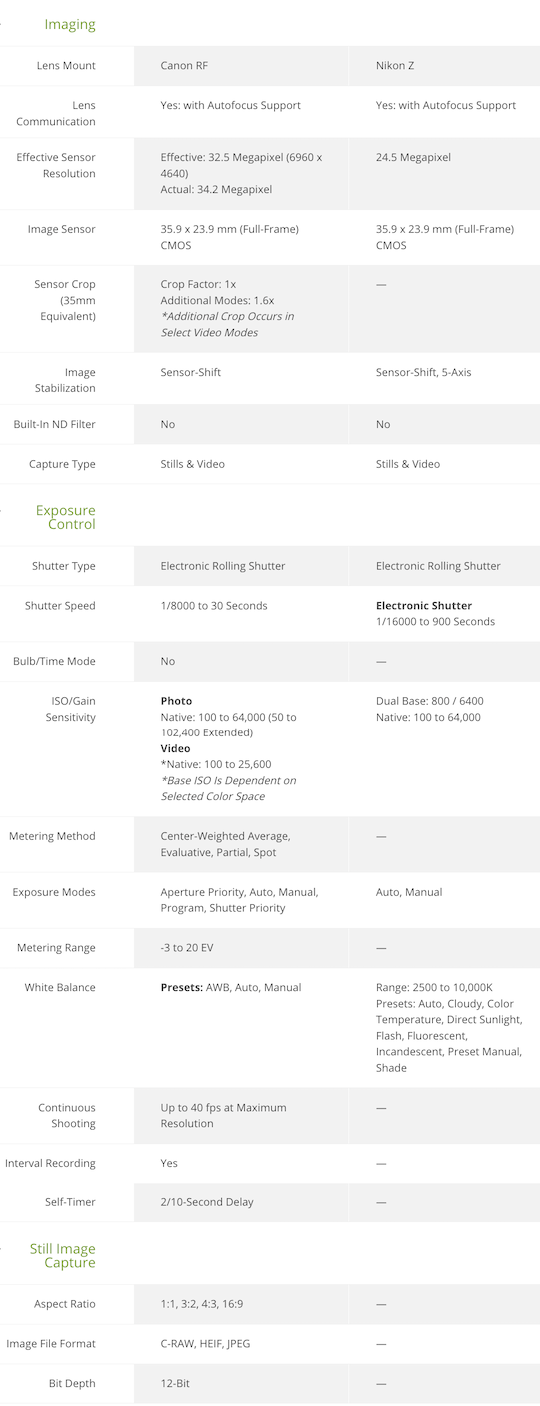
The Canon EOS R6V and Nikon ZR are both compact, full-frame, video-focused mirrorless cameras without an EVF. They prioritize internal RAW recording, strong IBIS, and run-and-gun usability in a small “cinema-style” body rather than traditional stills photography.
The Canon EOS R6V is a higher-resolution hybrid that builds on the R6 III sensor/platform with creator-friendly upgrades like active cooling and open-gate recording. The Nikon ZR is Nikon’s first Z Cinema camera, incorporating RED Digital Cinema technology for RAW recording, color science, and a more cinema-oriented design.
Key specs comparison:
Sensor & Resolution Canon: 32.5 MP full-frame CMOS (≈6960 × 4640). Nikon: 24.5 MP full-frame partially stacked CMOS (same family as Z6 III). Advantage: Canon for stills, cropping, and higher-resolution open-gate video; Nikon for potentially better readout speed/low light with its stacked design.
Processor Canon: DIGIC X. Nikon: EXPEED 7.
Video Capabilities Canon: Up to 7K 60p RAW (Cinema RAW Lite), 7K 30p open-gate (3:2 full sensor height), oversampled 4K 60p, 4K 120p, high-bitrate options, Canon Log 2/3. Active cooling fan for sustained recording without overheating. Nikon: Up to 6K 60p (R3D/NE RAW codec), ProRes RAW options, 4K 120p, 15+ stops dynamic range in Log3G10, N-Log, HLG. Dual base ISO (800/6400). Advantage: Canon for higher resolution and open-gate flexibility (great for vertical/social content); Nikon for industry-standard RED RAW workflow and color science.
Image Stabilization Both: 7.5 stops IBIS (Canon may reach 8.5 with compatible RF lenses via coordinated control). Tie: Excellent for both.
Autofocus Canon: Dual Pixel CMOS AF II with excellent subject detection (people, animals, vehicles). Nikon: Advanced subject detection (people, animals, vehicles, planes) with auto mode. Slight edge: Canon Dual Pixel is often praised for reliability in hybrid shooting, but Nikon is very capable.
Viewfinder: Neither has a built-in EVF (both are video-first designs with optional external EVF support via hot shoe).
Audio Canon: Standard high-quality inputs. Nikon: Internal 32-bit float recording (a standout feature for clean audio without clipping worries). Advantage: Nikon.
Storage Canon: CFexpress Type B + SD UHS-II (full-size slots). Nikon: CFexpress Type B + microSD. Advantage: Canon for easier media handling.
Build & Ergonomics Both are compact and lightweight (Canon ≈688g with battery; Nikon ≈630g or lighter). Canon has a more traditional hybrid grip; Nikon has a blockier cinema-style body. Both have weather sealing and full-size HDMI on Canon (Nikon uses micro variants).
Stills Performance Canon: Stronger – up to 40 fps electronic burst, better resolution for prints/cropping. Nikon: Capable but more video-prioritized (electronic shutter only).
Battery & Power Canon: LP-E6P. Nikon: Standard Z battery. Real-world runtime depends heavily on cooling, codec, and frame rate.
Who Should Buy Which?
Choose the Canon EOS R6V if:
You want higher resolution stills + video hybrid capabilities.
Open-gate 7K recording and active cooling for long takes are priorities.
Choose the Nikon ZR if:
You value RED RAW workflow, color science, and 32-bit float audio for professional post-production.
A larger, brighter 4″ screen and compact cinema form factor matter more.
Overall: These are very close competitors aimed at similar users (creators who want full-frame RAW in a small body). The Canon edges out in resolution, cooling, and hybrid versatility; the Nikon stands out with its screen, audio innovation, and RED-backed RAW/color pipeline.
When you use DPReview links to buy products, the site may earn a commission.
We've spent the last week and a bit testing the Panasonic L10 in earnest, as it's not every day that we get a new compact camera aimed at enthusiast photographers. Abby, Dale and Mitchell sat down to discuss the camera, what it could mean for the industry and more, in the video you can see above.
If you want to take a more in-depth look at the L10, you can check our our hands-on article, our size comparison of it and the LX100 II and our initial sample gallery. And stay tuned, because our initial review of it is coming very soon.
The prompt for the photo chain is a feast for the eyes.
Photo: Dale Baskin
In case you missed it, DPReview is gearing up for our biggest redesign in 25 years. As part of that transition, we've had to temporarily pause our long-running challenge system. Despite that, we don't want to miss out on seeing all of your incredible photographs.
To help provide an outlet during this pause, and in response to a recent article on collaboration in photography, we've launched a collaborative photo chain in our forums. The prompt is simple: share one photo (new or old) that responds directly to any visual element in the most recent image.
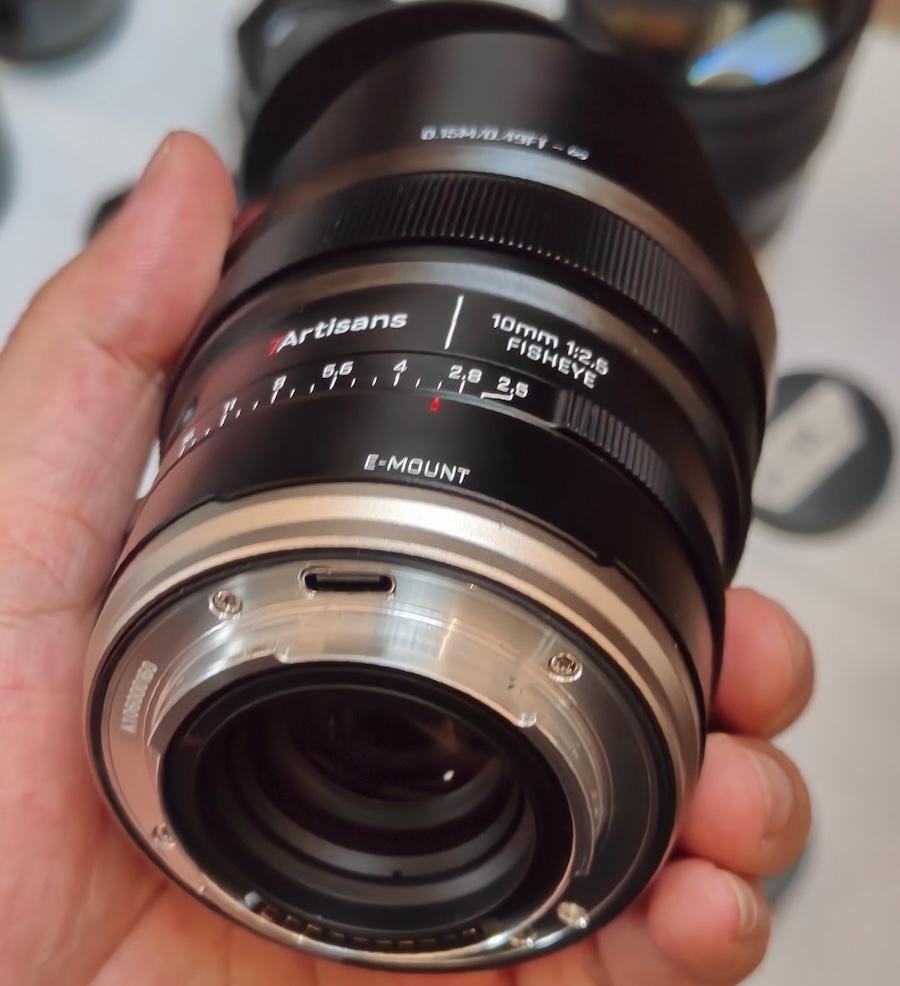
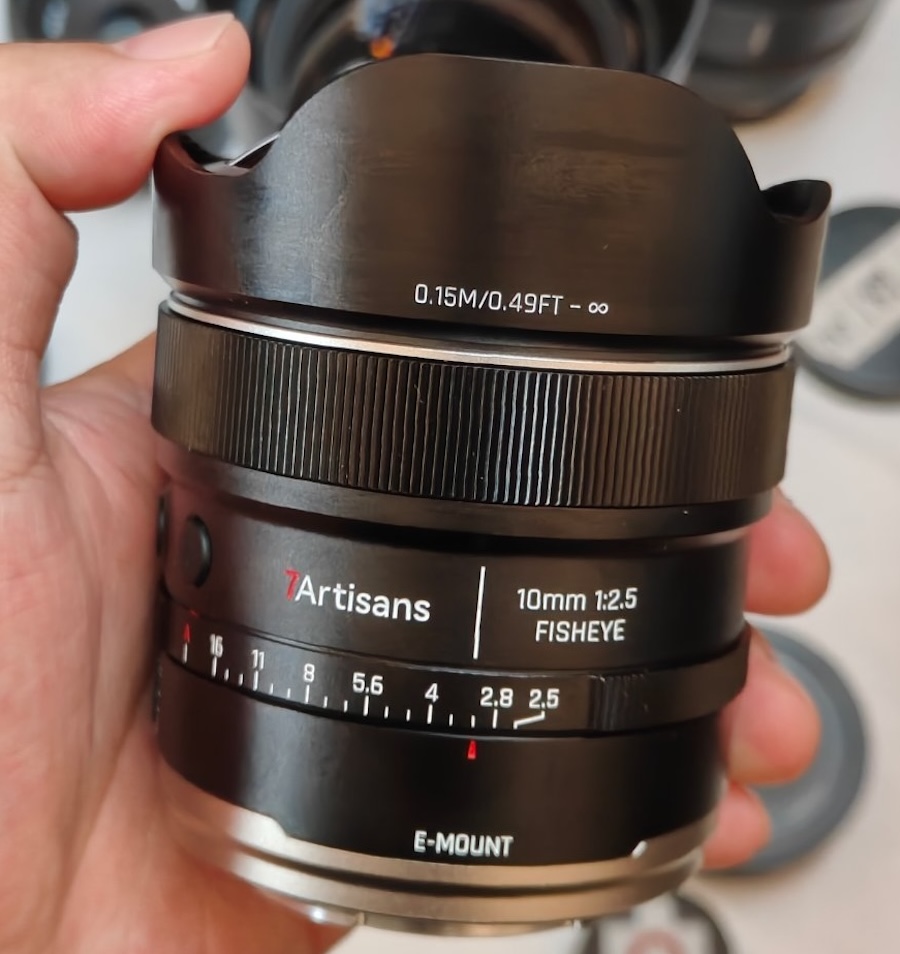
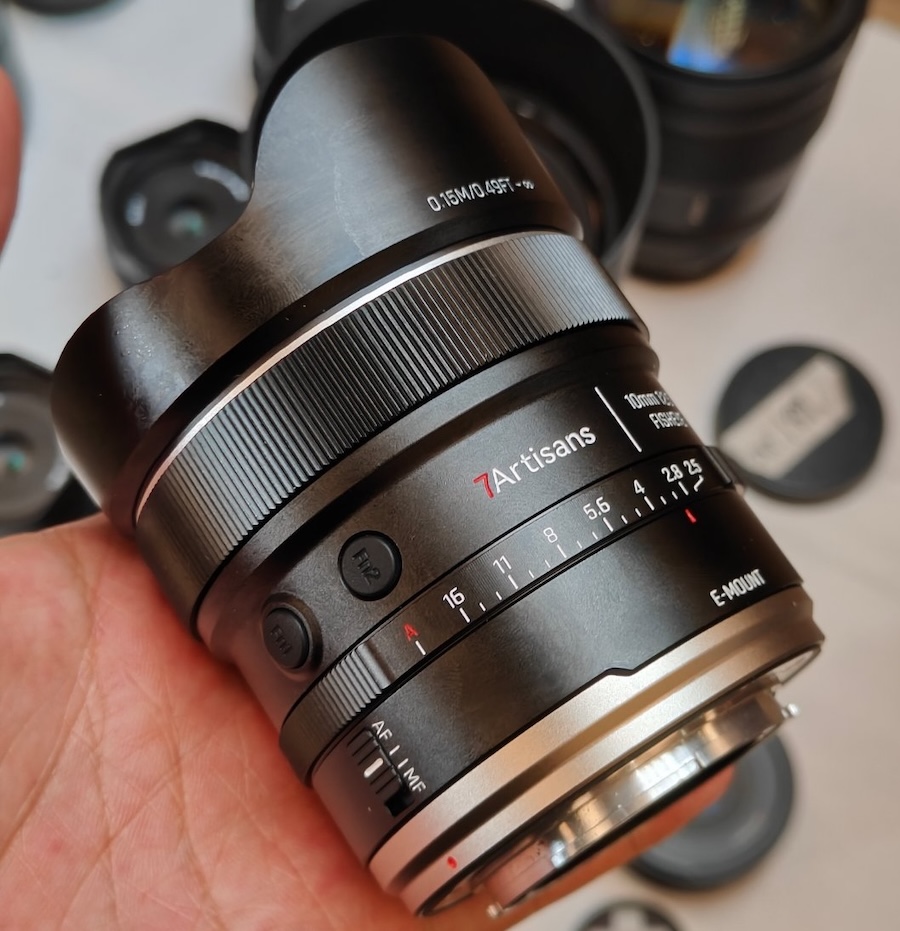
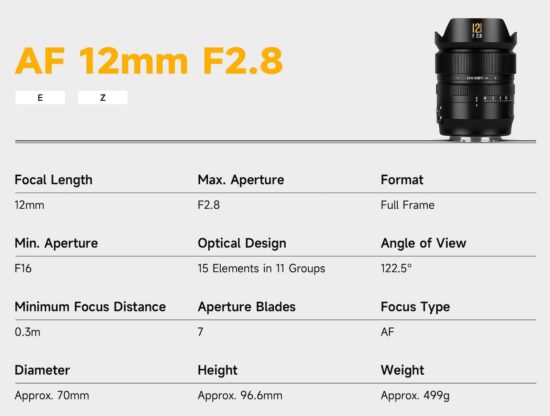
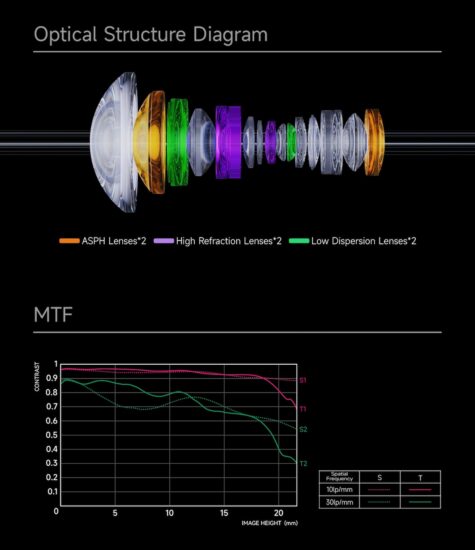
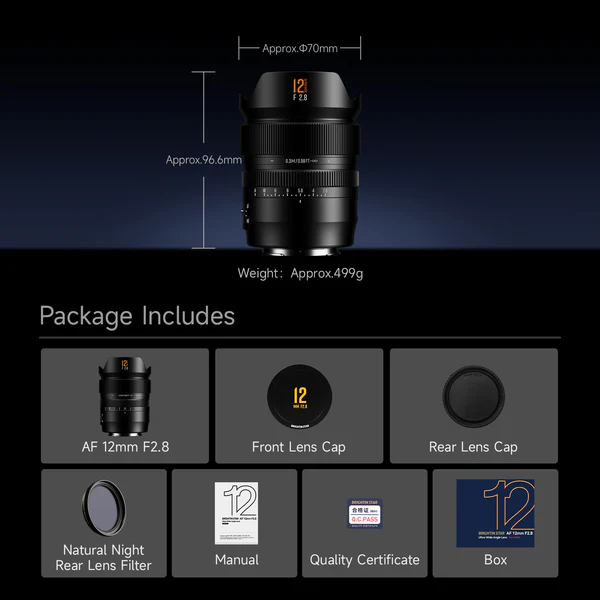
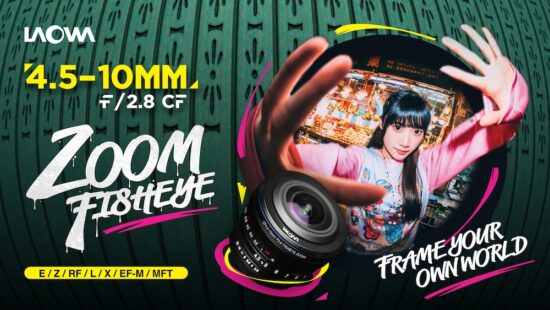
Refined Optical Excellence: 15 elements in 11 groups, featuring HRI, ED (HOYA), and ASPH lenses, with advanced IMC coating for vivid, high-contrast rendering.
2.12mm Ultra-Wide: 122.5° field of view for landscapes, architecture, interiors, and astrophotography.
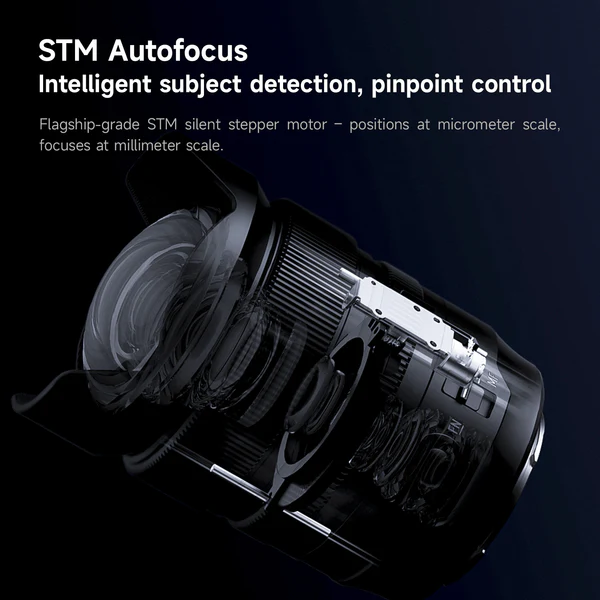
Fast STM Autofocus: Next-gen STM motor delivers fast, precise, near-silent autofocus in milliseconds.
Near-Zero Distortion: Aspherical elements ensure accurate geometry and edge-to-edge sharpness.
Intuitive Controls: AF/MF switch and customizable FN button for seamless operation.
Durable Construction: Integrated petal hood reduces flare, with rear sealing for dust and moisture resistance.
This was from one of my most recent collaborative projects, a double exposure series with a friend. Photo: Myra Holt and Abby Ferguson
If you're anything like me, photography most often feels like a solo endeavor. I typically go out to take photographs on my own. I edit alone. And, at least these days, I create images without any feedback or different perspectives.
Admittedly, all of that isolation is somewhat done on purpose. Photography for me is frequently quite personal. It can be a time for me to reflect, decompress or even work through things. Plus, as an introvert, doing things alone comes naturally.
Photography will always have a solitary side, since for many of us, that's part of the appeal. But I've been realizing that some of the most meaningful growth in my own work has come when I've let other people into the process. Thankfully, collaboration can take many forms and works well even for an introvert like me.
The number of ways to collaborate is essentially endless, so I won't be providing an exhaustive list of the possibilities here. But I will share some of the things that I have experience with and that have been meaningful for my practice.
Collaborative projects
When most people think about collaboration in photography, they likely think about projects worked on with someone else. I've previously written about using photo projects to find renewed creative motivation, but those were largely personal projects, not collaborative ones. Projects done in collaboration with others can also be very helpful for finding your creative voice again, and lead to some really cool work.
Double exposures
Two images from different rolls of our double exposure project. Photos: Myra Holt and Abby Ferguson
One ongoing collaboration I've been tackling lately is a double exposure project with a friend from graduate school. We live in different states, but we wanted a way to work on something together, so we schemed this up. We each shoot a roll of film, mail it to the other person, and shoot the roll of film again to create double exposures.
Thus far, the project has largely been about troubleshooting to get better results, so we've purposely kept the subject matter completely open. It's something we hope to narrow down and do something more specific with at some point, but for now, it's mostly just playing around. It's been a fun way to stay connected to a friend and a good excuse to get out with my camera (which I need to do, since I'm overdue in shooting a roll that she sent me).
Of course, this collaborative project requires access to film, film cameras and the means to develop and scan negatives. But the unpredictable results make it a fun way to work with someone, and it's an opportunity to have some fun with photography.
Photo challenges
One of the prompts during the photo challenge project was "fear." While I don't think this image does a perfect job of conveying that, it did get me to dust off some skills I hadn't used in a really long time, but that I really enjoy. Photo: Abby Ferguson
Another project I worked on for a while was a challenge project with a friend. Each week, we would alternate who picked the topic, and then we had to make an image with that in mind. The topics varied from broad, like black and white, to somewhat more specific, such as fear. We would typically each take more than one, sharing our top three picks at the end of the week before a new topic was selected.
When I started the project, I had been in a bit of a rut with my photography. The weekly challenge was a good way to flex my creative skills again. It pushed me to think outside the box for the first time in a while, which was refreshing and motivating. In this case, collaboration was a method for accountability, helping me to pick up my camera for something other than work on a more regular basis. I like the images I made, but it was more about the process and collaborative act than anything else.
There are plenty of variations on this type of idea, too. My local photo group is currently gearing up for a bingo challenge for our next photo walk, with a board created collaboratively as well. There are also group color hunting challenges (which the DPReview team tackled in Tokyo this year), and more. I've also seen collaborative editing ideas, from as simple as editing each other's photos to creating composite photos with elements from different people.
Shows as collaboration
Last fall, a friend put together a collaborative show to raise money for a wildlife area near us. Photo: Anthony Verdi
While not an area everyone will have interest in, group shows can be an excellent form of collaboration. I'm currently scheming up a show with two of my colleagues at the school I teach at, and last fall I participated in a group show with friends dedicated to wildlife and nature in our state.
A show could be based around a theme or simply an opportunity to show your work together, whatever it may be of or about. It could be in a formal gallery space, or maybe just the local coffee shop. No matter what, the process of planning and coordinating the show is a fantastic way to connect with others.
Seeing your images next to those created by someone else can give you a fresh perspective on your work and give you ideas for where to take it next. Plus, it's always nice to see your photographs up on the wall in some form.
Feedback as collaboration
Collaboration doesn't have to mean making something together, either. While feedback may not be the first thing people think of when it comes to collaboration, it can be a very useful form of it. Inviting someone else into the process, even after the photographs are made, can change how you understand the work and where you take it next.
Formal critiques
I have a somewhat unique experience in that I went to school specifically for photography, spanning both undergraduate and graduate degrees. As a result, I had 7.5 years of getting regular feedback on my work via critiques. In undergrad, every single project was critiqued, which meant one every couple of weeks.
"Those critiques could be difficult, but they forced me to consider how other people were reading my images."
Graduate school was less structured, since there wasn't a definitive end to projects, but there were still regular and formal group critiques. Those critiques could be difficult, but they also forced me to consider how other people were reading my images, not just what I intended when I made them.
School isn't the only place formal critiques can happen, either, so you're not out of luck if you don't go to school for photography. Some photography groups will host critiques, either in person or virtually, so it's worth checking locally. Photo conferences and expos will also often hold portfolio reviews or critiques, giving you the chance to receive feedback from experienced reviewers or significant names in the industry.
Informal feedback
My studio space in graduate school allowed for lots of impromptu discussions about my work. Photo: Abby Ferguson
While the structured critiques in graduate school were worthwhile, even better were the impromptu critiques that happened when a classmate would pop into my studio to say hi and we would end up discussing my work. They inevitably involved a mix of straightforward feedback and brainstorming on what could work better for a given piece or series.
Those casual conversations were often just as valuable as structured critiques, if not more so. They were more conversational and often served as a time for problem-solving rather than simply being told something isn't working, as can happen in a critique. They also happened in the middle of making the work, so they could help me think through problems before a project felt finished or fixed. That often meant I was more open to feedback, too.
Informal feedback is often easier to recreate outside of school than a structured critique. It can be as simple as sending a photograph to someone you trust to ask what they think or how they would suggest improving it. Or maybe inviting a friend over to flip through some of your recent images on a laptop to see if they have any suggestions. It can also be as simple as a conversation about something you're stuck on, either technically or visually. Or, you can even head to our forums to get input from our incredible community.
Learning to be open to feedback
Since leaving school, I haven’t sought out feedback nearly as much as I should, but I know how useful it can be. Formal and informal critiques have led to significant breakthroughs in my work, leading me to produce projects I'm still proud of to this day.
"If you find yourself in a position to have your work critiqued, be open to it."
If you find yourself in a position to have your work critiqued, be open to it. It can be scary, especially since not everyone knows how to deliver feedback well, but getting a glimpse into how others perceive your work can be a valuable opportunity to grow.
At the same time, staying open doesn't mean taking every comment as truth or instruction. Feedback is information, not a command. It also helps to remember that, no matter how personal the work is, the feedback is a comment on the photographs, not you as a person.
Start small
Collaboration doesn't have to feel like a chore or an overly structured project. It can be as casual or simple as trading prompts with a friend, asking someone you trust to look at a series or single image, or putting your work in conversation with another photographer's. For those of us used to working alone, even small forms of collaboration can be enough to shake something loose and open up renewed creativity and motivation.
If you have collaborated with others in meaningful ways, share those in the comments! It might give someone else an idea to try out as well. We've also started an easy collaborative project in our forums, so head over there to participate!
Zeiss is teasing “The next major advancement in lens technology”. The announcement will happen on June 2nd and will be “New horizon in Zeiss lens technology.”
The previously reported Venus Optics Laowa 4.5-10mm f/2.8 CF APS-C fisheye zoom lens for E/Z/RF/L/X/EF-M/MFT mounts has now been officially released. The price is $399: