Photography community leaders or educators looking to host events this year have new support available thanks to AI-based culling and editing software company Aftershoot. The company announced the second year of its Create Together Fund, a grant program that provides funding support for photography events and communities worldwide. Submissions for funding are open through February 28.
The Aftershoot Creat Together Fund is open to professional photographers, photography educators, and emerging community leaders. Workshops, meetups, photowalks and styled shoots are all eligible for funding support. To apply for Cohort 2 visit the Create Together Fund website for more details and to fill out an application.
“Our goal has always been to support photographers – not just in their post-production workflow, but in their growth, connections, and creative journey,” said Harshit Dwivedi, Founder of Aftershoot. “We saw how impactful Cohort 1 was, and we can’t wait to help even more photographers bring their community-driven ideas to life with Cohort 2.”
Last year, Aftershoot supported 27 community leaders hosting photography events across 15 cities in 4 countries. Those events brought together more than 600 photographers as part of Cohort 1 of the Create Together Fund. From photo walks to workshops, the events offered in-person connection and learning opportunities.
"The experience of hosting an event as part of Cohort 1 was incredible. Organizing a wedding-styled photoshoot for photographers had been a long-time goal of mine, and the Aftershoot Create Together Fund gave me the support I needed to turn that vision into reality. It allowed photographers to connect, learn, and grow together, and I’m grateful to have been part of it!" said Lindsey Birchfield, wedding and event photographer from Scottsdale, Arizona, USA.
This year, with Cohort 2, Aftershoot is even more ambitious and is expanding the program with $1M in total funding. By the end of 2025, it hopes to sponsor 750 events in the United States, Canada, the UK, Europe, Brazil, Australia and New Zealand. Funding depends on the event size and scope, with grants of $1000 for events with 15-25 attendees or $2000 for 25-50 attendees. Grants of $5000 are also possible for larger events, depending on the proposal.
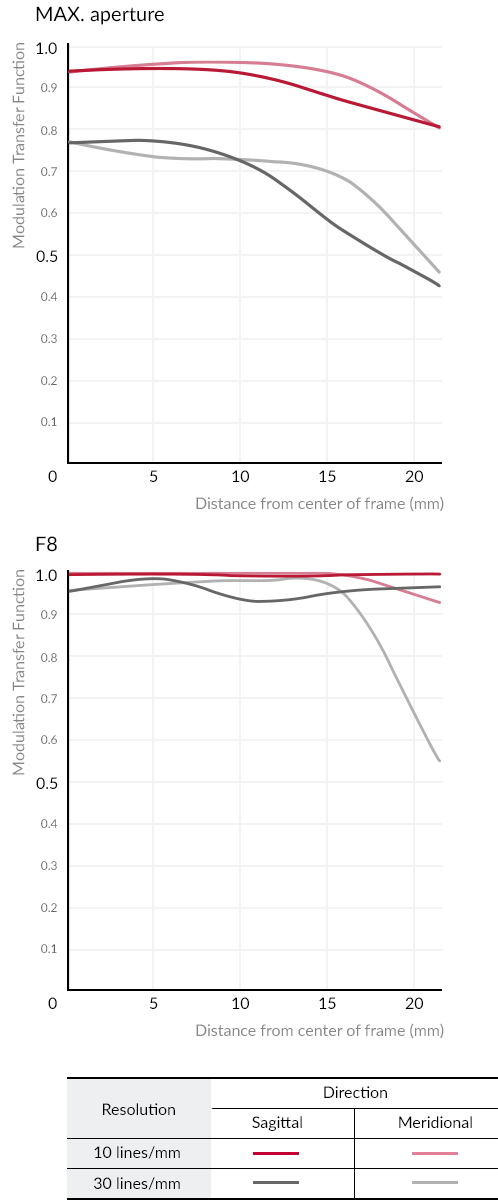
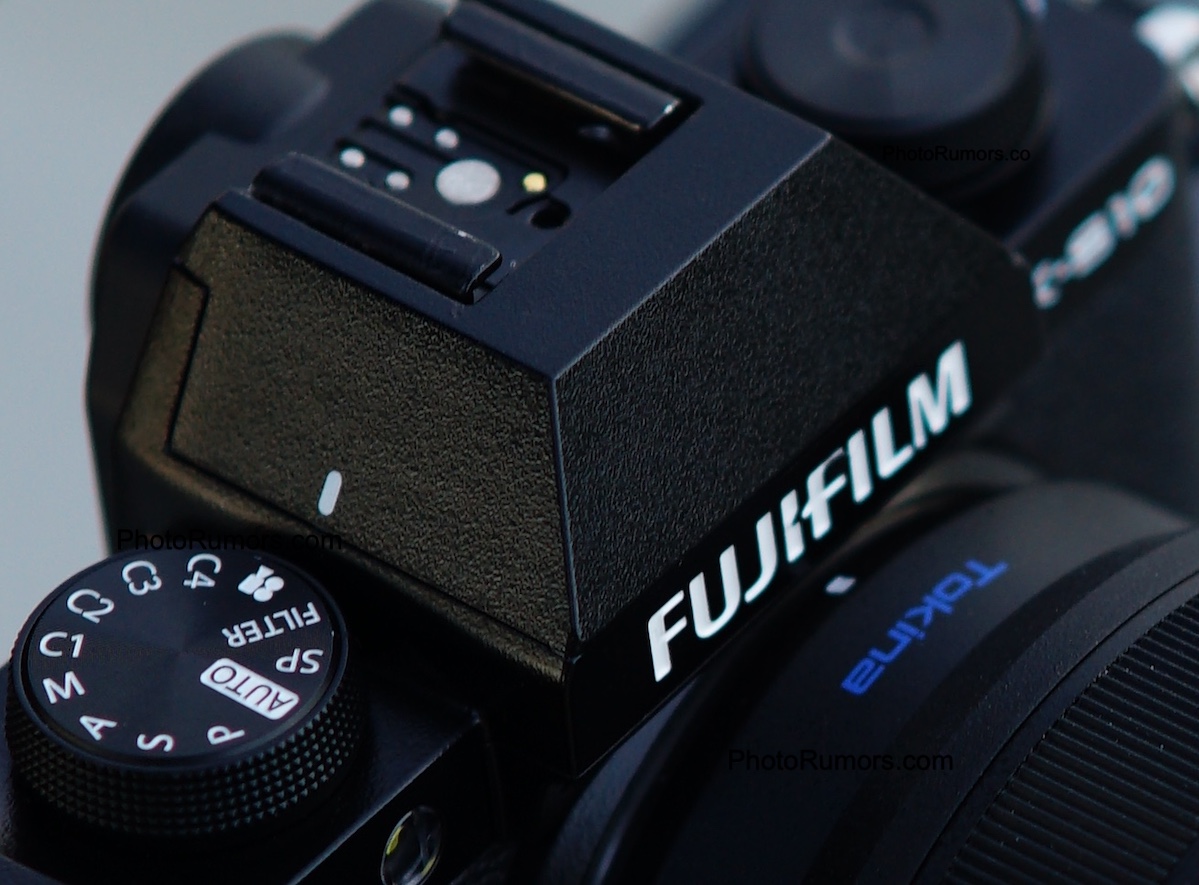
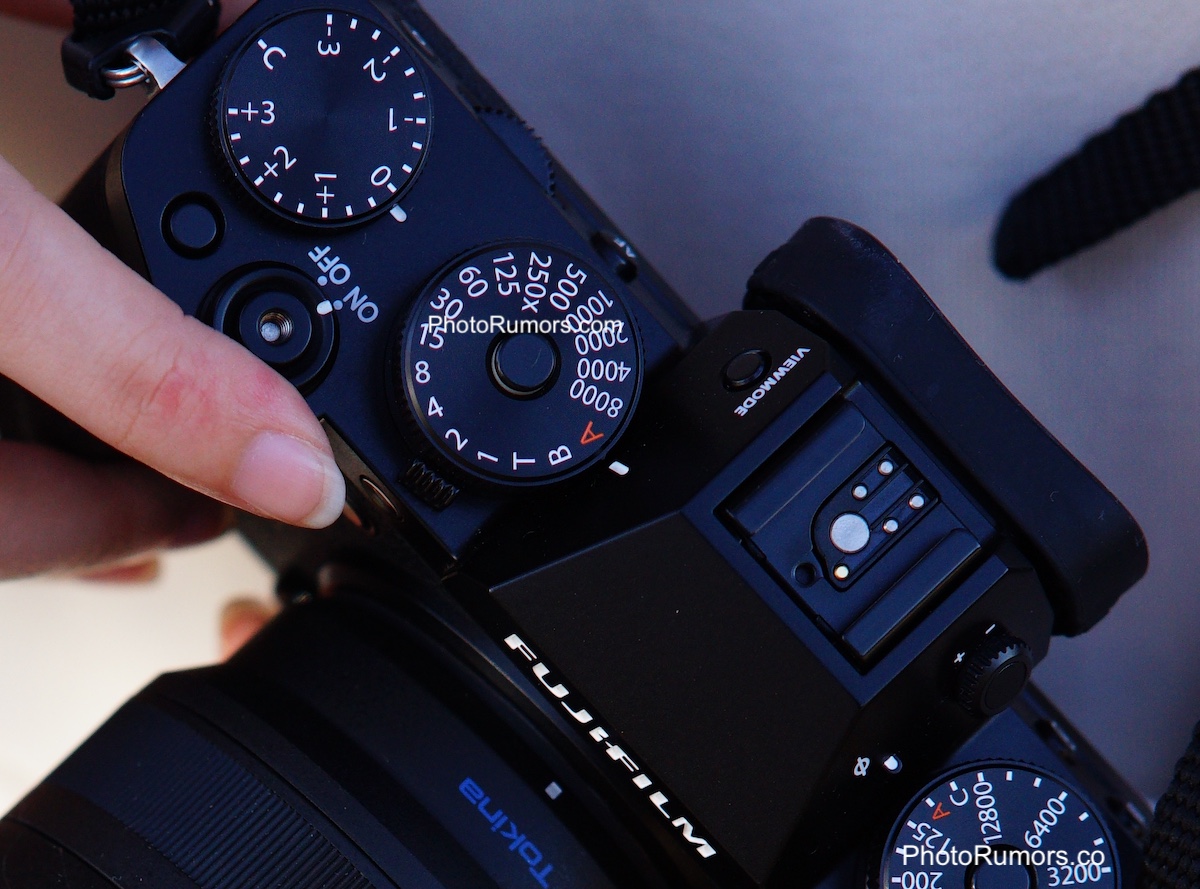
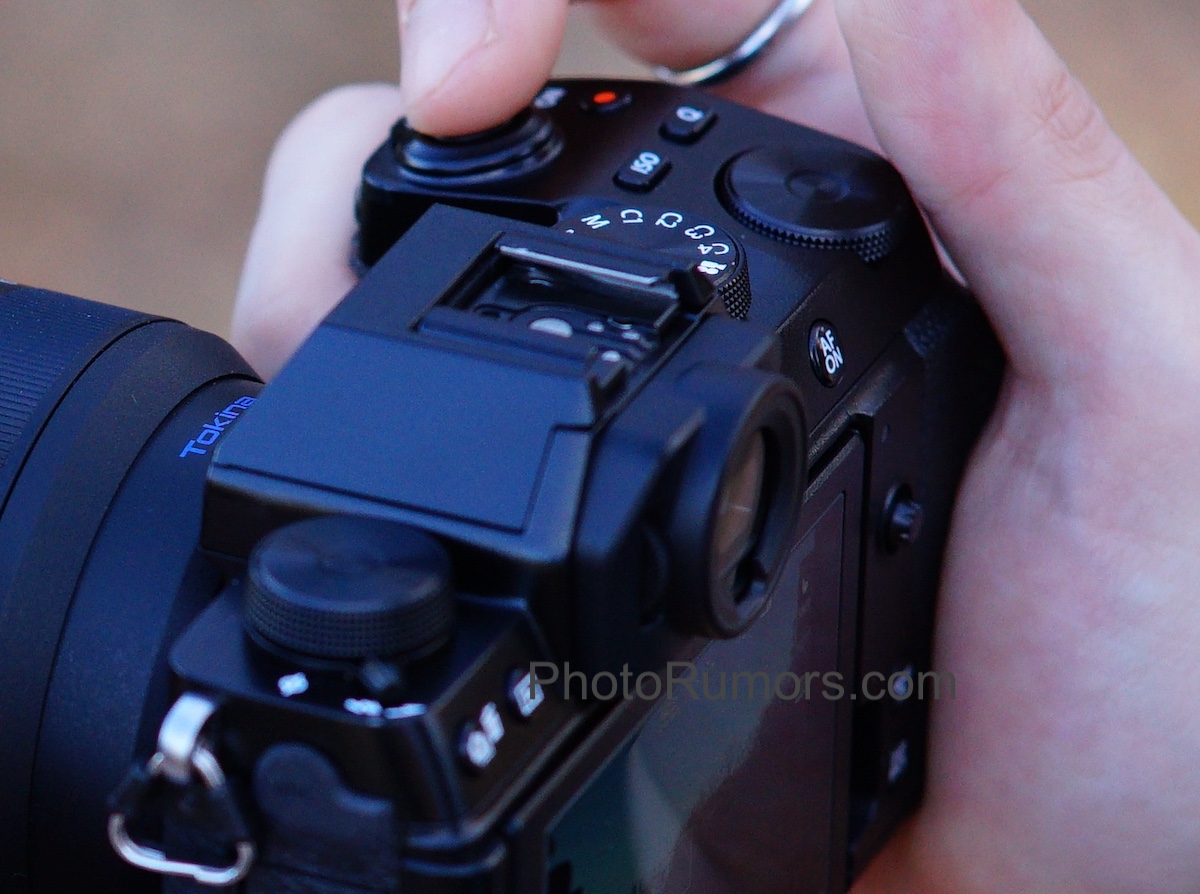
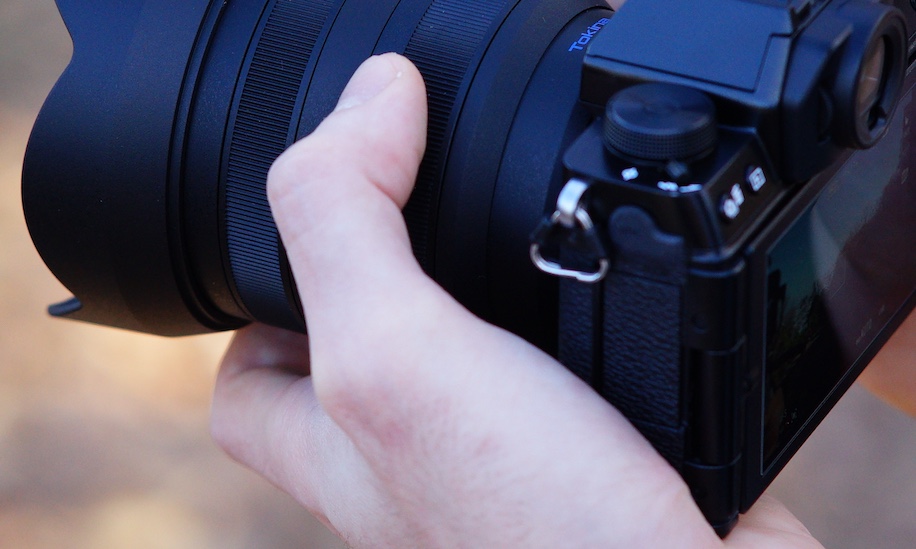
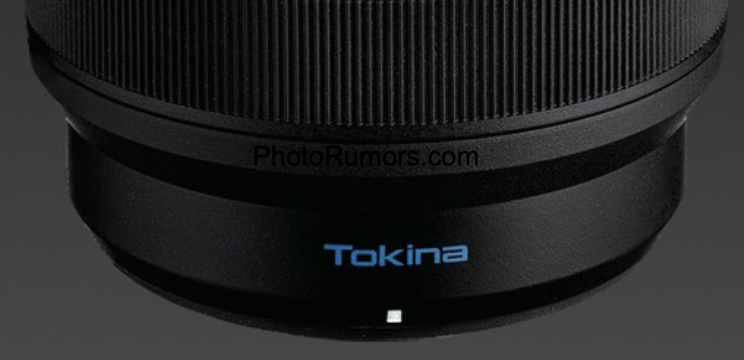
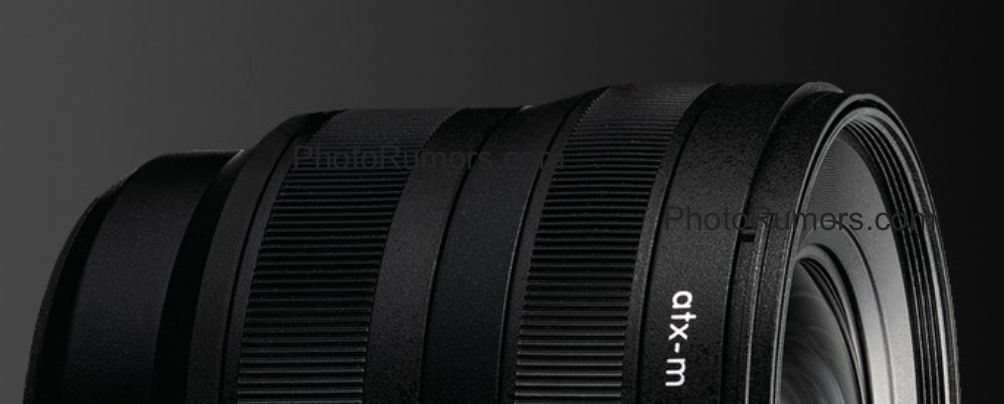
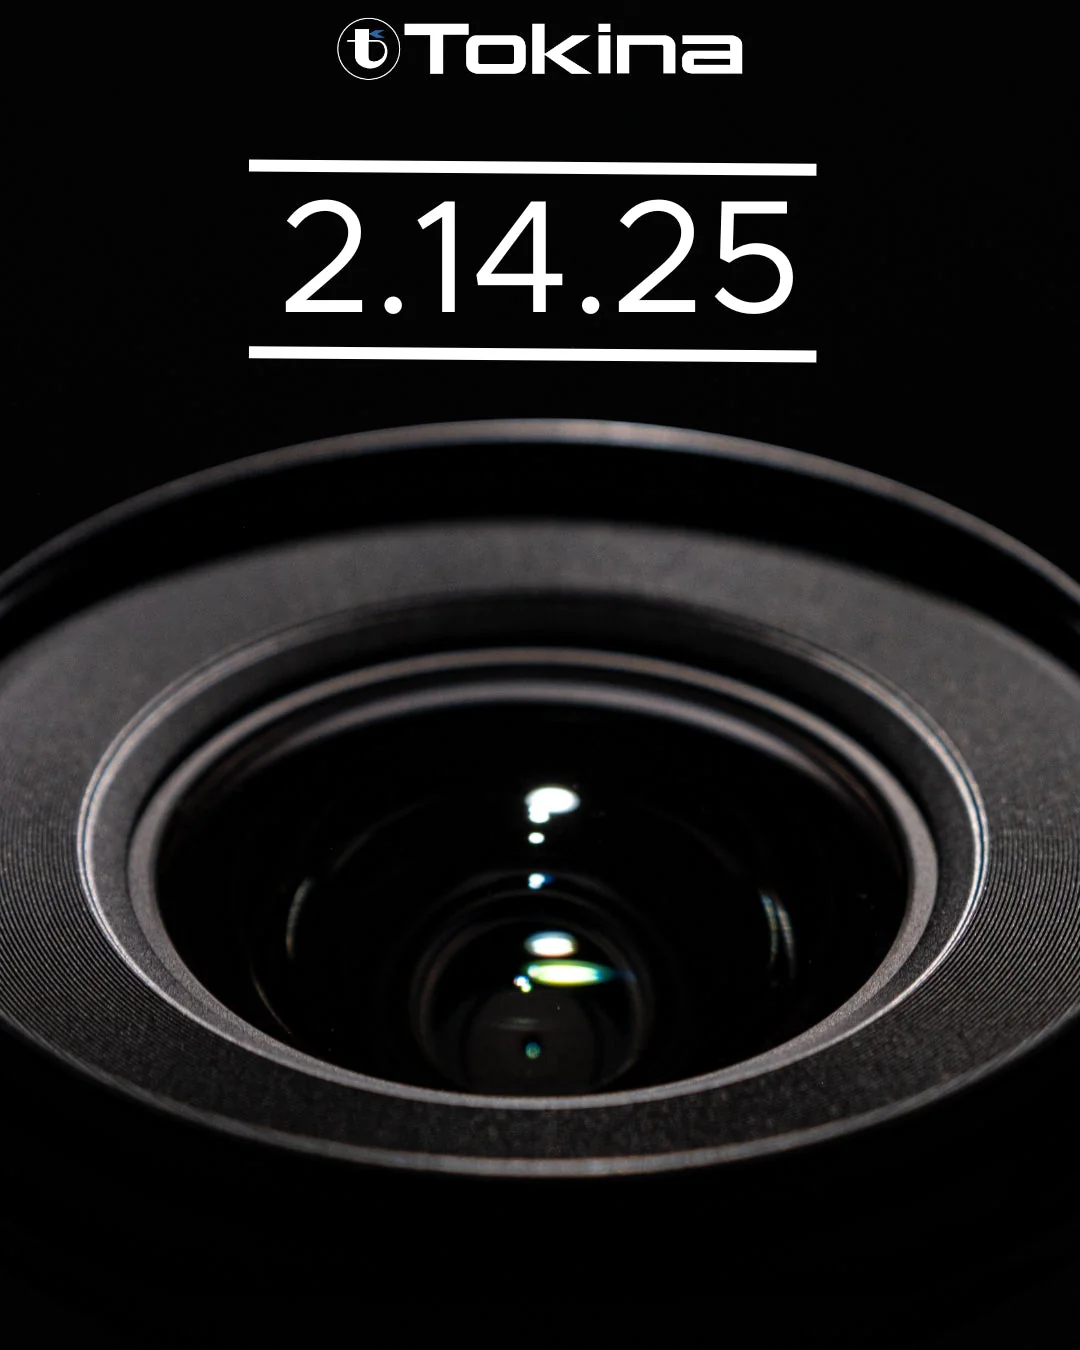
There is a new teaser - the upcoming lens (which seems to be a Fuji X version of the current 11-18mm f/2.8 ATX-M lens) will be officially announced on February 14th:
YouTuber Jack Joy, AKA Graindead has a question: does anyone have a manual for the 3DS-EXP 645, made by Sakai Special Camera?
If you've never heard of it, you're not alone. According to Joy, it's a six-lens camera that takes medium format 120 film, and is seemingly designed to produce lenticular images that give a 3D or animated effect when viewed at different angles. It also appears to be lost to history or, at least, the Internet's recollection of it. Joy says he wasn't able to find a manual for it – or any real information at all – via Google.
Despite that, he was able to make a decent attempt at taking pictures with it, a process he documents in an entertaining manner. Working off somewhat contradictory instructions written on the back of another copy of the camera that he found on an online auction site, he managed to produce a few series of images with the 3DS-EXP 645.
The 3DS-EXP 645 is many things. Compact is not one of them.
Photo: Graindead
The process wasn't without speedbumps; like many old film cameras, the 3DS-EXP has gained a few quirks as it's aged, and finding vital parts for it is obviously not really an option. It was also expensive, given that each press of the shutter uses five frames of quite spendy film – assuming the camera has decided to cooperate. The sixth lens, obviously, is used for the viewfinder.
Despite his success, Joy still ends his video with a call for more information on the 3DS-EXP 645. The video's comments do shed a bit more light on the subject; user klohto claims it's a rebranded ImageTech PRO645, and says it was made in 1992, and originally sold for "12.5k," though they don't specify a currency. They also say the lens system was used in the Seagull 3DMagic Pro 645. However, both cameras are similarly obscure on the internet.
We figured that, given our audience, there's a chance one of you may have some information on this system that hasn't ever been digitized. If so, we'd love to hear from you – have you ever used a 3DS-EXP 645, or one of its relatives? Do you still have one, or the manual for one? Let us know in the comments or on the fourms.
A photographer has gone to new lengths (or, in this case, depths) to create a unique photograph. Canadian photographer Steve Haining and model Ciara Antoski recently set a Guinness World Record for the deepest underwater model photoshoot. The shoot took place at 49.8 meters (163.4 feet) on a shipwreck near Boca Raton, Florida, producing otherworldly images.
This record-winning photo wasn't the pairs' first foray into underwater photography or setting Guinness World Records. They previously set a record for the same category in July 2023 for a shoot at 9.7 meters (32 feet) in Tobermory, Ontario. That project wasn't specifically to set a record, and mostly resulted from a joke about how to conduct a photo shoot safely during COVID-19 lockdowns. They quickly followed it up with another record for an underwater photo shoot at nearly 30 meters (98 feet) in December 2023.
Photo: Steve Haining
The latest record-breaking shoot was, of course, more challenging than their previous ones. Haining spent time researching the location and looking at image references ahead of time but said that, given the depth, there weren't many photos available. As a result, he opted for a recon dive to get a better sense of the location. “Once I had a visual look of the location, I could frame the composition, relay the shoot plan to the team, and get the lighting where it needed to be in order to get the shots I wanted,” he told My Modern Met.
Haining says it took roughly a year of planning between the creative team and their safety diver, Ray. Given how physically demanding it would be, Antoski spent a year training specifically for the shoot. After all, instead of a warm, streamlined wetsuit, she was wearing a flowing dress and didn't have constant access to oxygen. Communicating and moving underwater aren't simple, either, adding even more complexity once at the shipwreck.
Of course, things rarely go to plan, and that was the case here. The team dealt with fishermen attracting larger wildlife, tank malfunctions and even a jellyfish sting. According to Haining, the shoot took 52 minutes, with 15 minutes at the bottom, five more minutes than needed for the record. All in all, it shows a true dedication to craft, on the part of the entire team.
According to Leica, Jake Burton Carpenter, the founder of Burton Snowboards, used Leica cameras for years before passing away in 2019.
In addition to the unique blue design, the Sofort 2 Burton Edition also includes the Burton logo on the camera's top plate and ships with a custom Burton camera bag.
Unlike instant cameras that simply capture images on instant film, the Sofort 2 is a 4.9MP compact camera/printer hybrid. It uses a tiny Type 1/5 (2.9x2.2mm) CMOS sensor and a 2.4mm F2 lens that gives a 28mm equiv angle of view. It's compatible with Fujifilm's Instax Mini film.
Image: Leica
The camera captures images digitally, lets users decide which ones they want to print, and allows users to share photos to the Leica Fotos smartphone app. The Fotos app can also send any image in a smartphone's photo library to the camera for printing.
The Leica Sofort 2 Burton Edition is available for an eye-watering price of $599, a $200 premium over the standard Sofort 2 model, or €595 in Europe, including VAT.
I've only had the MS4 for a few months, but it's quickly become one of my favorite accessories by making my job of carrying around and using a wide variety of cameras that much easier. Much of that comes down to its star feature: the generically named Quick Detach, or QD, system. Most photographers will be familiar with Peak Design's circular anchors, which hang off your camera and let you quickly and easily attach and detach various straps without dropping your camera (usually).
The MS4 has two QD connectors: one attaches to your camera, while the other can either be locked into the buckle above the primary one or attached to a secondary point on your camera.
With QD gear, it's even easier: you press a button, slot it into a socket, and four metal balls keep the strap securely connected. Even better, it allows your gear to rotate freely, making it much easier to manipulate into whatever shooting position you need without detaching it from the strap.
Looking at the mechanism, it's unnervingly easy to imagine an errant button press sending thousands of dollars of gear crashing to the ground. However, I don't think that's likely. The D-ring design makes it so it'd be really difficult for the release button to get pressed while the strap is loaded. The MS4 also has two QD connectors, so if you want to connect it to two different points on your camera, you can, provided your camera has two QD mounting points – more on that in a moment.
The strap does a decent job of covering up the eject button.
It's also worth noting that the QD system was initially invented to hold rifles, which are perhaps the one thing you'd want to drop less than a camera. It's been in use for over a decade in that world and, so far, seems to be doing alright. Do I still keep one hand on the camera while I'm using this strap? Usually, yes, but that may fade with time, provided it continues to not drop my camera.
Beyond the convenience factor of the QD system, this strap is just plain comfortable, even when I'm carting around a heavy full-frame 70-200 F2.8 lens and body combo. It has several adjustment points that have let me carry my camera exactly where I want to, and the wide webbing doesn't dig into my shoulder despite the complete lack of padding. I'd probably miss some foam if I routinely carried around the largest super-telephotos, but that's a bridge I'll cross if I ever get to it.
We've bought one accessory, yes, but how about a second accessory?
"But Mitchell," I hear you ask. "Cameras don't have QD mounting points. How do you connect this strap to them?" Excellent question. Like any good accessory, this strap has begat more accessories. Alongside it, I bought this QD quick-release plate from Leofoto, which screws into standard 1/4"-20 threads and has a QD socket on the bottom. Two things I love about it beyond the fact that it lets me connect the MS4 to a camera:
The screw has a D-ring which lets me get it super secure by hand without needing a screwdriver, coin or hex key.
It can mount to my Peak Design Travel Tripod, so I can go straight from strap to tripod with two button presses.
This isn't the only option for adding a QD port to your camera; several cages now have them built in. But as someone who's using at least one new camera every month, sometimes with very large lenses, a universal adapter like this plate is by far the better option for me. Still, cages or L-brackets with QD sockets would probably be my best bet if I wanted to use the MS4 in its dual-point configuration; that, or I could use the tripod plate attached to the camera, and a clamp on the lens foot.
It's a breeze moving the Leofoto plate between the camera body and a tripod foot.
While I've heaped a lot of love on this setup, a lot of that comes down to liking the QD system, and Magpul isn't the only company using it for its accessories. Leofoto also makes a strap with the connectors, and you can buy standalone QD swivels that you can attach to your own favorite strap setup, though doing so might require a bit of creativity. So, if you like the idea but don't think the MS4 strap would suit you, there are options out there. I'd recommend at least checking them out; while QD may not be for everyone, I personally have a hard time imagining ever going back to a strap without it.
Tools to authenticate images and disclose the use of AI are hot topics right now. Just last week, content delivery giant Cloudflare announced it was joining Adobe's Content Authenticity Initiative (CAI) and offering a one-click setting to preserve Content Credentials. Not long before that, Sony announced it was expanding its Camera Authenticity Solution via a firmware update for three of its cameras. Now, Google is rolling out its solution for photos edited with the Google Photos Magic Editor generative AI feature.
The invisible SynthID watermark will be applied to photos edited using the Google Photos Reimagine tool.
Images: Richard Butler
Last week, Google announced that Google Photos will begin implementing a watermarking process for AI-edited images. The new process will rely on SynthID, "a technology that embeds an imperceptible, digital watermark directly into AI-generated images, audio, text or video," Google explained in the announcement. This tool will automatically watermark images that were edited with the Reimagine tool in Magic Editor.
SynthID is a watermarking system produced by Google's DeepMind team. It automatically embeds metadata tags onto images, video, audio and text to identify whether they were created or edited with AI tools. SynthID is already being used on images created entirely with AI, such as those made with Imogen, Google's text-to-image model. It is also already used on text created by Google's AI models.
While SynthID is potentially a step in the right direction, Google notes that some "edits made using Reimagine may be too small SynthID to label and detect — like if you change the color of a small flower in the background of an image." The results won't be perfect or all-encompassing, then.
It's also important to note that there won't be any visible watermarks on the images. Instead, if you are curious whether an image used AI for editing, you'll need to use Google's "About this image" tool through Circle to Search or Google Lens. While it's certainly nice that you won't have a giant watermark across your image, it doesn't do much to make it quickly known that something was created or edited with AI. It doesn't seem likely that most people will take the time to verify an image's AI use if there are multiple steps involved.
Another potential complication is that Google's SynthID watermarking system is separate from what Adobe is doing with CAI. The result is two different systems for flagging AI-created or manipulated images. At this point, there is no clear understanding of how (or if) these different systems will communicate.
In the age of highly produced and dramatic videos, sometimes it's nice to have something simple. This video of the Sigma lens manufacturing process is just that. Coming from the YouTube channel ProcessX, the video shows the Sigma 70-200mm F2.8 DG DN OS being made in the Sigma Aizu factory in Bandai Town, Japan. It walks through the entire process, including the coatings that go on the glass, lens bonding, quality control and more.
The captions provide some context, but there's no voiceover. It's just a soothing, ASMR-style video that shows the incredibly complex process of putting together a lens. Zoom lenses offer their own build challenges, of course, so it is always impressive to watch how so many components fit together to create a quality optic. You can check out our sample gallery of the Sigma 70-200m F2.8 DG DN OS to see the results of the production process. DPReview also had a chance to tour the Sigma Aizu factory back in 2019, though with a focus on the Sigma fp assembly process.
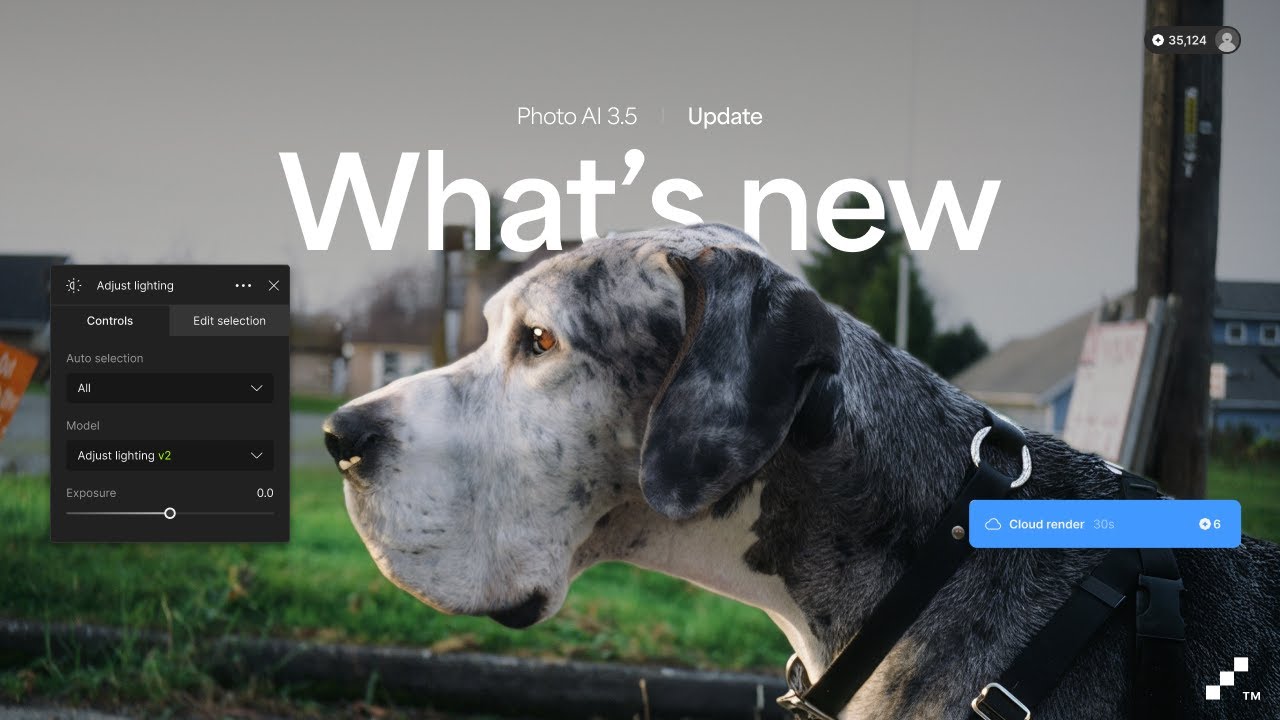
We’re announcing a version 2 of Adjust Lighting which is vastly improved to deliver a more natural, vibrant, and reliable results across the board.
Now anyone can run Super Focus in the cloud at lightning speed on any device, even if you don’t have a good GPU.
And for those who can, Super Focus now runs 40% faster on Apple devices. This combines with our previous speed boosts - it is now faster than ever.
If you encounter a crash with Photo AI, your session and work is now saved with crash recovery so you can get back to creating beautiful images.
Topaz Labs is also launching Project Starlight - the first-ever diffusion model for video restoration where you can enhance old, low-quality videos to high resolution:
The Leica D-Lux 8 is an updated 17MP enthusiast zoom compact camera that uses a series of crops of a Four Thirds sized sensor to give multiple aspect ratios. It's a gentle update of the D-Lux 7 with refreshed look, revised interface and a much-improved viewfinder.
Key Specifications
Up to 17MP images from a 22MP Four Thirds (17.3 x 13mm) CMOS sensor
24-75mm equiv. 10.9-34mm F1.7-2.8 stabilized lens
2fps shooting with AF, up to 11fps without
Captures DNG Raw files
Larger, 2.36M dot OLED viewfinder
1.84M dot rear touchscreen
Updated user interface
UHS-II card compatibility
5Gbps USB-C port
The D-Lux 8 is one of the only enthusiast compacts on the market, but follows on from some of the best of their type. It combines a relatively large sensor, a bright F1.7-2.8 zoom and a high level of direct control for shutter speed, aperture value and ISO or exposure compensation. In many respects it's conceptually similar to Fujifilm's X100 series, but with a zoom.
The Leica D-Lux8 is available at a recommended price of $1595, a $400 premium over the previous model.
The D-Lux8 is a relatively subtle update of the 2018 D-Lux 7, with much of the underlying hardware unchanged. The body has been redesigned and there are some changes to the controls and interface but the sensor and lens are the same as those used in the D-Lux7 and the Panasonic LX100 II.
4:3
3:2
16:9
1:1
This sees it use the same arrangement by which the entire sensor region is never used but instead a choice of three aspect ratios that have the same diagonal angle-of-view is offered. So you can switch between 4:3, 3:2 or 16:9 and maintain the same 24mm equiv. widest angle from the lens. The 1:1 setting is handled more like the majority of cameras and simply crops in from the default sensor region.
OLED viewfinder
The most significant change is the use of a standard OLED viewfinder. Previous models used field-sequential displays that would display their red, green and blue components one after the other. For some users this can give distracting red/green/blue fringing artefacts when their eye moves around the frame or they engage the menus because they become aware that the three colors haven't updated to the same degree.
So although the viewfinder spec looks like a downgrade on paper, in practice its 2.36M dots (1024 x 768 px) can give a more pleasant experience than the 2.76M dot-equivalent finder in the D-Lux 7. Also, because the old panel was a widescreen 16:9 aspect ratio, the new finder is actually higher resolution when you shoot 4:3.
The D-Lux 8's finder is also larger, with a magnification equivalent to 0.74x, rather than 0.7x in the previous camera. Again it sounds like a small change but it results in a much nicer experience.
The rear screen also sees a resolution boost, moving to 1.84M dots (960 x 640 px), rather than the 1.24M (∼786 x 524px) of the older model.
DNG capture
The other significant specification change in the D-Lux8 is that it can now capture its Raw data in the standard DNG format, rather than Panasonic's RW2 files that the D-Lux 7 shot.
The D-Lux 8 also adopts a USB-C connector, rather than the Micro B type connection on the previous model. Likewise the camera's Bluetooth capabilities have been brought up to the newer 5.0 LE standard, rather than 4.2, but the Wi-Fi is still a relatively basic 2.4Mhz connection.
Beyond this, much of what sets the D-Lux 8 apart from its predecessor is its revised body and interface. Leica has made an effort to bring it into line with the Q3 full-sensor fixed lens camera, generally for the better.
How it compares
As mentioned at the start of the article, the D-Lux 8 enters a much-reduced enthusiast compact space, compared with the one its predecessor competed in. But there are still small cameras offering good image quality and photographer-friendly levels of direct control, even as most of the market retreats to the higher profit margins of interchangeable lens cameras.
Sony's RX100 Va is still a current model, offering a similar short, bright zoom and, of course, there's perhaps the most visible small camera for photographers, the Fujifilm X100 VI.
The updates to the D-Lux 8 means it has one of the best viewfinders in the class, and becomes one of the only options to use the faster UHS-II SD cards (not that these stills-focused cameras especially need it). Its sensor size means it's a larger camera than the Sony but can offer a zoom, whereas you need to move to a prime lens if you want a larger sensor in a compact camera.
Body and Handling
The D-Lux 8 has a significantly simplified body and interface compared with the D-Lux 7.
The top plate of the camera now has a power button, rather than the on-off switch of its predecessor. The dedicated exposure comp dial has been replaced by a command dial with a custom button at its center, which itself replaces the 'A' button that was present on the D-Lux 7.
This custom button and the two just below the shutter speed dial and the button at the center of the four-way controller can be configured to control any of 38 options, from Exposure Comp and ISO Shutter Speed Limit to switching between the video and stills modes. You can reconfigure the function of a button by simply holding the button down for two seconds.
The command dial on the corner of the camera has four possible settings: Exposure Comp, ISO, Off or Auto. The Auto setting sees the dial's function change depending on the position of the aperture ring and shutter speed dial.
Shutter speed dial
Aperture ring setting
Exposure mode
Command dial function (Auto)
A
F-no
Aperture priority
Exposure Comp.
Time value
A
Shutter priority
1/3EV shutter adj
A
A
Flexible Program
F-no
Time value
F-no
Manual Exposure
1/3EV shutter adj
Interface
There have been big changes to the D-Lux's interface, too, giving it a close resemblance to that of the Q3 (it hasn't gained the red/yellow indication for stills/video shooting that we saw on the SL3).
Pressing the menu button takes you to a settings panel screen, from which you can adjust any exposure value that isn't being set by the specific position of one of the dials (you can't over-rule the aperture or shutter speed controls). Below this are a series of icons that can be tapped or navigated to, to change various camera settings.
To get to the main menu you need to press the menu button a second time or tap the icon with three lines at the lower right of the settings panel. This takes you into a five page, 29-option menu.
Within the menu, scrolling up and down also scrolls between its five pages. Pressing right changes the current option or takes you into a sub-menu, where required. Pressing left takes you back out of the sub-menus and back up to the main menu level.
There is one minor oddity, though: pressing left from the top level of the menu jumps you one page to the left. But you press the Menu button to jump a page to the right. This is slightly unusual behavior as it's more common for left/right or up/down button combinations to deliver opposing actions. The left/Menu combination requires a little more conscious thought.
Most of key options are in the settings screen, and the ability to quickly reconfigure the camera's four customizable buttons means you can gain quick or semi-quick access to all the photographic parameters you're likely to need. Like the Q3 and other recent Leica cameras, the D-Lux 8 ends up being an impressively photo-focused camera: you have direct access to shutter speed, aperture and either exposure comp or ISO, and then quick access to the other. Everything else is somewhat secondary to this, meaning you can focus on your photos, not the camera's other functions.
Battery
The D-Lux 8 uses the same BP-DC15 battery as its predecessor. This is a benefit in terms of compatibility with wide availability. But it also means it's still dependent on a relatively small 7.4Wh battery. Leica doesn't specify a CIPA-standard battery figure but we'd guess at a number somewhere in the sub-300 shot-per-charge region. It's certainly small enough that you'll want to keep track of where your USB-C lead is.
Image quality
Our test scene is designed to simulate a variety of textures, colors and detail types you'll encounter in the real world. It also has two illumination modes to see the effect of different lighting conditions.
Image Comparison
This widget is not optimized for RSS feed readers. Click here to open it in a new browser window / tab.
The D-Lux8's image quality isn't all you might hope for, for the price. By the standards of compact cameras it has a very large sensor: it uses up to 83% of the area of a Four Thirds sensor, which is still ∼60% larger than the Type 1 (13.2 x 8.8mm) chips used by the likes of Sony's RX100 series or Canon's G5X and G7 X models.
This still leaves it with about half the sensor area of the APS-C, prime-lens cameras such as the Ricoh GR III and Fujifilm X100 VI, though. This results in image quality about a stop noisier than those cameras. It's not as different from the Type 1 Sony as we'd expect at base ISO, but by high ISOs, the differences are as we'd expect (note the different settings used).
Despite multiple attempts, we couldn't get the lens on our copy of the D-Lux 8 to match the results we got out of the Panasonic LX100 II, but it's worth bearing in mind that a test chart, by its nature, is good at highlighting small differences. The sharpness we were able to achieve is pretty well maintained out toward the corners, which isn't always the case with zoom compacts.
Dynamic range
The D-Lux 8 uses a relatively old sensor: old enough that it underperforms modern expectations, when it comes to dynamic range. If you try to underexpose base ISO to protect highlights, with the intention of pulling up shadows, its results start to resemble those of the RX100 VII. For the first few stops of pulling it has the 2/3EV advantage that you'd expect, but then starts to drop to the Sony's level, before falling behind. This suggests it's adding more noise than the Sony and that noise appears to have a pattern to it, making it harder to remove. This rather limits the camera's Raw latitude.
If given the same exposure, the ISOs above 200 look very similar, suggesting there's little benefit to raising the ISO much above this. If you're trying to shoot bright lights such as neons in low light, you might be better off using the 'correct' exposure, then reducing ISO, giving you a stop of recoverable highlights for every stop you reduce the ISO.
Image Comparison
This widget is not optimized for RSS feed readers. Click here to open it in a new browser window / tab.
Autofocus
The D-Lux 8's autofocus system is pretty simple: you can select a series of different AF area sizes or select a Face Detection mode or a Tracking AF mode. To move the AF point you can either use the touchscreen or use the four-way controller, which is a little slow to operate.
Within the Face or Tracking options there's no control over the AF point size and the modes can't be combined, as is increasingly common in other brands. This means you'll need to switch in and out of Face Detection mode, rather than the camera using its Tracking mode and then engaging Face Detection when appropriate.
In terms of performance the AF does pretty well. Improvements in either the algoritms or processing power of the camera mean it's much more sticky than we remember the previous generation of camera being. If you point it at a subject it'll generally do a good job of keeping its attention on that subject.
The D-Lux 8 doesn't have phase detection autofocus though, so can be prone to hunting, especially in low light. Overall the D-Lux 8's autofocus is not at all bad, but both the clunkiness of the interface and the reliability feel like they're a few years behind the times.
Video
In video the autofocus tracking continues to do a good job of staying on the subject you've specified but the focus itself can take a while to catch up with any changes. There's no ability to adjust the focus speed, to choose whether you want a rapid response to keep things in focus or a slow 'pull' between subjects.
It's a strictly 8-bit affair, so there are no Log or HDR options for those more adventurous output ambitions.
Image Comparison
This widget is not optimized for RSS feed readers. Click here to open it in a new browser window / tab.
The D-Lux 8's video isn't bad, by any means, with pretty good levels of detail capture. The downside is that the focus is prone to hunting and pulsing, due to its use of the depth-from-defocus system that needs to shift focus to attempt to build a depth map of the scene. Add into this the inability to use an external mic and the lack of means to monitor the audio and the risk is you'll end up with clips that look ok but sound bad: something that's more off-putting than a lower detail capture level.
Perfectly good for social media use, where you can overlay a clip of music or some uncanny generated speech, but not an option we'd consider if video is of real interest to you.
In use
The D-Lux 8 has a variation of the user interface from the company's third-gen SL models, putting core exposure parameters front-and-center.
The D-Lux has a dedicated aperture ring and shutter speed dial, with the command dial on the shoulder that defaults to exposure compensation. There are also four customizable buttons, including one placed in the center of that shoulder dial, that can be used to access settings such as ISO.
Holding any of the buttons down for more than a second pops-ups a list of the 38 functions that can be assigned to them. Unlike the SL cameras, you can't edit this down to just include the settings that you want quick access to, if you find yourself needing regular access to more than four options.
The main things that we found got in the way of our enjoyment of the D-Lux 8 came down to its distinctly slow zoom motor
Also setting the D-Lux apart from the SL cameras is that the video mode's settings aren't as well separated from the stills mode's. There's also none of the red/yellow color-coding to distinguish them. This is less of a problem, given the D-Lux isn't especially suited to video capture.
Because there's no Time or Bulb setting on the shutter speed dial, you can't set a separate shutter speed for video and stills modes: both have to follow the dial's setting. And again, the lack of mic input or headphone socket means the audio on your video won't be great, so unless you plan to overlay music on your footage, it may end up pretty unwatchable.
The main things that we found got in the way of our enjoyment of the D-Lux 8 came down to its distinctly slow zoom motor. The camera has a rocker switch around the shutter button, but not much happens when you press it: there's a distinct lag before the camera decides to communicate the message down to the engine room and set the zoom motor into action. This, more than anything else, makes the camera feel unresponsive, taking you out of the moment, distancing you from the action and significantly undermining the shooting experience.
There's a lot to like about the D-Lux 8 but waiting for the zoom lens to react and move where you want isn't necessarily one of them.
Similarly the camera's on/off button adds to the frustration: the use of a button, rather than a switch, means you have to hold it down for a moment to prevent inadvertently turning the camera on, constantly. Then you have to wait for the zoom to painfully extend out into position. By which stage you may well have missed the moment.
And yet, despite adding an extra lag before the lens plays its part in slowing you down, the confirmation lag on the D-Lux 8 is brief enough that you are likely to find yourself accidentally turning the camera on. It's the worst of both possible worlds, essentially. There's a reason so many cameras use on/off switches, rather than buttons.
We still love what the D-Lux 8 is. Its bright 24-70mm equiv lens, with that clever aspect ratio switch prompting you to make the most of its multi-aspect lens/sensor design is great. But it doesn't deliver the responsive, 'pure photography' experience that other Leicas do.
Conclusion
Pros
Cons
Decent image quality with a choice of interesting color modes
Useful lens range with bright maximum aperture
Well-designed user interface
Good size-to-image quality balance
Switch to exploit multi-aspect sensor/lens arrangement
Decent video spec
Lens isn't especially sharp
Zoom function is slow and laggy
Sensor noisier than more modern examples
Lack of mic or headphone socket make audio capture hit-or-miss
Power button easy to engage inadvertently
The Leica D-Lux 8 is an infuriating combination of a great concept disappointingly executed. We love the idea of someone making a new enthusiast compact camera with a good degree of direct control. But while the D-Lux brings a particularly good user interface to the table, it's not enough to overcome the limitations of elderly hardware and a borderline ridiculous price tag.
As photographers, the enthusiast compact must offer two things: fitting as much image quality as possible in a pocket and ergonomics to let you take hands-on control of the photographic process, so your contribution amounts to more than just pointing your smartphone and tapping the screen.
However, while the D-Lux 8 gets some of the basics of this equation right, there are too many shortcomings for it to all add up.
The D-Lux 8 is small enough to boost the chances you'll have it with you when you encounter good light, engaging enough that you'll feel you played a part in the images it produces, and good enough to be worth using, instead of your phone.
Built-in lens @ 70mm equiv. | F2.8 | 1/400 sec | ISO 200 Photo: Richard Butler
The slow and laggy zoom of the lens can really distance you from the shooting experience: a critical failing in an photographer's compact. And while the autofocus performance is good enough to overcome our concerns about the rather awkward AF interface, the same accommodations can't be made for the image quality.
Quite simply the sensor performance doesn't look particularly great and the lens never seems especially sharp. And those are killer blows. The D-Lux 8 falls short on both experience and results by too much, and that's before you even start to think about how much the camera costs.
Conceptually, the Leica D-Lux 8 is exactly the kind of camera we desperately want someone to make. It's small enough to keep with you, and is engaging enough to make you feel like you're playing a part in the images is makes, but the drawbacks definitely add up. With heavy hearts, we feel it falls too far short of this promise to justify us giving it an award.
Scoring
Scoring is relative only to the other cameras in the same category. Click here to learn about what these numbers mean.
Leica D-Lux 8
Category: Enthusiast Large Sensor Compact Camera
Build quality
Ergonomics & handling
Features
Metering & focus accuracy
Image quality (raw)
Image quality (jpeg)
Low light / high ISO performance
Viewfinder / screen rating
Optics
Performance
Movie / video mode
Connectivity
Value
PoorExcellent
Conclusion
The D-Lux 8 puts a lot of image quality and flexibility in a small, attractive package. The slow-zooming lens undermines the shooting experience and the image quality doesn't quite live up to the price tag. We admire the D-Lux 8 more than we love it.
Good for
Photographers wanting a flexible compact.
Not so good for
Budget-conscious shooters who need true pocketability.
83%
Overall score
Compared to its peers
Sony's RX100 Va is one of the few direct competitors to the D-Lux 8. Its image quality isn't too far behind, despite having a sensor around 60% of the size. Its autofocus is more dependable but its interface is nothing like as engaging as the Leica's, with chaotic menus and a clickless control wheel undermining experience of using the camera. The Sony is more capable, the D-Lux more enjoyable.
Canon recently said it's upping production of the PowerShot G7X III, suggesting we're not the only people interested in the concept of enthusiast compacts. The G7X III again offers a conceptually similar set of features, a pretty engaging shooting experience, and not too much of an IQ drop. This makes it the more rational choice: it's not quite as nicely built but it's significantly smaller and less expensive.
The Fujifilm X100VI is in some senses a logical rival to the D-Lux 8 in that they both aim to offer high image quality in a compact package with lots of direct control points (if anything, the VI's have become a bit over-cluttered). They're also utterly different: the fixed 35mm equiv lens on the Fujifilm makes for a delightfully limited / focused camera, and its image quality is in a different league to the Leica's. For the same money, assuming you're ok shooting with a prime lens, we'd go for the Fujifilm.
The Ricoh GR IIIs (both the 28mm and 43mm equiv versions) again offer better image quality in a smaller package, but with a fixed focal length lens. The interface is more intricate than the Leica's, and there's a similar need to pay attention to dust ingress. But the Ricohs are also significantly less expensive. There's a reason they have a cult following.
Please do not reproduce any of these images on a website or any newsletter/magazine without prior permission (see our copyright page). We make the originals available for private users to download to their own machines for personal examination or printing (in conjunction with this review); we do so in good faith, so please don't abuse it.
Sample gallery
This widget is not optimized for RSS feed readers. Click here to open it in a new browser window / tab.
The Broncolor RFS 3 is an ultra-compact, lightweight flash trigger with a high-contrast OLED touch display, sleek design, and High-Speed Sync (HSS). Its intuitive touch controls, rotary dial and buttons ensure seamless operation. The built-in lithium battery charges via USB-C in 2 hours. The RFS 3 can control all Broncolor power packs and monolights equipped with the RFS 2 module.
Features:
The Broncolor RFS 3 is an extremely compact and lightweight (48g / 0.106 lbs) flash trigger. It impresses with its precise and high-contrast, full-color OLED touch display, stylish design, High-Speed-Sync (HSS), and effortless operation.
All parameters can be adjusted through touch – there is also a small rotary control and two buttons for a tactile feel. As with modern mobile devices, navigation is straightforward - by swiping and tapping.
A quick-mount hotshoe combines speed and stability during installation.
The built-in lithium battery can be charged in 2 hours via USB-C port. The standby time is approximately 7 days. Additional functions provide more convenience, e.g. the screen lock, the display brightness setting or the sleep timer to save battery power.
There are five product versions in total, supporting the most common camera models from Canon, Fuji, Leica, Nikon, and Sony.
The RFS 3 can control all current Broncolor power packs and monolights (Satos, Scoro, Siros, and Move). Older Broncolor devices need to be equipped with the RFS 2 module.
Specifications:
Lithium battery: 3.7 V DC, 850mAh/ non-user replaceable/rechargeable via USB-C
Charging time: ≈ 2 hours
Standby time: ≈ 7 days
Manual flash: Yes
TTL auto flash: No (function could be made available retrospectively via firmware update)
High-Speed-Sync (HSS): Yes
Display panel: Touch screen with adjustable brightness
Transmission range (approx): up to 100 m / 328 ft
User Interface languages: English, Chinese Simplified, German, French, Italian, Japanese, Korean, Polish, Spanish
Dimension (l x w x h): 41 x 47 x 39 mm / 1.61 x 1.85 x 1.54''
Weight: 48 g / 0.106 lbs
Compatible Broncolor power packs and monolights: Satos, Scoro, Siros, Move, and older devices if equipped with RSF 2 module