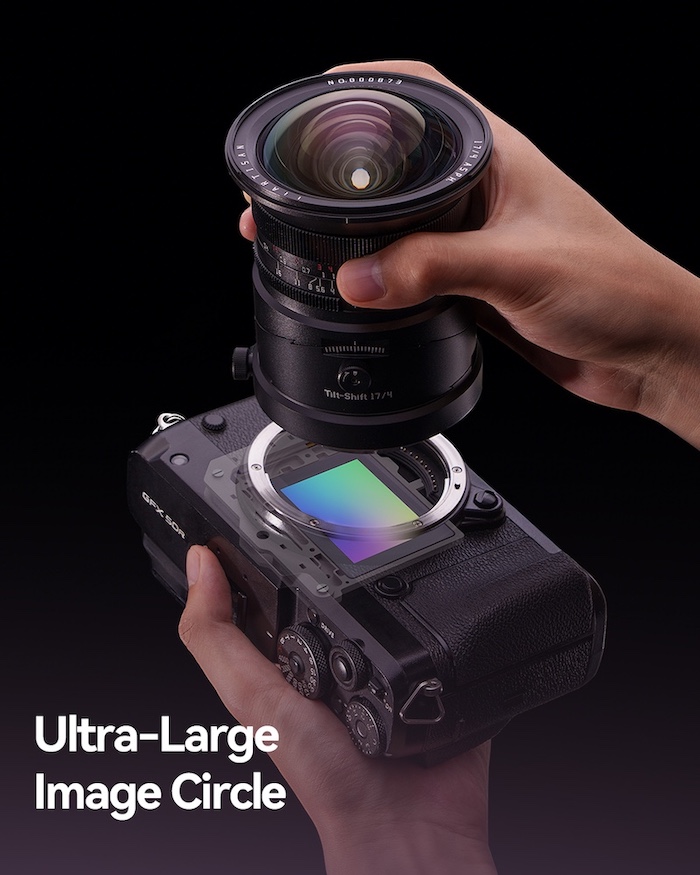
Laowa is continuing to be the torchbearer for bringing tilt-shift lenses to modern mirrorless mounts. The company's latest release is the 17mm F4 Zero-D Tilt-Shift / Shift, which is available for Sony E, Nikon Z, Canon RF, Fujifilm GFX, Hasselblad XCD and L mount, though the latter comes with a pretty big caveat that we'll cover in a bit.
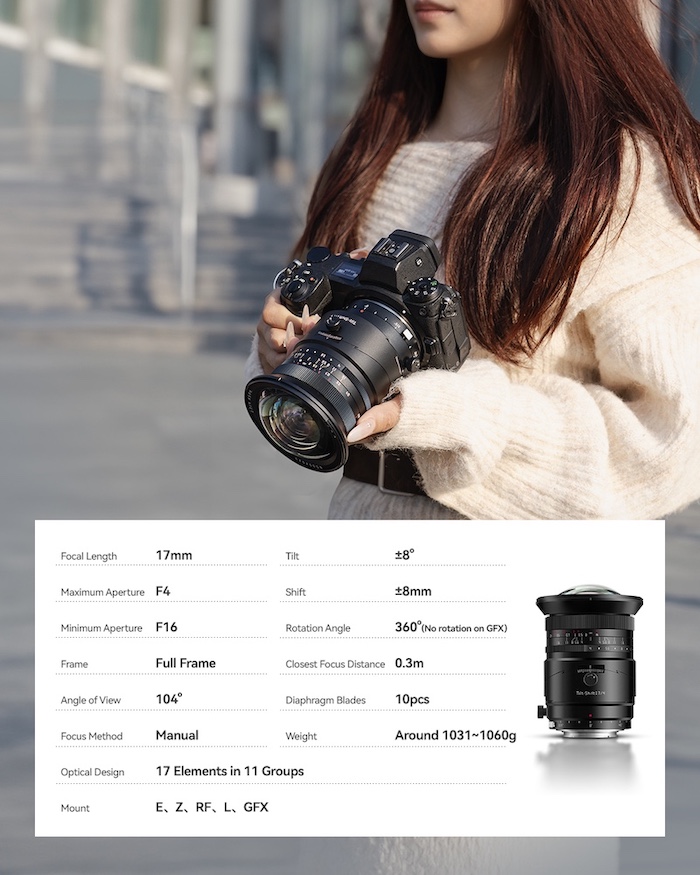
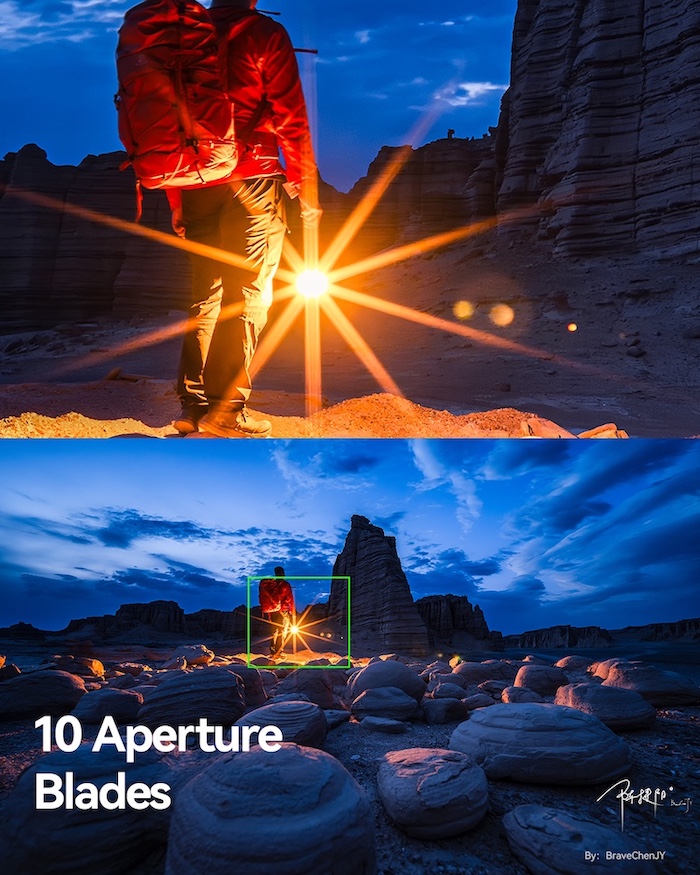
There are two versions of the lens, both of which use the same optics: 18 elements in 12 groups, with four extra-low dispersion lenses, two glass aspherical elements and five ultra high refraction glass elements. They both have 14-bladed apertures.
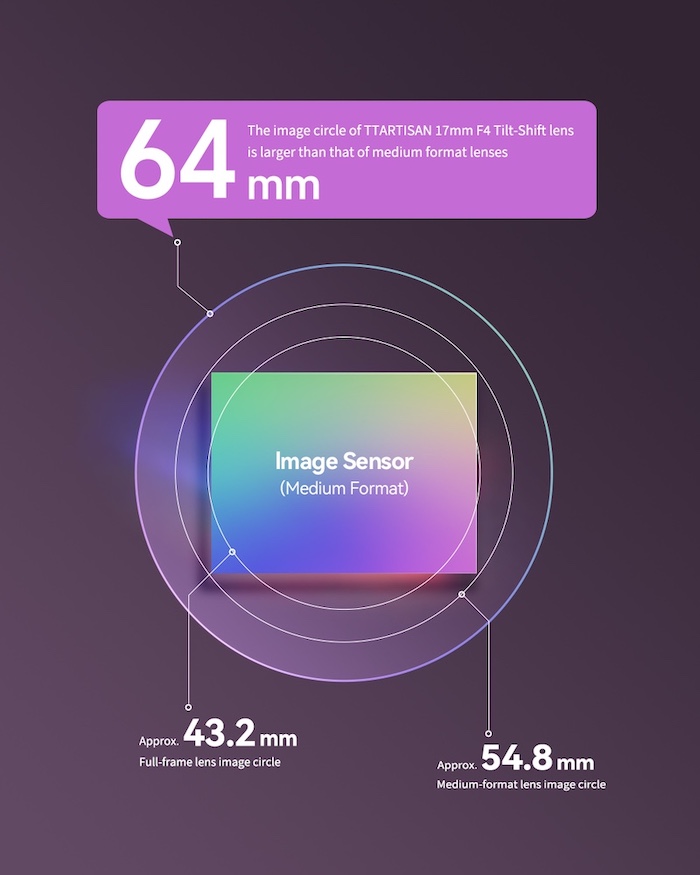
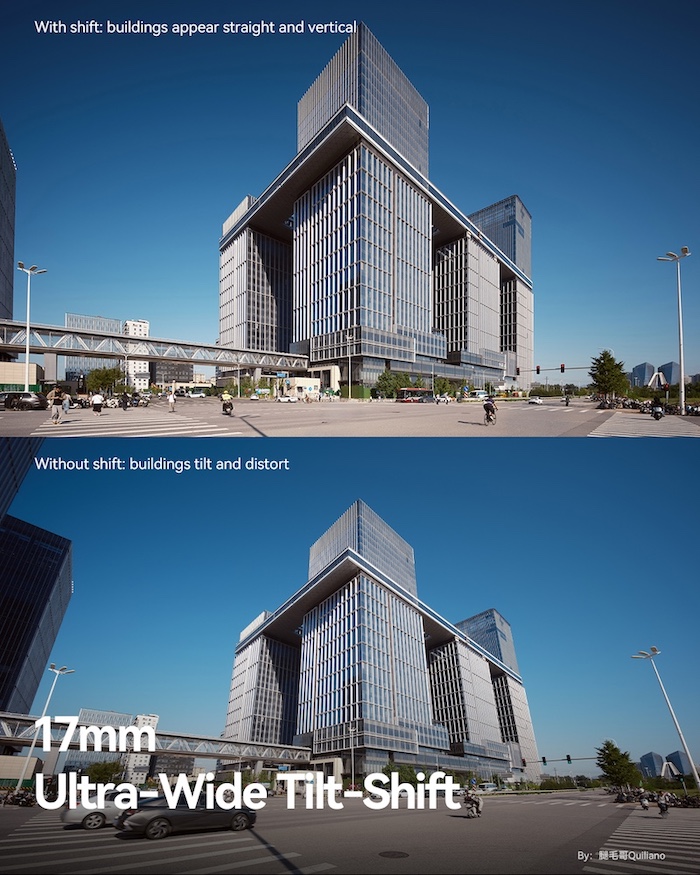
One just supports shifting, which gives you the ability to change perspective while keeping the camera level, which can be especially helpful when shooting architecture. The shift-only model supports 11mm of shift in either direction on full-frame system, or 8mm on a medium format camera.
Image: Laowa
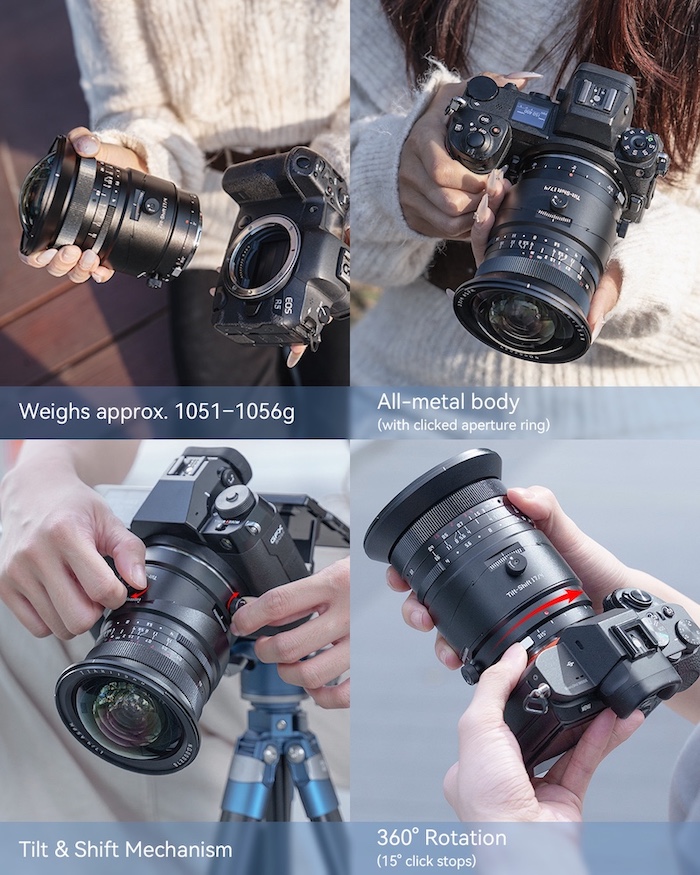
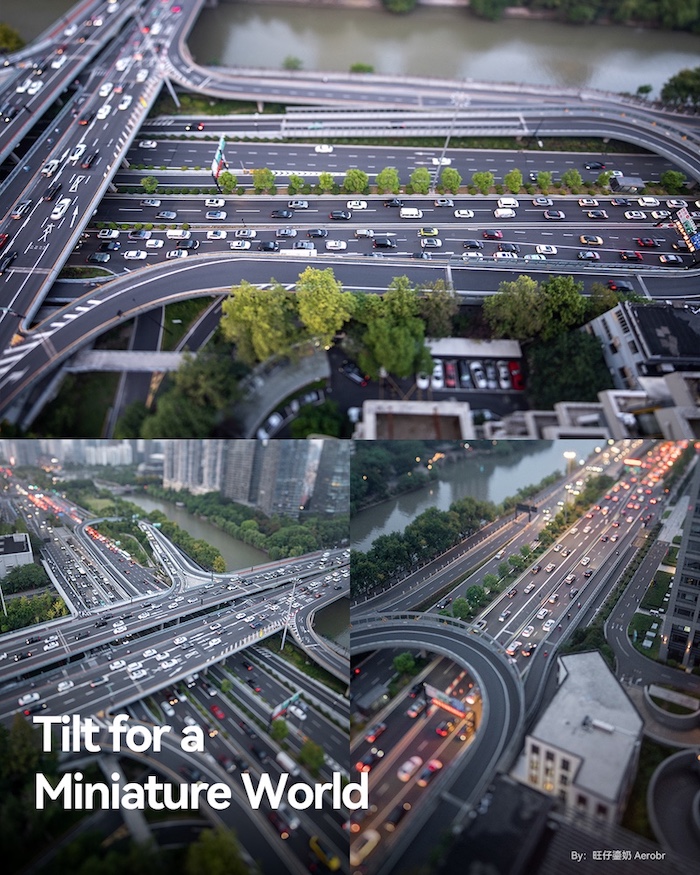
The tilt-shift model bumps that up to 12mm of shift on a full-frame, and adds 12° of tilt (10° on medium format), giving you the ability to manipulate the plane of focus. You can use that to either maximize your depth of field without having to worry about diffraction or to create the miniature effect that tilt-shift lenses are famous for.
The company promises that the lens has no barrel distortion, and says it can focus on subjects as close as 0.25m (9.8") away. It has an 86mm filter thread and a built-in Arca-Swiss compatible lens foot. The mount can easily be rotated with a click of a button and has preset rotation positions in 15° increments. It weighs 810g for the tilt-shift model and 770g for the shift model.
Given that the lens is manual focus only, and that Laowa has brought its other tilting and/or shifting lenses to a wide variety of mounts, it's not surprising to see this lens coming to mounts that are usually more restricted. It is, however, worth noting that the company says the L-mount version isn't compatible with some of the system's most popular cameras: the S5II/X, S1II, S1RII and S1IIE. The company told us this is because the overhang of those cameras' EVF housings protrudes forward over the lens mount. While you can physically mount the lens on one of the camera, the barrel will run into the EVF cladding essentially as soon as you try to rotate it, which severely limits the lens' functionality.
Given that we haven't seen major camera manufacturers like Canon or Nikon release tilt-shift lenses for their most recent systems, it's exciting to see Laowa continue to expand its lineup of them.
The 17mm F4 Zero-D Shift costs $999, and the Tilt-Shift costs $1249. Both are available starting today.
Manufacturer samples
Sample gallery
This widget is not optimized for RSS feed readers. Click here to open it in a new browser window / tab.
Laowa 17mm F4 Zero-D Tilt-Shift specifications
Principal specifications
Lens type
Prime lens
Max Format size
Medium Format (44x33mm)
Focal length
17 mm
Image stabilization
No
Lens mount
Canon RF, Canon RF-S, Fujifilm G, Hasselblad X, L-Mount, Nikon Z, Sony E, Sony FE
Aperture
Maximum aperture
F4
Minimum aperture
F22
Aperture ring
Yes
Number of diaphragm blades
14
Optics
Elements
18
Groups
12
Special elements / coatings
4 extra-low dispersion, 2 asph., 5 ultra high refraction
When you use DPReview links to buy products, the site may earn a commission.
Image: Frame.io
You can now use Frame.io, the video and image workflow platform that integrates with several pieces of editing software, to automatically upload stills files from certain Nikon cameras to the cloud. The software has supported this kind of workflow for video files for a while, but the new JPEG and Raw support could be convenient if you have a Z6III, Z8, Z9 or ZR.
While some cameras from companies like Fujifilm and Panasonic can connect directly to the Adobe-owned service, that's not quite what's going on with Nikon's implementation. As Frame.io's update notes say: "Using NX MobileAir (iOS and Android), images upload directly from the camera to Frame.io—no need to remove cards or manually transfer files before sharing. From there, editors can move seamlessly into Adobe Lightroom for immediate editing and delivery." It feels a bit funny to describe images as being uploaded "directly" when you need another app in the mix to do it, but theoretically it should be relatively hands-off once you establish the connection.
Nikon offers similar capability with its Imaging Cloud service
If this all sounds familiar, it may be because Nikon offers similar capability with its Imaging Cloud service. With it, supported cameras can automatically upload images to Nikon's cloud, which will then transfer them to services like Dropbox, Google Photos or Lightroom.
While that approach is more convenient in some ways – you use it by directly connecting your camera to Wi-Fi, rather than your phone – the Z8 and Z9 famously haven't received support for Imaging Cloud, despite lower-end cameras like the Z5II and Zf having it. This update gives owners of those cameras an easy way to offload the images they take directly to a cloud service, even if it is a little less flexible.
Adobe has announced that its "AI Assistant" for Photoshop is now available in public beta. It's designed to let you describe how you want your image changed to a chatbot, and either have the program carry out the edits for you or tell you how to do them. And, if you're willing to use generative AI, you can even draw on your image to have it add new elements or remove existing ones.
When you open a picture in Photoshop for web or mobile and activate the assistant, it analyzes the image to come up with some suggested edits: things like brightening the foreground or cropping in on the subject. The suggestions come in two categories: do it for me, or show me how. If you have your own edits in mind, you can also type what you want done into the box, and it will either go off and do it or tell you what you should do, sometimes complete with links to the tools you'll need.
The company has been working on the feature behind closed doors for a while now, teasing it early last year before finally announcing it at its Max conference in October. When I spoke to a Photoshop product manager at Adobe's Max conference last year, it was clear that the company is thinking of the AI assistant as an automation tool first, and a learning tool second. However, in the little bit I played around with it, the current version seemed to be at its best when instructing, rather than executing.
This is exactly the kind of edit a beginner might need help with, and I think the answer it came up with is pretty decent for that audience, especially since it gives you links to open the tools.
As an example, I asked it how I could brighten the shadows in an image without also raising the highlights. It came up with a genuinely good answer: add a curves adjustment layer, and drag the shadow adjustment point upwards. It even gave me a link that opened up the Curve tool. However, it also told me it could do it for me, so I told it to give it a shot.
Instead of taking the steps it described, the assistant added a brightness/contrast adjustment layer and just raised the brightness of the entire image, blowing out the highlights. The bot then said: "Shadows are now brighter! 🕶️✨ The adjustment layer focused on lifting the dark areas (like faces and clothing), while the highlights stayed crisp and untouched-no blown-out windows here!" (Especially ironic since the chat box was covering most of the image except for the now blown-out window.)
The tool is at its best when using the tools that Adobe's already been working on automating, such as subject masking and adjustment, and removing objects.
Theoretically, this approach would've worked had it created a layer mask, an edit it was happy to do in other situations, but for whatever reason, it didn't decide to do that. Some other issues I ran into: when I asked it to brighten the foreground of an image, its initial selection was completely incorrect, including patches of the sky, resulting in an oddly splotchy result (though, in fairness, at the end the bot realized things hadn't gone to plan). On another photo, one of the suggested edits was to "enhance the colors for a more vibrant look," which would've been a reasonable suggestion had it not been a black and white photo.
The tool showed me the selection as it was making it, and I thought, "Well, that's not going to go well." And, indeed, it did not.*
There were some successes. Perhaps unsurprisingly, given all the work Adobe has put into distraction removal, the model did a decent job when I asked it to remove extraneous objects from a photo. It's also worth noting that the AI assistant's edits are broken down in the edit history pane, so if it fell over at the last step, you can just undo that and take control yourself. It also shows the tools being used on screen as it (slowly) runs through each step, potentially making it easier to do it yourself next time.
Adobe has also introduced a tool called AI Markup, which lets you sketch something onto your photo and have generative AI add it in for you. AI image generation in Photoshop is nothing new, but this should make it that bit easier to make sure the elements you're trying to add end up where you want them to.
I'm tired of every tool I use showing me endless pop-ups about their AI assistants, but...
I'm tired of every tool I use showing me endless pop-ups about their AI assistants, but I think there's definitely a place for something like this in a program as complicated as Photoshop. As long as it's not too insistent that you use it, it could wind up being a useful teaching tool for those getting into photo editing, or for more obscure edits that you don't quite remember how to do (not everyone will have memorized CollegeHumor's Photoshop tutorial rap for redeye removal). It seems like Adobe has a bit of work to do before the tool can reliably automate tiresome tasks, but the bones for that system are clearly here.
The AI Assistant is available in Photoshop for the web and mobile, and AI Markup is available in the web version. Adobe says Creative Cloud subscribers will have unlimited image generation with the tool until April 9th; after that, it'll presumably fall back to using however many credits are included in your plan. If you're a free Photoshop for web user, you'll get 20 image generations.
* - In fairness, giving it a JPEG with such high contrast wasn't really setting it up for success, but I at least expected it to select the black part of the image and try to brighten it. I would've tried it with the Raw, but Photoshop for web couldn't open it.
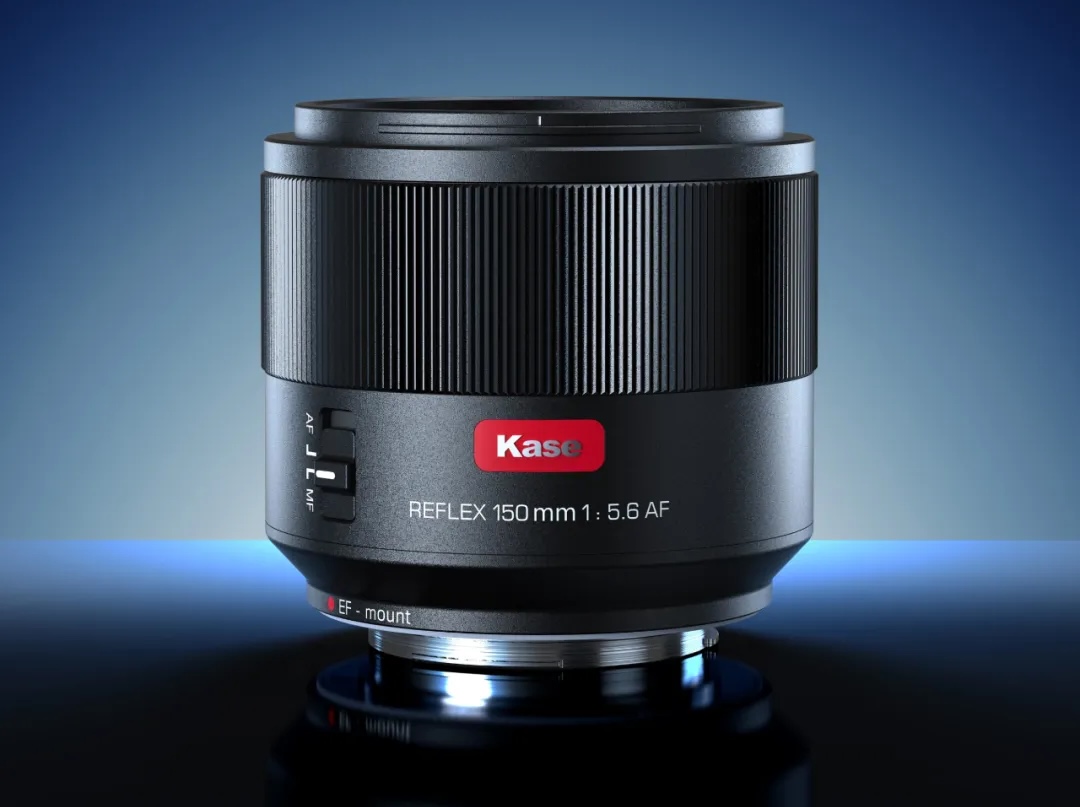
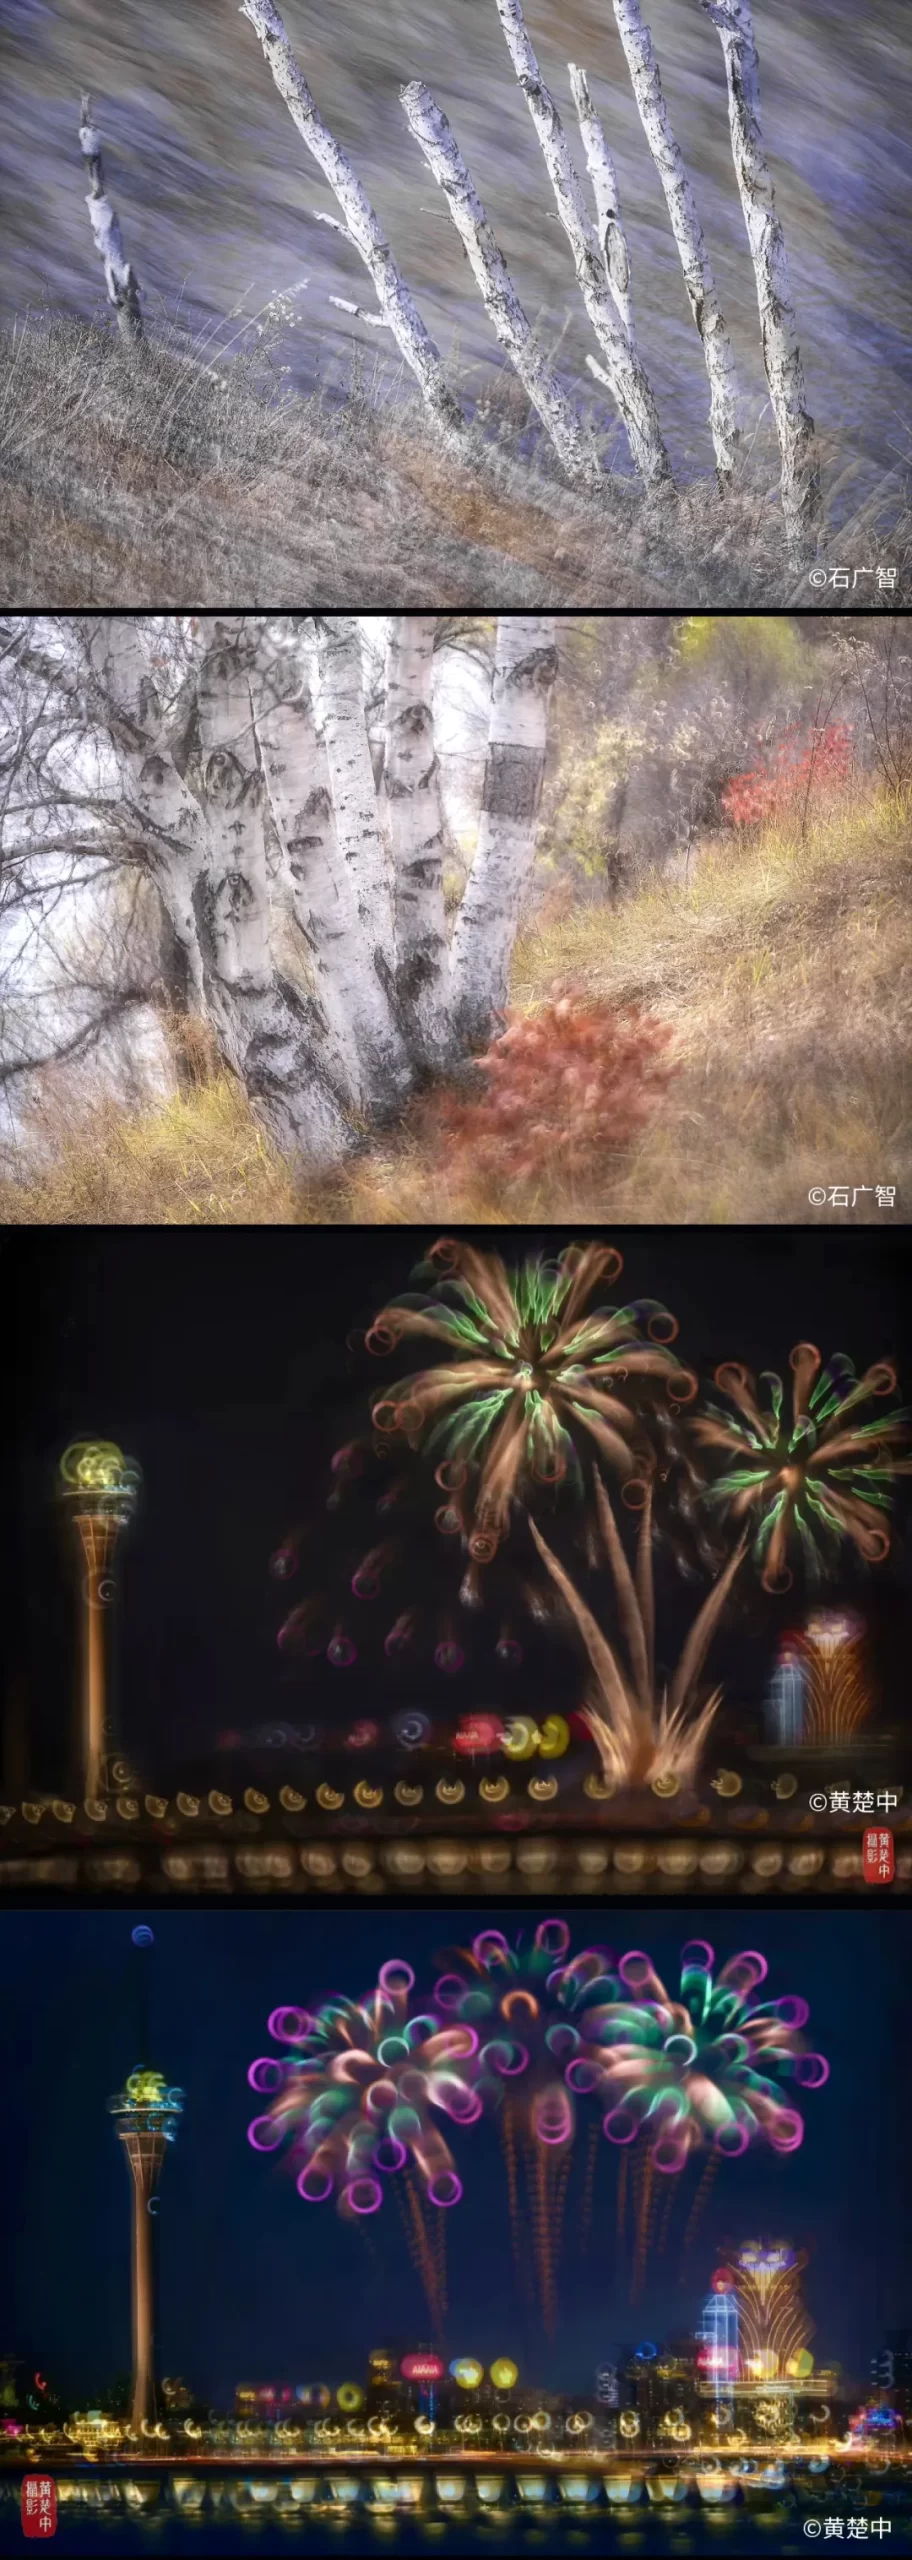
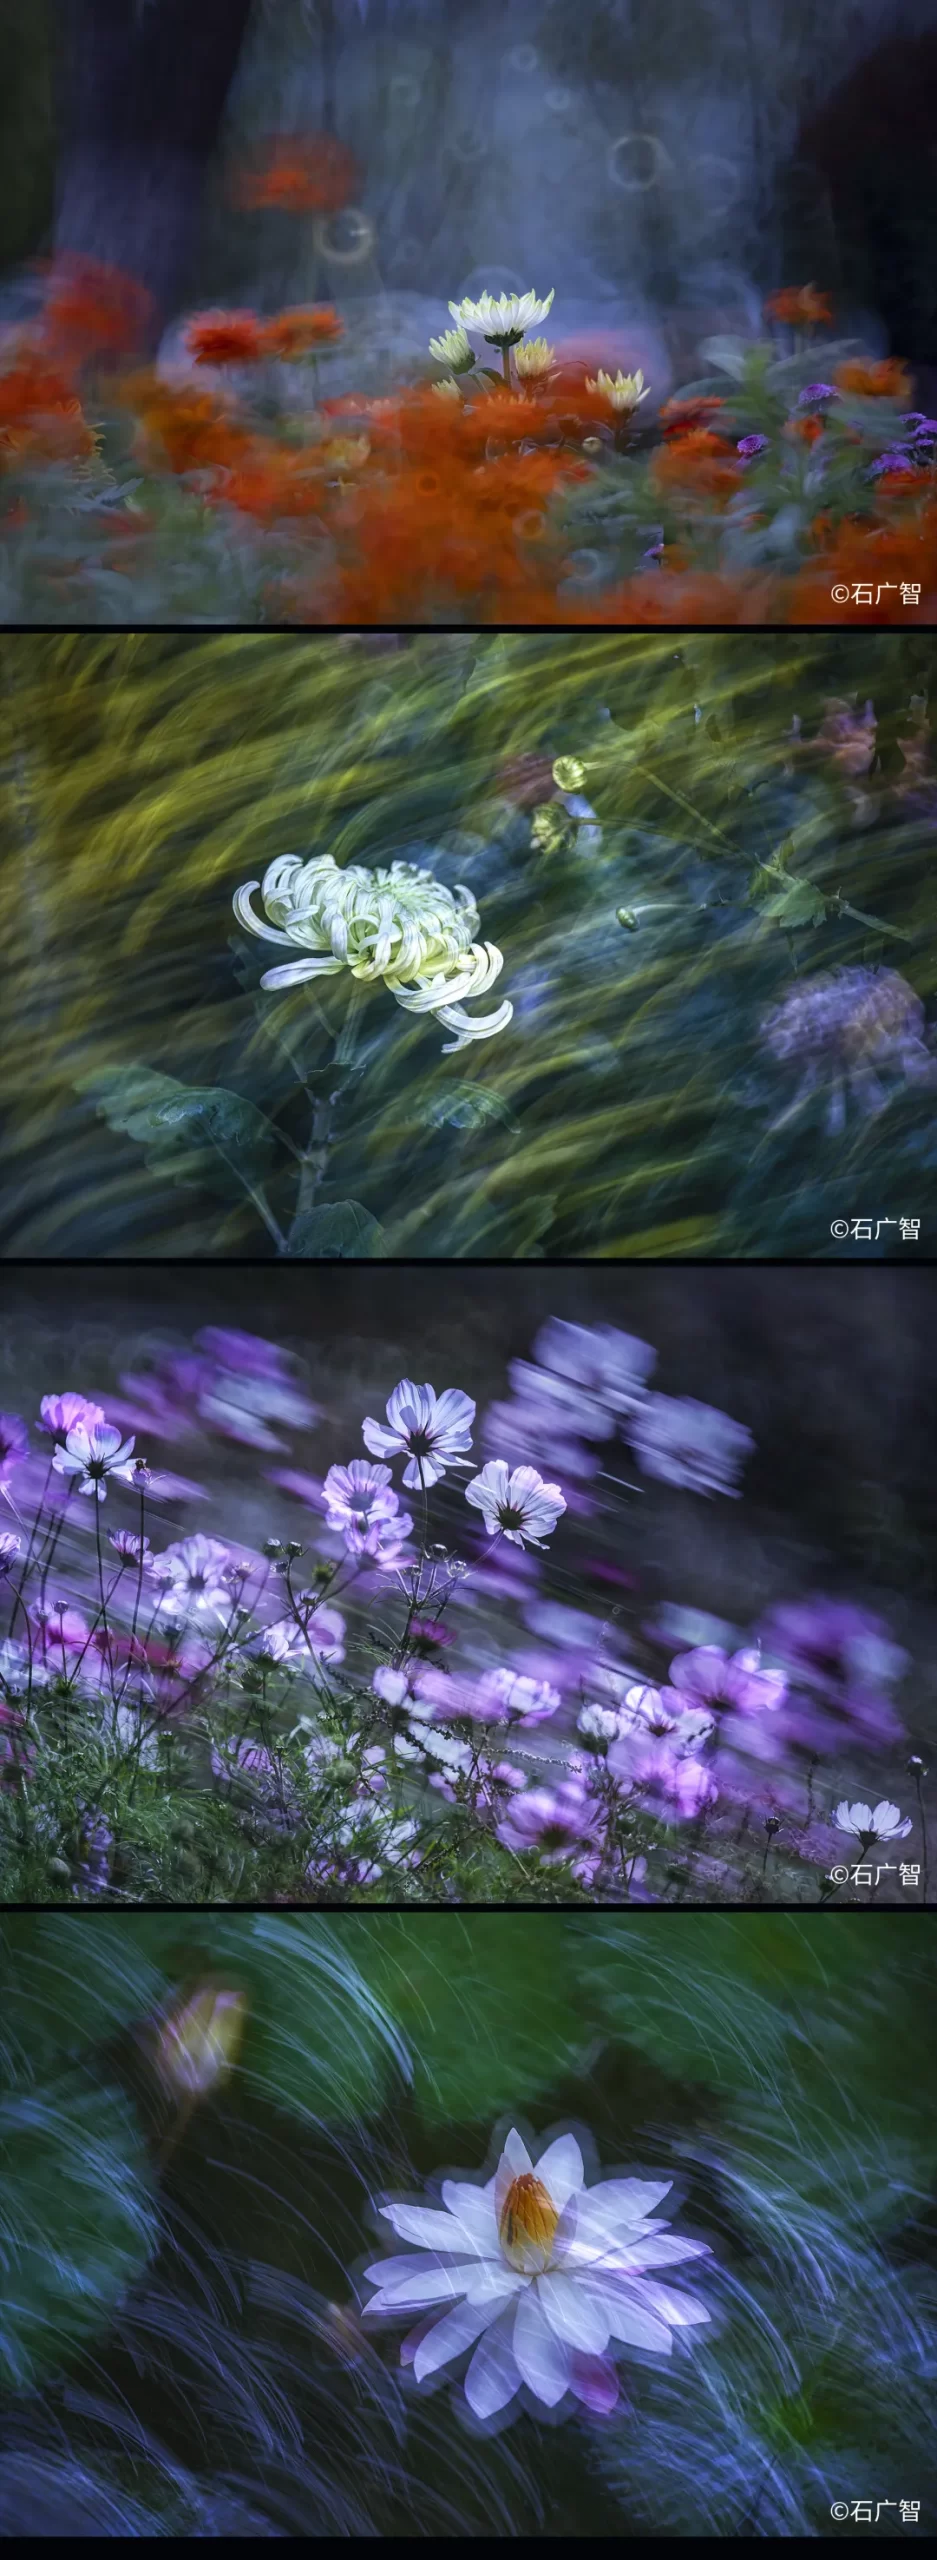
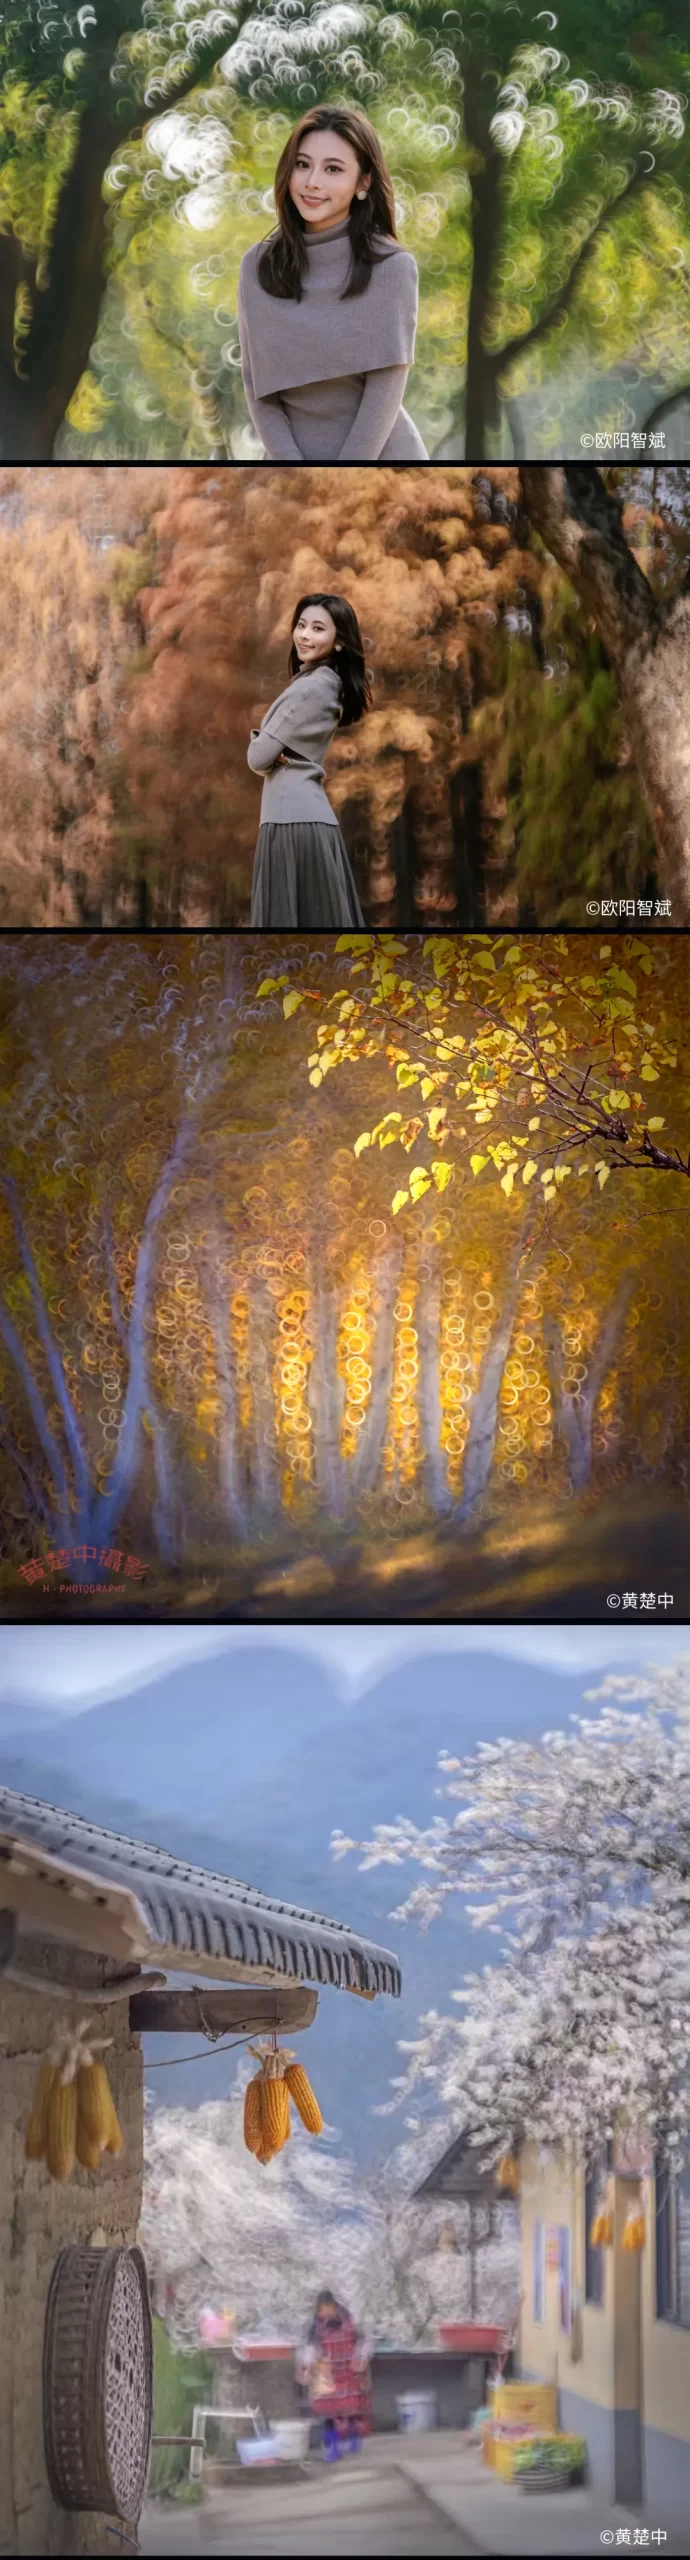
The previously reported Kase 150mm f/5.6 reflex autofocus lens (E/EF) is now officially released in China. The lens features a magnetic front ring for filters.
Google recently released its latest entry-level smartphone, the Pixel 10a. The updates are modest overall, with the most visible change being a redesigned camera array that now sits flush with the back of the phone. We took the 10a on a recent trip to Japan for CP+ to see how its cameras handled a variety of situations.
Despite the slimmer design, the camera hardware is unchanged from the Pixel 9a. Like the previous model, it features a 48MP main camera with a Type 1/2 (~31mm²) sensor and a 13MP ultra wide camera with a Type 1/3.1 (~19mm²) sensor. Google has carried over some of the AI-focused photography features from the 10‑series phones, such as Auto Best Take and Camera Coach, which aim to help users capture stronger images with less effort. Otherwise, the Pixel 10a feels very familiar if you have used the 9a.
"The Pixel 10a feels very familiar if you have used the 9a."
That similarity extends to image quality. You would be hard-pressed to tell the difference between photos from the 9a and 10a. In good light, the phone's two cameras perform well enough. When the light gets dim, though, along comes the noise. That's especially evident in the night photos with vast expanses of open sky or other dark areas, which you can see in the gallery below. Night Mode does seem to help with some of that noise, and also adds some lightness at times. But it's important to note that, unlike other phones, the Pixel 10a does not automatically switch between camera modes. If you want to use Night Mode, you'll need to manually select that in dark conditions.
The Pixel 10a is not aimed at photographers who want to use their phone as a somewhat serious camera; that role remains reserved for the higher-end 10‑series models, especially the Pro versions. But for people who want a compact, relatively affordable phone that can reliably capture everyday memories, the Pixel 10a’s cameras can get the job done.
Sample gallery
This widget is not optimized for RSS feed readers. Click here to open it in a new browser window / tab.
Mitchell and Abby got to experience the (overwhelming) magic of a Yodobashi camera store for the first time on their trip to CP+. Photo: Abby Ferguson
The DPReview team recently returned from CP+, the camera industry's official trade show held in Yokohama, Japan. Most of our focus was, naturally, on the show and interviewing executives from the major camera and lens companies. However, we also had some time before and after CP+ to wander around, taking photographs and checking out some of Japan's camera store offerings.
This trip marked Abby's first time in Japan, and it was a second journey to the country for me (Mitchell). Now that we've been back for a bit, we wanted to take some time to reflect on our experiences there beyond CP+.
Seeing a new place through the same lens
Nikon Z8 | Viltrox 35mm F1.2 Lab | F8 | 1/400 sec | ISO 64 | Processed in Capture One Photo: Mitchell Clark
Mitchell's thoughts
If you've spent any time on gear-related forums such as ours, there's a bit of advice you've probably seen pop up anytime someone asks about upgrading their equipment: you should spend the money you would've spent on a camera/lens on taking a trip with your current kit instead.
While I obviously don't think that's always true, this trip showed me that there is definitely some wisdom there. Being in a completely new place (I've been to Osaka, which has quite a different vibe from Tokyo and Yokohama), where many things are unfamiliar, helped get me out of my photographic rut. I found interesting new angles to shoot things in, and tried out things I might not have at home, just because I was inspired and excited to be doing photography again. Travel, even if it's mainly for work, was a great way to get my creative energy going (especially after what's been a particularly dull and uninspiring winter at home).
Even when I wasn't taking pictures for work, I was constantly pulling out my phone to capture interesting compositions that I saw.
iPhone 15 Pro | Rear wide camera | Cropped to 4:3 Photo: Mitchell Clark
As someone who often shoots at night, I was also delighted to find that Tokyo, in particular, is one of the most well-lit cities I've ever been in. That meant that I was still able to get pictures late into the evening, no matter where I went, something that's definitely not the case in my more rural neck of the woods.
It's also astoundingly dense, its streets and alleyways bursting with people and things to take pictures of. If I'm doing a photowalk in downtown Spokane, it might take me an hour or two to come up with 10-15 good images, especially if I'm trying to find subjects I haven't shot before. In Tokyo, it felt like I could do that or more in fifteen minutes and a few blocks.
Abby's thoughts
The colors, textures and lights in Tokyo and Yokohama were feasts for my eyes. Edited in Adobe Photoshop.
Panasonic S1RII | Viltrox AF 16mm F1.8 | F3.5 | 1/80 sec | ISO 500 Photo: Abby Ferguson
I'll start by echoing Mitchell's comments about taking a trip somewhere new. Just like he experienced, this trip to Japan felt like a little rekindling of my photography. It was very refreshing to be someplace new in general, especially somewhere drastically different in almost every way from where I currently live.
Both Tokyo and Yokohama, where I spent all of my time, are absolutely filled with color and lights. The densely packed architecture and infrastructure of both places create lots of interesting opportunities for photography, with rich lines, textures and shapes to play with. It was like a photographer's playground in many ways.
SOOC JPEG
Panasonic S1RII | Viltrox AF 16mm F1.8 | F2.2 | 1/20 sec | ISO 640 Photo: Abby Ferguson
Now, this could very well be the case in any major city (which I do not live in at the moment), but it was still fun to have so many opportunities for photographs. I went out with my 35mm film camera on my last day, with just a few hours before needing to catch a train to the airport and easily shot through an entire roll of film. It typically takes me a few days to do that, even when I'm in new locations that I'm excited about.
Another thing I noticed was that we were far from the only photographers wandering around, even well away from CP+. Yokohama is a tourist-rich city, so that may be part of it, but I saw a good number of people walking around with dedicated cameras, which is quite different from what I'm used to. Even though I live in a touristy area, I rarely see photographers out and about. Maybe I felt emboldened by this, but I even worked up the courage to ask two women who were painting near a bridge if I could photograph them, something I never do where I live.
A rich camera history: Shinjuku's used camera stores
I was in constant awe, looking around the used camera stores. Photo: Mitchell Clark
Abby's experience
I love old cameras, particularly old film cameras. Where I currently live, and really everywhere I've lived in the US, options for shopping around for these cameras in person are remarkably slim. There are a few stores more than an hour's drive away from me right now, but the selection is very small at each. That's also more than I had access to in most of the other places I've lived, and this is the seventh state I've called home.
My experience in Japan was completely different. We went to Shinjuku City while in Tokyo, and within just a few block radius, went into six different camera stores. There were more in that immediate area that we didn't check out, too, and countless beyond that one neighborhood. Even in Yokohama, I found a handful of shops within walking distance and a few more within public transportation distance of CP+.
While most of these shops were quite small, they were absolutely filled to the brim with cameras and lenses. Each was packed with glass cases with rows and rows of cameras and lenses, and many also had boxes on the floor with even more to choose from, if you were willing to hunt through them to maybe find a gem. The selection was downright overwhelming at times, especially since I didn't have a specific one in mind (other than my husband's request for a Canon P). I could have easily come home with a suitcase full of cameras if my budget had allowed for it.
I hadn't set out specifically for the Olympus M-1. But I saw one in the last shop I checked out, and looked it up since I hadn't heard of it before. The history (and condition of this one) sold me.
Google Pixel 10a | Rear wide camera Photo: Abby Ferguson
It was also fascinating seeing so many brands and cameras that I'd never even heard of. I am kicking myself for not writing some of them down to look up later, because there were some very intriguing names and form factors. I ended up buying an Olympus M-1 for myself, which I hadn't even heard of before I looked it up in the store after seeing one.
Mitchell's experience
My one thought as a 1.8m tall American who was wearing a backpack to carry all our filming gear: these stores were DENSE. I barely had room to turn around, and trying to get to a specific aisle could feel like a sliding tile puzzle if someone was between you and it. I remember one store in particular where it was the three of us, and then another person shopping there; when two more people came in, the shopkeeper laughed, saying, “Too many people!”
This isn’t at all meant to be a complaint – it’s part of the density that gave the city its charm – but it’s worth being aware of if you’re going shopping at them. Had I realized just how small they were, I might’ve opted to film with a phone, rather than my full-size camera and backpack full of supporting gear.
Experience of Yodobashi Camera for the first time
My local Best Buy is a surprisingly competent camera store, but certainly doesn't stock every color of the Nikon Zf... nor practically every other camera and lens that Nikon makes.
iPhone 15 Pro | Rear wide camera Photo: Mitchell Clark
Mitchell's thoughts
As part of our trip, our coworker Dale Baskin recommended that we all go to the Yodobashi Camera store in Akihabara, partially for the sheer experience of shopping at a photographic Mecca, and partially because he thought it'd make for a really good video for social media (it did). And despite all the things he told us about it, it still ended up being a much more interesting experience than I'd thought.
The first thing that became apparent right when we walked in was that, despite its name, the store sells much more than camera gear (though I suppose that should've been obvious given that it was seven stories tall). You don't even get to the main photography section until the third floor, after you've gone through a maze of smartphones, computers, monitors, networking equipment, printers and enough cables and accessories for the aforementioned to make a Best Buy blush.
Once you make it to the photo level, though, it is absolutely glorious. They have pretty much every current camera and lens, not just available, but out on the shelves for you to play with. (Though, perhaps unsurprisingly, the one camera I didn't see was a Fujifilm X100VI). Basically, every kind of photography is represented: there were booths for pretty much every brand, as well as displays for various lens makers, video cameras of all shapes and sizes, flashes, film cameras and film to put in them and more. They had pretty much every kind of Instax (which we noted were all completely sold out), and even a wide array of itty-bitty toy cameras for the kids or camera-curious.
It's not all fancy cameras at Yotobashi; they also stock the increasingly popular cheap point-and-shoots and charm-sized cameras. Photo: Dale Baskin
Of course, it's not just the cameras, it's the accessories too. You can get flashes, tripods, printers and paper for them, bags, film, straps, whatever. The experience really highlighted the fact that there's currently nothing even remotely comparable where I live; no stores that I could go to and feel assured that they would have a particular hotshoe cover or filter ring adapter. For most types of photo gear, if I want it, I’ll have to order it and wait a few days for it to arrive. It’s very cool to experience a store that sells basically everything I could ever want as a photographer.
One final note is that I was told to expect complete sensory overload, and I have to say that I was a little disappointed. Sure, the constant music and announcements took some getting used to, but it wasn't particularly overwhelming; I was mostly just excited to be there. However, your mileage may vary: it may just be that I've completely cooked my brain by listening to YouTube videos at 2x while also playing video games, and that others would find the sheer density of products and information to be too much to take in.
Abby's thoughts
Overall, I very much agree with Mitchell's takeaways. I was surprised by the sheer variety of items at Yodobashi, as there's plenty there that has nothing to do with photography. I really enjoyed and appreciated how well-rounded the photography items were, though. There were products for every step of the photographic process. That included a wide range of inkjet papers, which you normally don't see in camera stores.
Where our opinions differ, though, is in regards to sensory overload. I have not destroyed my brain like Mitchell has, so I did find it completely overwhelming. I was very glad to leave the store when we did for the comparatively quiet streets of Tokyo.
The TTArtisan Instax retro-styled folding instant camera is not canceled or blocked by Fujifilm, as some websites suggested. The camera is already available for sale in China via an invitation-only release, and a small number of users can purchase it with an invitation code. The model has not been launched overseas yet. The price in China is 2,780 yuan or around $400 (check for US pricing here). Check also the official website for updates.
Get ready for another AMA (Ask 'Me' Anything) with the DPReview editorial team!
The CP+ Japan trip team
Dale Baskin (Managing Editor)
Mitchell Clark (Reviews Editor)
Abby Ferguson (News Editor)
On Wednesday, March 11th, from 5:30 p.m. to 8 p.m. UTC (9:30 a.m. to 12 p.m. Pacific Time / 12:30 p.m. to 4 p.m. Eastern Time), our team will join you in the forums to answer questions live about their trip to Japanese camera stores. You can ask anything related to the used stores we visited, cameras we may have seen, what we thought of Japan, and the state of the camera industry around it all.
When you use DPReview links to buy products, the site may earn a commission.
Photo: Richard Butler
As we're working on reviewing the Ricoh GR IV Monochrome, we've put it in front of our studio test scene to see how it performs. And, while it's one thing to know intellectually that the lack of a color filter array improves certain aspects of image quality, it's impressive to see it actually in action.
Our test scene is designed to simulate a variety of textures, colors, and detail types you'll encounter in the real world. It also has two illumination modes, full even light and low directional light, to see the effect of different lighting conditions.
Image Comparison
This widget is not optimized for RSS feed readers. Click here to open it in a new browser window / tab.
Like its color sibling, the GR IV Monochrome's 26MP BSI CMOS captures a very good level of detail in its Raws. However, thanks to the lack of demosaicing, the black and white images look noticably sharper, even compared to the files from the higher-resolution Fujifilm X100VI.
The Monochrome doesn't have a noise advantage if you compare its base ISO performance to that of the color version, but its base ISO is 2/3EV higher, so it's delivering a comparable result despite being exposed to less light. Once you bump up to ISO 200, and give the two versions the same exposure though, the difference starts to become apparent: the GR IV Monochrome has less noise than its APS-C counterparts, and comes much closer to full-frame cameras.
This continues to be the case through mid to high ISOs, and the GR IV Monochrome continues to produce passable images well into ranges that we wouldn't bother with on a color camera; in addition to not losing light to any color filters, it probably helps that luma noise won't be as distracting as chroma noise to most viewers. Ricoh lets you go all the way up to a ludicrous ISO 409,600, though by that point the image has, unsurprisingly, truly fallen apart.
As we saw with the GR IV, Ricoh's JPEG engine doesn't quite manage to include all the detail that the camera's Raws do, though the results are still very nice to look at. At higher ISOs, though, the effects of noise reduction on the Monochrome's images are less noticeable; the JPEGs show more detail than their color counterparts, even if you compare images that received a stop less light".
This is typically where we'd discuss the JPEG colors but, of course, the GR IV Monochrome doesn't capture any. There is a cost for the extra detail and improved noise, after all.
Like the standard GR IV, the Monochrome offers excellent dynamic range performance with relatively low read noise, giving you room to boost shadows, or to shoot at ISO 160 for maximum dynamic range and brighten to your preferred lightness in post without introducing too much additional noise.
With that said, it's worth remembering that once your highlights are clipped on a monochrome camera, they're gone. With a color camera, you have the chance of pulling back at least some detail from one of the three color channels, but that's not an option with the Monochrome.
If you want to go into more detail on the 28mm equiv. F2.8 lens that this camera shares with the original GR IV, you can check out our review of that camera. The short version, though, is that it's impressively sharp edge-to-edge given its size, even wide open, though it has a fair amount of vignetting throughout its aperture range.
Our studio scene didn't reveal anything surprising about the GR IV Monochrome, but that's not a bad thing. It turns in an impressive performance, producing sharper images with less noise than the standard GR IV, at the same settings. Given that the GR IV was already a benchmark in image quality for a camera of its size, we can't complain about that.
It’s been less than a week since I returned from Japan and my first time at the CP+ Expo, and I’m still processing all that I experienced there. We’ve already shared our team discussion from Yokohama, but after a bit of time (and while still fighting some serious jet lag), I wanted to jot down a few thoughts about what stood out the most from my first time at CP+.
The show isn't just about gear
OM System had two gallery spaces, one with black walls and one with white. Photo: Abby Ferguson
One of the biggest surprises for me, as a CP+ newbie, was how many non-gear-related activities and displays there were. Prior to attending, I was under the impression that the show was strictly about lenses, cameras, lights, tripods and so on. I assumed the focus was entirely on the technical side of photography, not necessarily the creative.
While I certainly appreciate the gear side of things (I do work at DPReview, after all), the creative side is where my foundation in photography began and is what continues to fuel me. So I was pleasantly surprised and very excited to see so many things dedicated to the craft of photography outside of gear.
Every major booth had a stage where they hosted photographers to give presentations on their work. Unfortunately, I don't speak Japanese, so I couldn't understand any of them, but it was still exciting to see. Each major manufacturer also had at least a small gallery (some had more than one) with prints from photographers. Those images were, of course, meant to showcase how good the company's gear is, but I still appreciated that they were highlighting interesting pictures.
Fujifilm had very attractive books dedicated to each of its different film simulations. Photo: Abby Ferguson
My favorite creative parts of CP+, though, were the book-related ones. Sigma's booth featured a long bookshelf full of photo books. Some were iconic photo books by artists like Robert Mapplethorpe, Vivian Maier and Ed Ruscha. There were also two books that marked the kick-off of the Sigma Foundation, a funding mechanism to support and promote photographic artists. As a side note, the Sigma booth featured a beautifully minimalist design with flowing white curtains, which reminded me of some of my all-time favorite works by Carrie Mae Weems.
I couldn't resist this photo book by Daisuke Yamamoto at the zine fair. Photo: Abby Ferguson
We also stumbled on the zine fair at CP+, which was a delightful surprise. This was the first year for the zine section at CP+. It replaced the used camera market that used to be at the show, and perhaps signals a move by organizers to include more art moving forward. The zine festival was separate from the main floor and consisted of a large room filled with tables featuring individual creatives showcasing their photo-related books and zines. It was wonderful to walk around, talk to the artists about their work and see the creativity and diversity of the work on display. I even bought a photo book, since I couldn't resist leaving with something.
Yes, the gear is impressive
It's really neat seeing a wall of cameras and lenses. Photo: Abby Ferguson
I know I just wrote about how much I loved that the show isn't only about equipment, but gear is still the main focus of CP+. And it is indeed cool to see brands put all their lenses, cameras, and accessories on full display in one small area. Regardless of your brand loyalty, it's flat-out neat (and very satisfying) seeing a wall of pristine lenses.
Walking through the show floor was a good reminder of the sheer number of options we have these days as photographers. It is almost overwhelming seeing it all in one place, in fact. No matter your style, needs, or preferences, there will be gear that fits, and seeing everything on display made that abundantly clear.
Like-minded individuals
Photo: Abby Ferguson
Photography can be an isolating activity. After all, so much of the medium happens behind a camera or a screen. As an introvert, it’s easy for me to stay in that bubble, focused on my own projects. But every time I put myself in situations to join other photographers in some manner, it's refreshing.
While I wasn't necessarily talking with lots of people on the CP+ show floor outside of brand interviews, it was fun to simply be surrounded by so many (so very many) people interested in photography in some capacity. It was a refreshing change of pace to be among others who understand that same pull toward creating pictures (or videos), and a good reminder that there are so many who can relate to what you enjoy doing. If you haven't ever attended a photography-specific expo, conference or event, I'd highly suggest doing so at least once, to remind yourself of the importance of community.
I captured this photo in the Shinjuku neighborhood of Tokyo, Japan, a couple of years ago while visiting used camera stores in the area. In addition to the used camera stores, however, Shinjuku lights up at night, becoming a bright, colorful playground for photographers.
This month, we want to see your most brilliant photos of artificial light sources that light up the night. There's a myriad of possibilities, ranging from city lights and fireworks to carnivals and neon signs. The creative possibilities are endless. Our favorites will be featured in an article on the DPReview homepage.
Photos can be submitted between Sunday, March 15, and Saturday, March 21 (GMT). The challenge is open to photos captured at any time.
Important: Images MUST include a title and a caption of at least 25 words to be eligible. We need to be able to share the story behind your photo. We will consider both photos and captions when selecting our winners, so make sure to tell us that story!
Visit the challenge page to read the full rules and to submit your photos for consideration as soon as the challenge opens.
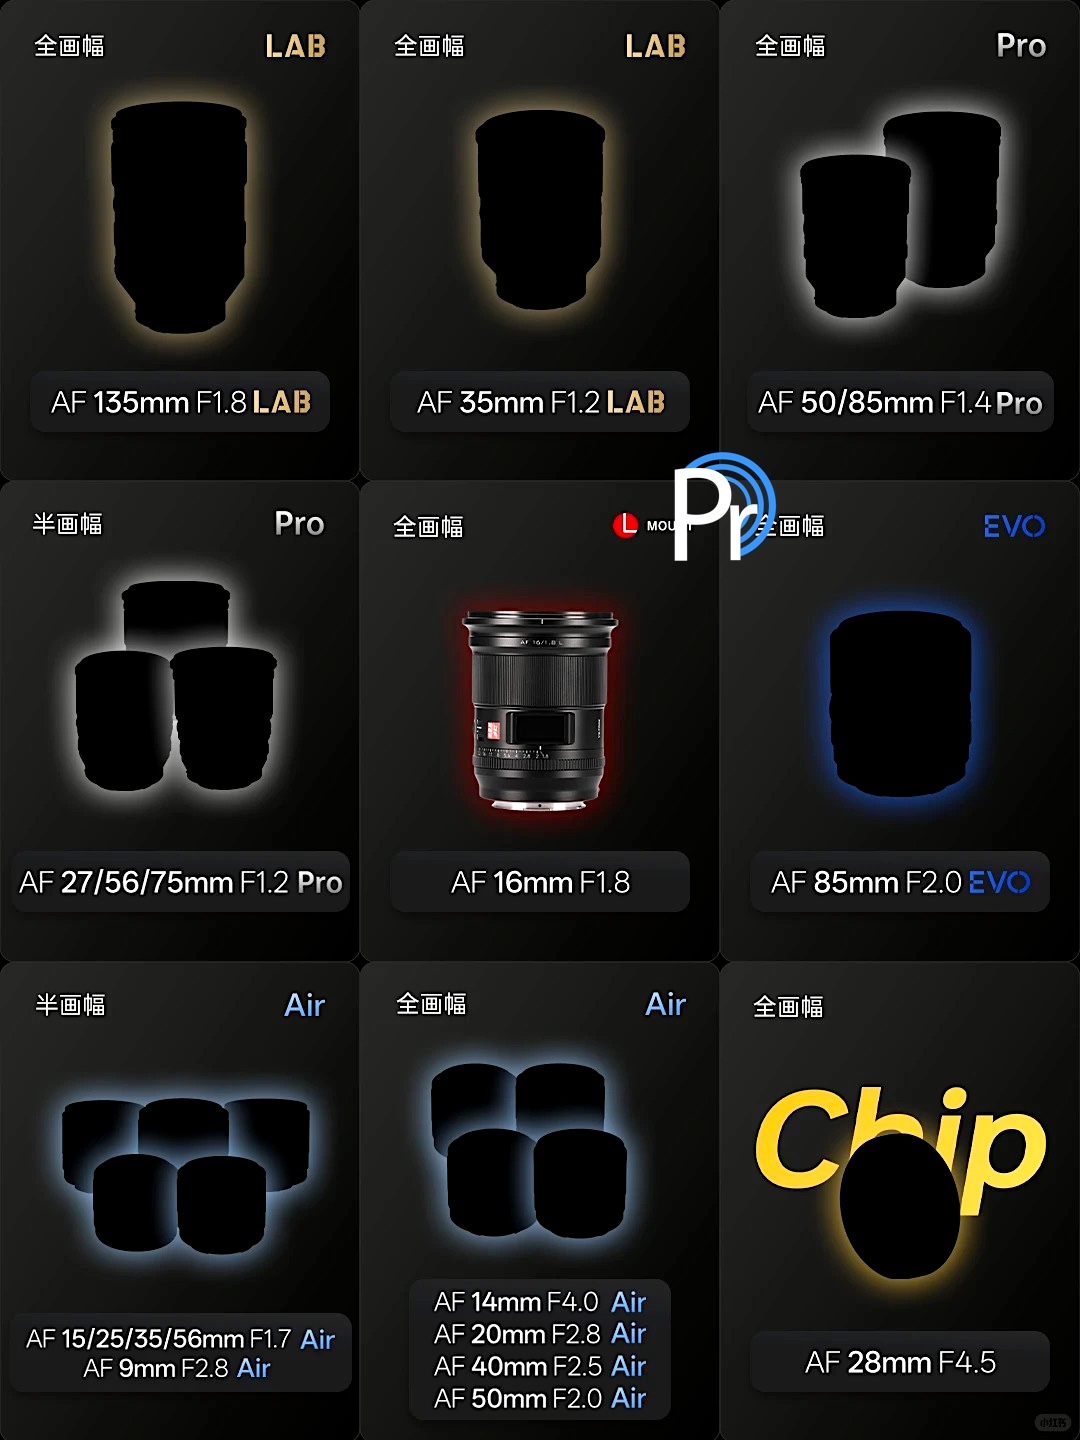
The upcoming Viltrox 35mm f/1.8 EVO and 55mm f/1.8 EVO lenses surpass the performance of some existing APO lenses, acording ot a Viltrox engineer. This is why they call the new line of EVO lenses “Hyper APO”:
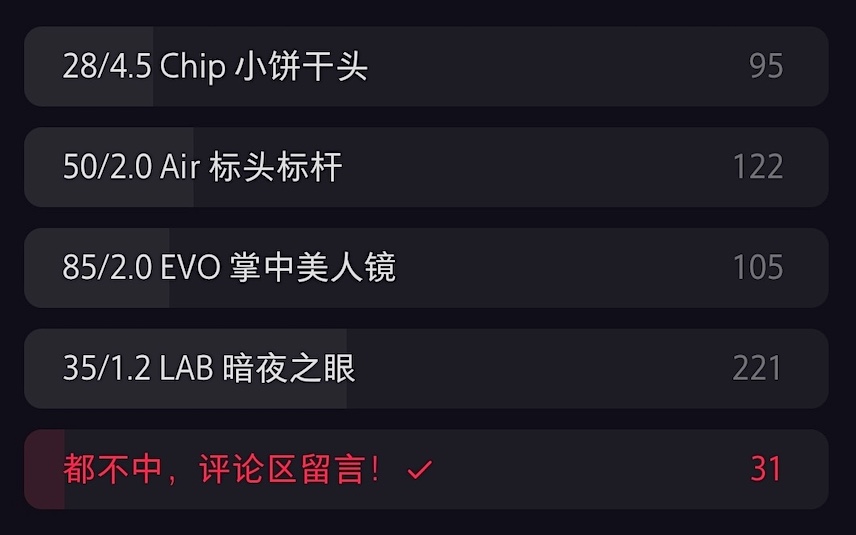
The Viltrox engineer also asked what EVO “Hyper APO” lens should be released next – a new 28mm seems to be the clear winner:
Another poll is asking what Viltrox lens should be released next for L-mount:
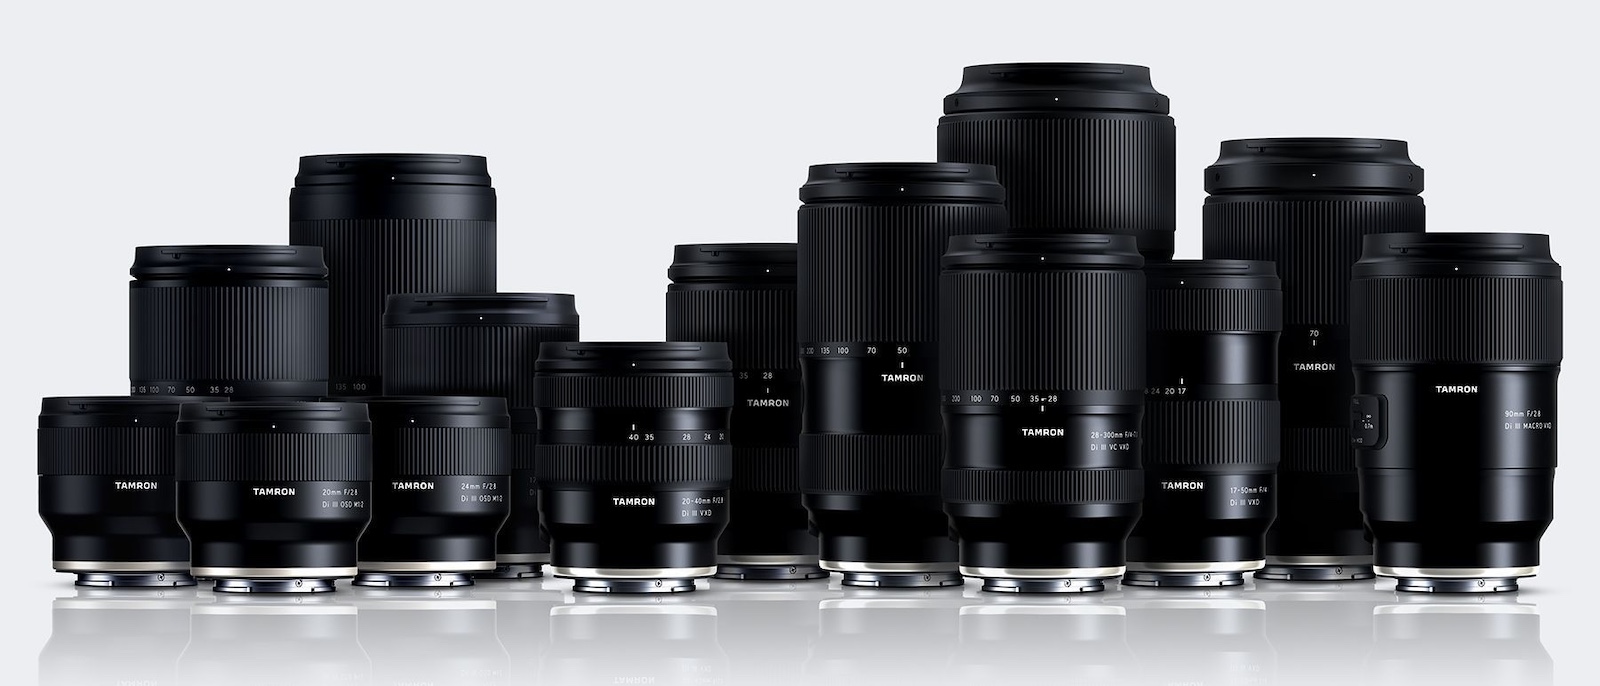
Yesterday, Tamron Americas announced updates to its 6-Year Limited Warranty program, aimed at providing more value and support for photographers and videographers in North America. This enhancement builds on their existing warranty, which offers coverage for defects in materials or workmanship for six years from the date of purchase when purchased from an authorized retailer.
The enhanced benefits are available for Tamron lenses purchased from authorized Tamron Americas retailers or the official Tamron Store.
Applies to customers in the United States, Canada, and Mexico.
To access the full benefits, the lens must be registered with Tamron Americas according to their guidelines.
New benefits (marked below) are effective for eligible lenses purchased and registered on or after January 1, 2026.
Full terms and details can be found on Tamron’s warranty registration page.
Benefits for Registered Users
Registering your lens unlocks product support, company updates, event invitations, educational seminars, and potential qualification for the Tamron VIP Club. Specific warranty perks include:
Authorized repairs using original Tamron parts.
Free annual external clean and check service.
New: Accidental damage coverage – 50% off repair charges for non-warranty issues like liquid, impact, or sand damage within the first six months of purchase.
New: $50 bonus rebate toward purchasing a new Tamron lens.
New: Free replacement of zoom and focus rubbers.
New: 25% savings on replacement hoods, front caps, and rear caps.
Lens replacement for unrepairable units – In-warranty replacements are free (same or equivalent model); out-of-warranty may qualify with applicable charges.
Repair replacement review – If the same issue requires a third consecutive repair, the lens may qualify for replacement.
When you use DPReview links to buy products, the site may earn a commission.
Nikon Z8 | Viltrox AF 35mm F1.2 Lab | F5.6 | 1/800 sec | ISO 64 Photo: Mitchell Clark
Late last year, Viltrox announced that it was bringing its 35mm F1.2 Lab lens to Nikon's Z mount. Given that the company pitches its Lab lenses as including "flagship optical design," we're happy we got the opportunity to test one out in a variety of conditions.
Image quality
Nikon Z8 | Viltrox AF 35mm F1.2 Lab | F1.8 | 1/125 sec | ISO 64
Wide-open, we found that the 35mm F1.2 Lab has good levels of sharpness in the center, and does a decent job at maintaining that to the edges. It's not quite as sharp as the best F1.2 optics we've seen, but for the price, it's hard to complain about the performance of our copy. Vignetting is also around what we'd expect for an F1.2 lens, almost entirely clearing up around F4.
I find the lens' out-of-focus rendering to be quite pleasing, but at F1.2, the cat's eye effect on the specular highlights outside the center of the frame can be a bit lopsided and uneven in a way that can be distracting if your background only has a few bright lights in it (the effect is less noticable if the bokeh is made up of several light sources blending together). By F2 the bokeh is closer to circular, but past that it becomes a bit more geometric.
F1.2
F1.4
F2
F2.8
F4
F5.6
We found that the lens maintained contrast well, even when shooting with bright backlight, and that it resisted flare in all but the most intense conditions.
If you go looking for chromatic aberration, you'll definitely find some, but it's typically not distracting in all but the most challenging scenarios.
Usability
To start with the elephant on the camera, this is a large, heavy lens. However, that comes with the F1.2 territory, and it's not unduly so; it's actaully lighter than Nikon's own 35mm F1.2 S (though around 23% heavier than Sigma's second-gen 35mm F1.2). While it wouldn't be my first choice as a travel lens, I never felt particularly burdened by it as I carried it around Japan while I was there for CP+.
The Viltrox AF 35mm F1.2 Lab Z isn't big and heavy for a F1.2 lens, but it is still big and heavy. I also don't find the top display to be especially useful or aesthetically pleasing, but your mileage may vary on that. Photo: Becky O'Bryan
While we don't make it a point to test gear's weather sealing, I did end up shooting in light rain for an hour or two with this lens, and it didn't miss a beat, and has continued to work afterwards with no issues. I'm not saying that you'll definitely get the same results, or that this lens is capable of withstanding any weather, but it did at least hold up well when I got caught in a drizzle.
The control ring is a bit of a mixed bag. It's nice that it can be clicked or declicked, especially for controlling aperture, but the control is inconsistent. Sometimes I would turn the ring one click, and the aperture wouldn't change at all, and I'd have to turn it a few more clicks to get it to go up or down 1/3 of a stop. Sometimes, though, one click was enough. This inconsistency basically put me off using it entirely, though I'd be interested to see if it performs the same way on a Sony body.
It can take several clicks of the control ring to get the aperture to change at all.
The lens's autofocus motors are relatively quick and responsive, though it doesn't quite seem capable of immediately snapping from minimum focus to infinity like other lenses with linear motors we've tested. It's hard to say how much of this is on the camera, though. I also found that my Z8 was hunting for focus or slightly missing it more frequently than I'd expect, based on my experience using it with other first-party or officially licensed lenses.
While the lens was still very usable, this issue was prevalent enough that I checked to make sure there wasn't a firmware update available that might improve it; at the time of writing, there is not, though the company did just release one for the E-mount version of the lens.
Summary
Pictured: my friend ogling the Leica Noctilux M 35mm F1.2 Asph., a lens that costs around $8500 more than the Viltrox. While I'd certainly rather carry the Leica around, I'm not sure I actually liked the images it produced that much more (though the Lab's slightly odd bokeh is highlighted in this picture).
While you can certainly find things to complain about with the images it produces, it's worth remembering that the Viltrox 35mm F1.2 Lab for Z mount costs $1000. That's substantially less than F1.2 lenses typically cost, especially the ones from first-party companies like Nikon. The Nikkor 35mm F1.2 S may have nicer bokeh, sure, but it also costs three times as much, so it had darn well better.
With that said, we'd typically urge anyone thinking about picking up this lens to at least consider how much benefit they really expect to get from the extra 1/2 or 1EV it provides compared to its F1.4 and F1.8 rivals. If you're willing to give up the extra speed, you can get a lens with fewer compromises, and that will be significantly smaller and lighter, a proposition that I personally find very tempting. Many will also be cheaper, too.
If you absolutely need F1.2, this is one of the most affordable ways to get it
However, if you absolutely need F1.2, this is one of the most affordable ways to get it (at least, if you want modern amenities like autofocusing, which, believe me, is very nice to have if you're shooting such a fast lens). And while I've gone over some of my complaints with it, it's still a very competent lens capable of producing great images. It does a lot of things reasonably well, especially given its price.
The final wrinkle is, of course, that Nikon is currently taking legal action against Viltrox, so the future of the company's lenses on Z mount is a bit up in the air at this point. That may be something worth keeping in mind if you're looking at spending what is still a fair chunk of change on this lens.
Sample gallery
This widget is not optimized for RSS feed readers. Click here to open it in a new browser window / tab.