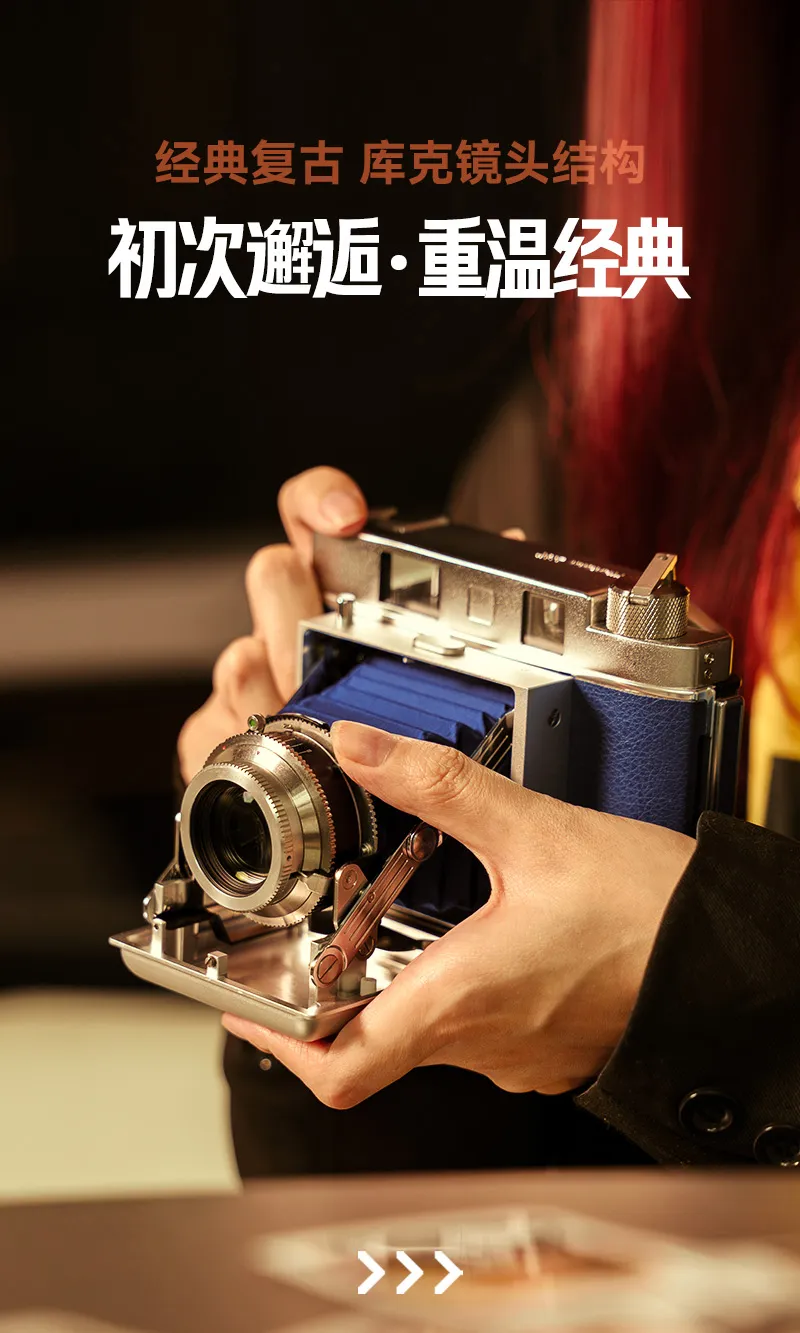
The TTArtisan Instax retro-styled folding instant camera is not canceled or blocked by Fujifilm, as some websites suggested. The camera is already available for sale in China via an invitation-only release, and a small number of users can purchase it with an invitation code. The model has not been launched overseas yet. The price in China is 2,780 yuan or around $400 (check for US pricing here). Check also the official website for updates.
Get ready for another AMA (Ask 'Me' Anything) with the DPReview editorial team!
The CP+ Japan trip team
Dale Baskin (Managing Editor)
Mitchell Clark (Reviews Editor)
Abby Ferguson (News Editor)
On Wednesday, March 11th, from 5:30 p.m. to 8 p.m. UTC (9:30 a.m. to 12 p.m. Pacific Time / 12:30 p.m. to 4 p.m. Eastern Time), our team will join you in the forums to answer questions live about their trip to Japanese camera stores. You can ask anything related to the used stores we visited, cameras we may have seen, what we thought of Japan, and the state of the camera industry around it all.
When you use DPReview links to buy products, the site may earn a commission.
Photo: Richard Butler
As we're working on reviewing the Ricoh GR IV Monochrome, we've put it in front of our studio test scene to see how it performs. And, while it's one thing to know intellectually that the lack of a color filter array improves certain aspects of image quality, it's impressive to see it actually in action.
Our test scene is designed to simulate a variety of textures, colors, and detail types you'll encounter in the real world. It also has two illumination modes, full even light and low directional light, to see the effect of different lighting conditions.
Image Comparison
This widget is not optimized for RSS feed readers. Click here to open it in a new browser window / tab.
Like its color sibling, the GR IV Monochrome's 26MP BSI CMOS captures a very good level of detail in its Raws. However, thanks to the lack of demosaicing, the black and white images look noticably sharper, even compared to the files from the higher-resolution Fujifilm X100VI.
The Monochrome doesn't have a noise advantage if you compare its base ISO performance to that of the color version, but its base ISO is 2/3EV higher, so it's delivering a comparable result despite being exposed to less light. Once you bump up to ISO 200, and give the two versions the same exposure though, the difference starts to become apparent: the GR IV Monochrome has less noise than its APS-C counterparts, and comes much closer to full-frame cameras.
This continues to be the case through mid to high ISOs, and the GR IV Monochrome continues to produce passable images well into ranges that we wouldn't bother with on a color camera; in addition to not losing light to any color filters, it probably helps that luma noise won't be as distracting as chroma noise to most viewers. Ricoh lets you go all the way up to a ludicrous ISO 409,600, though by that point the image has, unsurprisingly, truly fallen apart.
As we saw with the GR IV, Ricoh's JPEG engine doesn't quite manage to include all the detail that the camera's Raws do, though the results are still very nice to look at. At higher ISOs, though, the effects of noise reduction on the Monochrome's images are less noticeable; the JPEGs show more detail than their color counterparts, even if you compare images that received a stop less light".
This is typically where we'd discuss the JPEG colors but, of course, the GR IV Monochrome doesn't capture any. There is a cost for the extra detail and improved noise, after all.
Like the standard GR IV, the Monochrome offers excellent dynamic range performance with relatively low read noise, giving you room to boost shadows, or to shoot at ISO 160 for maximum dynamic range and brighten to your preferred lightness in post without introducing too much additional noise.
With that said, it's worth remembering that once your highlights are clipped on a monochrome camera, they're gone. With a color camera, you have the chance of pulling back at least some detail from one of the three color channels, but that's not an option with the Monochrome.
If you want to go into more detail on the 28mm equiv. F2.8 lens that this camera shares with the original GR IV, you can check out our review of that camera. The short version, though, is that it's impressively sharp edge-to-edge given its size, even wide open, though it has a fair amount of vignetting throughout its aperture range.
Our studio scene didn't reveal anything surprising about the GR IV Monochrome, but that's not a bad thing. It turns in an impressive performance, producing sharper images with less noise than the standard GR IV, at the same settings. Given that the GR IV was already a benchmark in image quality for a camera of its size, we can't complain about that.
It’s been less than a week since I returned from Japan and my first time at the CP+ Expo, and I’m still processing all that I experienced there. We’ve already shared our team discussion from Yokohama, but after a bit of time (and while still fighting some serious jet lag), I wanted to jot down a few thoughts about what stood out the most from my first time at CP+.
The show isn't just about gear
OM System had two gallery spaces, one with black walls and one with white. Photo: Abby Ferguson
One of the biggest surprises for me, as a CP+ newbie, was how many non-gear-related activities and displays there were. Prior to attending, I was under the impression that the show was strictly about lenses, cameras, lights, tripods and so on. I assumed the focus was entirely on the technical side of photography, not necessarily the creative.
While I certainly appreciate the gear side of things (I do work at DPReview, after all), the creative side is where my foundation in photography began and is what continues to fuel me. So I was pleasantly surprised and very excited to see so many things dedicated to the craft of photography outside of gear.
Every major booth had a stage where they hosted photographers to give presentations on their work. Unfortunately, I don't speak Japanese, so I couldn't understand any of them, but it was still exciting to see. Each major manufacturer also had at least a small gallery (some had more than one) with prints from photographers. Those images were, of course, meant to showcase how good the company's gear is, but I still appreciated that they were highlighting interesting pictures.
Fujifilm had very attractive books dedicated to each of its different film simulations. Photo: Abby Ferguson
My favorite creative parts of CP+, though, were the book-related ones. Sigma's booth featured a long bookshelf full of photo books. Some were iconic photo books by artists like Robert Mapplethorpe, Vivian Maier and Ed Ruscha. There were also two books that marked the kick-off of the Sigma Foundation, a funding mechanism to support and promote photographic artists. As a side note, the Sigma booth featured a beautifully minimalist design with flowing white curtains, which reminded me of some of my all-time favorite works by Carrie Mae Weems.
I couldn't resist this photo book by Daisuke Yamamoto at the zine fair. Photo: Abby Ferguson
We also stumbled on the zine fair at CP+, which was a delightful surprise. This was the first year for the zine section at CP+. It replaced the used camera market that used to be at the show, and perhaps signals a move by organizers to include more art moving forward. The zine festival was separate from the main floor and consisted of a large room filled with tables featuring individual creatives showcasing their photo-related books and zines. It was wonderful to walk around, talk to the artists about their work and see the creativity and diversity of the work on display. I even bought a photo book, since I couldn't resist leaving with something.
Yes, the gear is impressive
It's really neat seeing a wall of cameras and lenses. Photo: Abby Ferguson
I know I just wrote about how much I loved that the show isn't only about equipment, but gear is still the main focus of CP+. And it is indeed cool to see brands put all their lenses, cameras, and accessories on full display in one small area. Regardless of your brand loyalty, it's flat-out neat (and very satisfying) seeing a wall of pristine lenses.
Walking through the show floor was a good reminder of the sheer number of options we have these days as photographers. It is almost overwhelming seeing it all in one place, in fact. No matter your style, needs, or preferences, there will be gear that fits, and seeing everything on display made that abundantly clear.
Like-minded individuals
Photo: Abby Ferguson
Photography can be an isolating activity. After all, so much of the medium happens behind a camera or a screen. As an introvert, it’s easy for me to stay in that bubble, focused on my own projects. But every time I put myself in situations to join other photographers in some manner, it's refreshing.
While I wasn't necessarily talking with lots of people on the CP+ show floor outside of brand interviews, it was fun to simply be surrounded by so many (so very many) people interested in photography in some capacity. It was a refreshing change of pace to be among others who understand that same pull toward creating pictures (or videos), and a good reminder that there are so many who can relate to what you enjoy doing. If you haven't ever attended a photography-specific expo, conference or event, I'd highly suggest doing so at least once, to remind yourself of the importance of community.
I captured this photo in the Shinjuku neighborhood of Tokyo, Japan, a couple of years ago while visiting used camera stores in the area. In addition to the used camera stores, however, Shinjuku lights up at night, becoming a bright, colorful playground for photographers.
This month, we want to see your most brilliant photos of artificial light sources that light up the night. There's a myriad of possibilities, ranging from city lights and fireworks to carnivals and neon signs. The creative possibilities are endless. Our favorites will be featured in an article on the DPReview homepage.
Photos can be submitted between Sunday, March 15, and Saturday, March 21 (GMT). The challenge is open to photos captured at any time.
Important: Images MUST include a title and a caption of at least 25 words to be eligible. We need to be able to share the story behind your photo. We will consider both photos and captions when selecting our winners, so make sure to tell us that story!
Visit the challenge page to read the full rules and to submit your photos for consideration as soon as the challenge opens.
The upcoming Viltrox 35mm f/1.8 EVO and 55mm f/1.8 EVO lenses surpass the performance of some existing APO lenses, acording ot a Viltrox engineer. This is why they call the new line of EVO lenses “Hyper APO”:
The Viltrox engineer also asked what EVO “Hyper APO” lens should be released next – a new 28mm seems to be the clear winner:
Another poll is asking what Viltrox lens should be released next for L-mount:
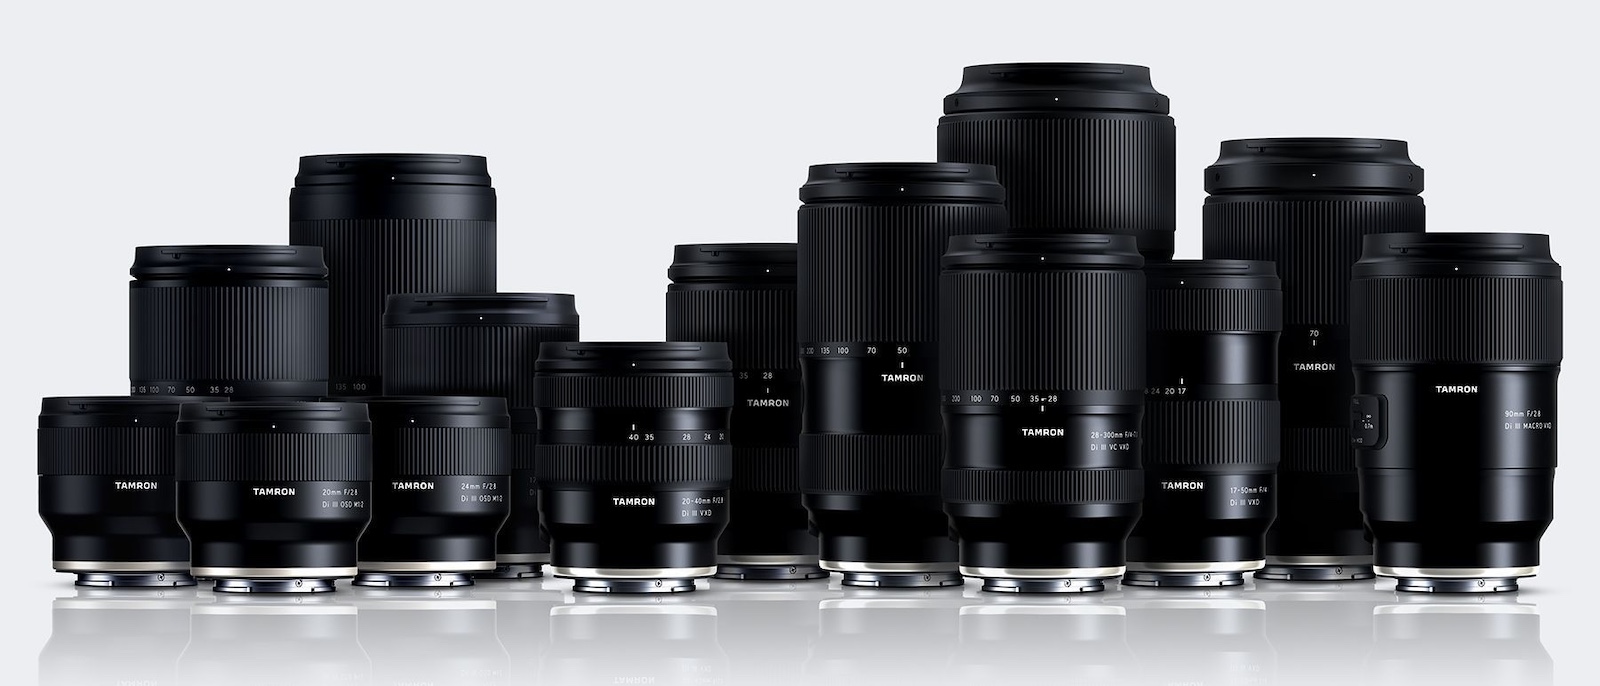
Yesterday, Tamron Americas announced updates to its 6-Year Limited Warranty program, aimed at providing more value and support for photographers and videographers in North America. This enhancement builds on their existing warranty, which offers coverage for defects in materials or workmanship for six years from the date of purchase when purchased from an authorized retailer.
The enhanced benefits are available for Tamron lenses purchased from authorized Tamron Americas retailers or the official Tamron Store.
Applies to customers in the United States, Canada, and Mexico.
To access the full benefits, the lens must be registered with Tamron Americas according to their guidelines.
New benefits (marked below) are effective for eligible lenses purchased and registered on or after January 1, 2026.
Full terms and details can be found on Tamron’s warranty registration page.
Benefits for Registered Users
Registering your lens unlocks product support, company updates, event invitations, educational seminars, and potential qualification for the Tamron VIP Club. Specific warranty perks include:
Authorized repairs using original Tamron parts.
Free annual external clean and check service.
New: Accidental damage coverage – 50% off repair charges for non-warranty issues like liquid, impact, or sand damage within the first six months of purchase.
New: $50 bonus rebate toward purchasing a new Tamron lens.
New: Free replacement of zoom and focus rubbers.
New: 25% savings on replacement hoods, front caps, and rear caps.
Lens replacement for unrepairable units – In-warranty replacements are free (same or equivalent model); out-of-warranty may qualify with applicable charges.
Repair replacement review – If the same issue requires a third consecutive repair, the lens may qualify for replacement.
When you use DPReview links to buy products, the site may earn a commission.
Nikon Z8 | Viltrox AF 35mm F1.2 Lab | F5.6 | 1/800 sec | ISO 64 Photo: Mitchell Clark
Late last year, Viltrox announced that it was bringing its 35mm F1.2 Lab lens to Nikon's Z mount. Given that the company pitches its Lab lenses as including "flagship optical design," we're happy we got the opportunity to test one out in a variety of conditions.
Image quality
Nikon Z8 | Viltrox AF 35mm F1.2 Lab | F1.8 | 1/125 sec | ISO 64
Wide-open, we found that the 35mm F1.2 Lab has good levels of sharpness in the center, and does a decent job at maintaining that to the edges. It's not quite as sharp as the best F1.2 optics we've seen, but for the price, it's hard to complain about the performance of our copy. Vignetting is also around what we'd expect for an F1.2 lens, almost entirely clearing up around F4.
I find the lens' out-of-focus rendering to be quite pleasing, but at F1.2, the cat's eye effect on the specular highlights outside the center of the frame can be a bit lopsided and uneven in a way that can be distracting if your background only has a few bright lights in it (the effect is less noticable if the bokeh is made up of several light sources blending together). By F2 the bokeh is closer to circular, but past that it becomes a bit more geometric.
F1.2
F1.4
F2
F2.8
F4
F5.6
We found that the lens maintained contrast well, even when shooting with bright backlight, and that it resisted flare in all but the most intense conditions.
If you go looking for chromatic aberration, you'll definitely find some, but it's typically not distracting in all but the most challenging scenarios.
Usability
To start with the elephant on the camera, this is a large, heavy lens. However, that comes with the F1.2 territory, and it's not unduly so; it's actaully lighter than Nikon's own 35mm F1.2 S (though around 23% heavier than Sigma's second-gen 35mm F1.2). While it wouldn't be my first choice as a travel lens, I never felt particularly burdened by it as I carried it around Japan while I was there for CP+.
The Viltrox AF 35mm F1.2 Lab Z isn't big and heavy for a F1.2 lens, but it is still big and heavy. I also don't find the top display to be especially useful or aesthetically pleasing, but your mileage may vary on that. Photo: Becky O'Bryan
While we don't make it a point to test gear's weather sealing, I did end up shooting in light rain for an hour or two with this lens, and it didn't miss a beat, and has continued to work afterwards with no issues. I'm not saying that you'll definitely get the same results, or that this lens is capable of withstanding any weather, but it did at least hold up well when I got caught in a drizzle.
The control ring is a bit of a mixed bag. It's nice that it can be clicked or declicked, especially for controlling aperture, but the control is inconsistent. Sometimes I would turn the ring one click, and the aperture wouldn't change at all, and I'd have to turn it a few more clicks to get it to go up or down 1/3 of a stop. Sometimes, though, one click was enough. This inconsistency basically put me off using it entirely, though I'd be interested to see if it performs the same way on a Sony body.
It can take several clicks of the control ring to get the aperture to change at all.
The lens's autofocus motors are relatively quick and responsive, though it doesn't quite seem capable of immediately snapping from minimum focus to infinity like other lenses with linear motors we've tested. It's hard to say how much of this is on the camera, though. I also found that my Z8 was hunting for focus or slightly missing it more frequently than I'd expect, based on my experience using it with other first-party or officially licensed lenses.
While the lens was still very usable, this issue was prevalent enough that I checked to make sure there wasn't a firmware update available that might improve it; at the time of writing, there is not, though the company did just release one for the E-mount version of the lens.
Summary
Pictured: my friend ogling the Leica Noctilux M 35mm F1.2 Asph., a lens that costs around $8500 more than the Viltrox. While I'd certainly rather carry the Leica around, I'm not sure I actually liked the images it produced that much more (though the Lab's slightly odd bokeh is highlighted in this picture).
While you can certainly find things to complain about with the images it produces, it's worth remembering that the Viltrox 35mm F1.2 Lab for Z mount costs $1000. That's substantially less than F1.2 lenses typically cost, especially the ones from first-party companies like Nikon. The Nikkor 35mm F1.2 S may have nicer bokeh, sure, but it also costs three times as much, so it had darn well better.
With that said, we'd typically urge anyone thinking about picking up this lens to at least consider how much benefit they really expect to get from the extra 1/3 or 1EV it provides compared to its F1.4 and F1.8 rivals. If you're willing to give up the extra speed, you can get a lens with fewer compromises, and that will be significantly smaller and lighter, a proposition that I personally find very tempting. Many will also be cheaper, too.
If you absolutely need F1.2, this is one of the most affordable ways to get it
However, if you absolutely need F1.2, this is one of the most affordable ways to get it (at least, if you want modern amenities like autofocusing, which, believe me, is very nice to have if you're shooting such a fast lens). And while I've gone over some of my complaints with it, it's still a very competent lens capable of producing great images. It does a lot of things reasonably well, especially given its price.
The final wrinkle is, of course, that Nikon is currently taking legal action against Viltrox, so the future of the company's lenses on Z mount is a bit up in the air at this point. That may be something worth keeping in mind if you're looking at spending what is still a fair chunk of change on this lens.
Sample gallery
This widget is not optimized for RSS feed readers. Click here to open it in a new browser window / tab.
Harman Photo is keeping the ball rolling on new film, releasing a creative color film called Switch Azure. As the name suggests, the company's latest offering "switches" the colors for a more experimental look.
Switch Azure's color swap results in rendering blues as orange, bright yellows as azure and reds as hues of purple or blue. Harman says that greens are less affected, but even those will shift depending on the original hue. It promises to provide similar results to Lomography's Turquoise film. Sunsets effectively become inverted, skin tones are a bit alien-like and common objects become a bit strange. Those who like realistic, natural colors from their film won't be fans, but for creatives who like to play around with unexpected results, it's an interesting option.
Don't expect normal colors from this film.
Photo: Vitor Lopes Leite / Harman Photo
Adding another layer of complexity is that Harman specifies that the type of scanner used will significantly affect the colors. An example image on the Switch Azure product page shows a scanned sunset photo: the Fuji scan renders a very blue image, while a Noritsu scan produces warmer colors.
Harman's new film is rated at ISO 125, and the company says the film is best used outside while metering for the mid-tones. It's available in 120 format and in a 35mm DX-coded cassette with 36 frames. The film can be processed with standard C41 processing.
Harman Switch Azure film is starting to trickle into stores, and you can use the Harman Photo website to find a location near you. Pricing varies by location, though most are around $13 for 35mm and $12 for 120.
Sometimes you just need some joy in your life, and, at least for me, watching other people experience joy can be a way to fulfill that need. A recent video of Jeff and Susan Bridges unboxing the first two models of their Widelux-X camera does just that, with Jeff absolutely giddy about what he's seeing. You'll have to head to the Widelux-X website to watch the video, as it is only hosted there, but it's worth a watch if you need some wholesome excitement.
For those unfamiliar, Jeff Bridges is a very big fan of the Widelux, a panoramic, panning-lens film camera that was originally developed in Japan in 1958. A factory fire and other factors ended production roughly 20 years ago, and they are now highly sought-after collector items. Bridges has said that most of the images he creates are with the Widelux, and he's taken some incredible behind-the-scenes shots on movie sets with it.
Image: SilverBridges
Bridges is such a fan of the camera that he decided to recreate it through his SilverBridges company. The team revealed a handmade working prototype in November of last year. Recently, two models were mailed to the Bridges in LA, and the pair unboxed them for a video that is hosted on the Widelux-X website.
It's very evident that Bridges is absolutely ecstatic about the camera, and the pair immediately took some portraits of each other and a selfie. It's fun to see how excited he is, and it's also neat to see additional shots of – and from – the camera. The team hasn't unveiled any new details, but it appears the project is at least moving forward, which is good to see, even if it will be well out of my budget.
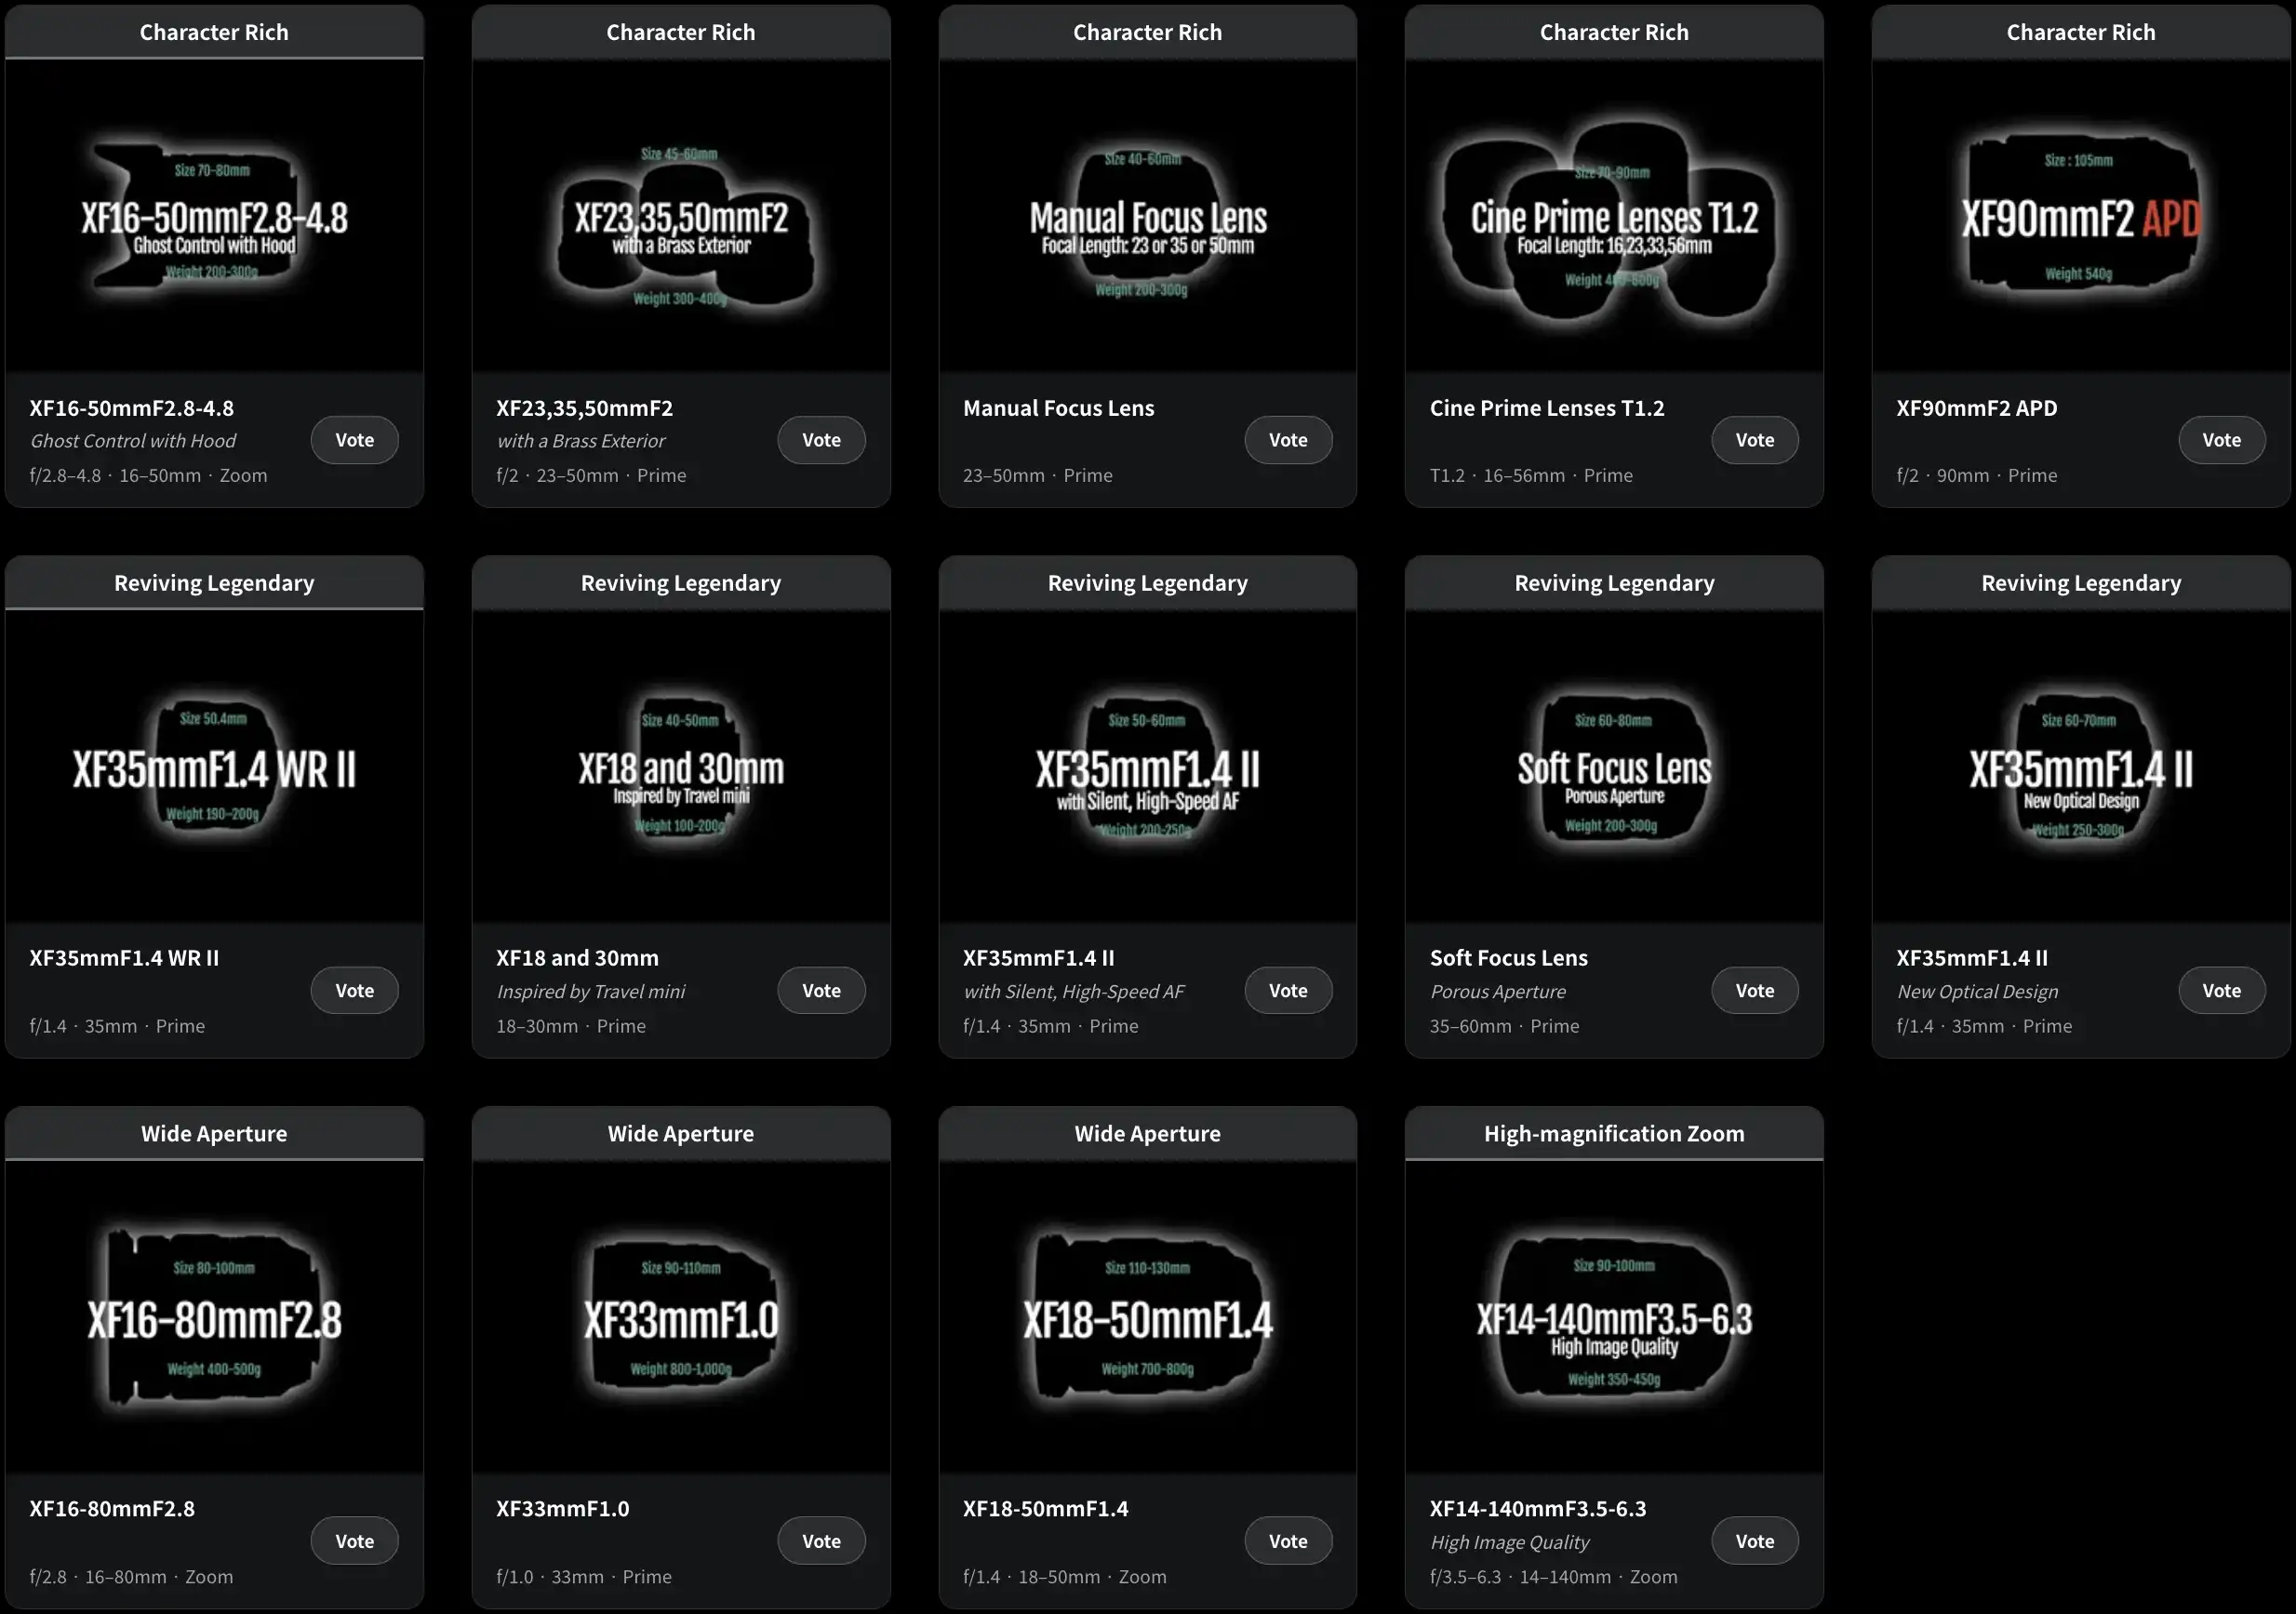
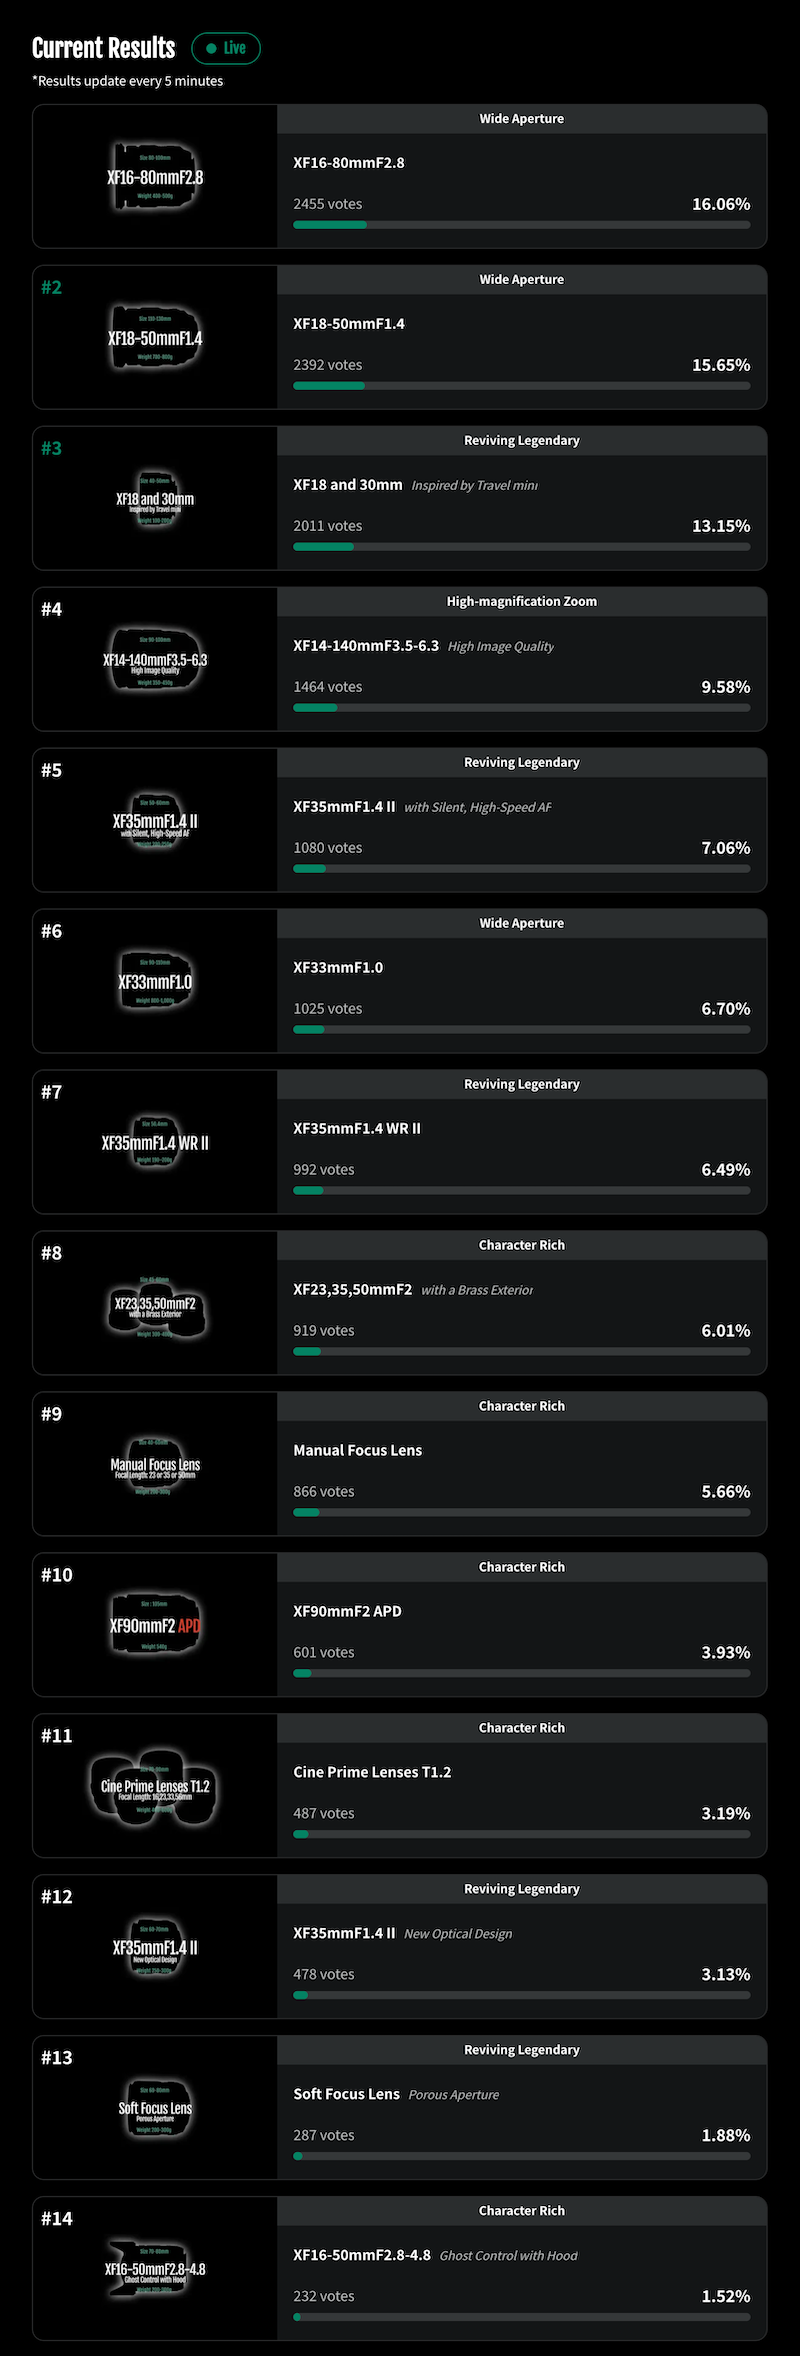
Fujifilm invites users to explore and vote on potential future XF lenses for the X-mMount system, based on 14 concept ideas proposed by Fujifilm’s product planning team. None of these concepts are currently in development, but the voting helps gauge community interest to influence future priorities. Users are prompted to select their top three favorite lens ideas after reviewing details like focal length, aperture, size, weight, and unique features. The page includes sorting options for the lenses (by category, aperture, focal length, or size) and likely interactive elements, such as checkboxes or buttons to submit votes. There’s also a link to view live voting results, which update every 5 minutes:
Early voting trends show strong interest in the wide-aperture zooms like the XF18-50mm f/1.4 and XF16-80mm f/2.8. The 14 concept lenses are grouped into four categories: wide-aperture lenses, high-magnification zooms, special-effect or updated classics, and other innovative ideas. Here’s a breakdown of each, including estimated specs and key notes from the event:
Lens Concept
Category
Key Details/Description
XF33mm F1.0
Wide-aperture prime
Revisited from a canceled past plan due to excessive size; aims for ultra-bright standard focal length. Size: 90-110mm, Weight: 800-1,000g, Filter: 80-90mm.
XF18-50mm F1.4
Wide-aperture zoom
Ambitious constant-aperture standard zoom; technically challenging but possible with tech advances; f/2 version more feasible. Size: 110-130mm, Weight: 700-800g, Filter: 80-90mm.
XF16-80mm F2.8
Wide-aperture zoom
5x zoom extending the 16-55mm concept; targets compact form similar to existing F4 version. Size: 80-100mm, Weight: 400-500g, Filter: 80-90mm.
XF14-140mm F3.5-6.3
High-magnification zoom
Superzoom with emphasis on high image quality; single entry in this category. Size: 90-100mm, Weight: 350-450g, Filter: 75-85mm.
XF35mm F1.4 II
Updated prime
New optical design for the classic 35mm; focuses on improved performance. Size: 60-70mm, Weight: 250-300g, Filter: 65-70mm.
Soft Focus Lens
Special effect prime
Uses porous aperture for creative soft focus effects; focal length not specified. Size: 60-80mm, Weight: 200-300g.
XF35mm F1.4 II (Silent High-Speed AF)
Updated prime
Enhanced autofocus version; aims for silent, faster operation while maintaining character. Size: 50-60mm, Weight: 200-250g, Filter: 65-75mm.
XF35mm F1.4 WR II
Updated prime
Weather-resistant update; retains original optical design for classic rendering. Size: 50.4mm, Weight: 190-200g.
XF18mm and 30mm (Switchable)
Switchable prime
Non-zoom lens that switches between two focal lengths (inspired by old Fuji cameras); compact, potentially fast aperture. Size: 40-50mm, Weight: 100-200g, Filter: 60-65mm.
Cine Prime Lenses T1.2 (16mm, 23mm, 33mm, 56mm)
Cine primes
Set of four cinema-style primes with ultra-bright T1.2; geared for video production. Size: 70-90mm each, Weight: 400-600g each, Filter: 75-85mm.
XF90mm F2 APD
Special effect prime
Incorporates Apodization (APD) filter for smoother bokeh, similar to XF56mm F1.2 APD. Size: 105mm, Weight: 540g, Filter: 75mm.
Manual Focus Lens (23mm or 35mm or 50mm)
Manual focus prime
Compact, autofocus-free option; choice of standard focal lengths. Size: 40-60mm, Weight: 200-300g, Filter: 60-65mm.
XF23mm, XF35mm, XF50mm F2 (Brass Exterior)
Primes with premium build
Updated F2 primes with brass exterior for aesthetic appeal; relatively easy to produce. Size: 45-60mm each, Weight: 300-400g each, Filter: 43-46mm.
XF16-50mm F2.8-4.8
Zoom with ghost control
Standard zoom with deliberate flare/ghosting control via removable hood for creative effects. Size: 70-80mm, Weight: 200-300g, Filter: 65mm.
2026 Sony World Photography Awards Professional Finalists
The World Photography Organization has announced the professional finalists and shortlists for the 2026 Sony World Photography Awards. While the Open competition (for which the 2026 category winners were announced last month) celebrates standout single images, the Professional awards focus on cohesive series that tell a story over multiple frames. The professional finalists offer a counterpoint to the Open winners, revealing how photographers are using image sequences to deepen storytelling beyond what a single photo can achieve.
This year's announcement highlights long-form projects across 10 categories, from Documentary Projects and Portraiture to Landscape and Wildlife & Nature. For the 2026 edition, 30 photographers have been named finalists, and more than 65 others have been shortlisted for series that range from intimate personal narratives to wide-ranging explorations of social and environmental change. The judges evaluated each body of work on its narrative strength, visual consistency and conceptual ambition, rather than on a single standout frame.
Selected images will be exhibited at Somerset House in London from April 17 to May 4, alongside hundreds of images from across all divisions of the World Photography Awards. Category winners and the overall Photographer of the Year, who receives a substantial cash prize and gear from Sony, the sponsor of the competition, will be announced at a ceremony in London on April 16. Work from the Photographer of the Year will also be shown in a solo presentation at next year's exhibition.
We've included a small section of the finalist images below, but you can see all of the finalists and shortlisted images at the contest website.
Architecture & Design
Photographer Name: André Tezza
Image Name: Loja e Mercado Marielen
Year: 2026
Image Description: Named after one of the owner's daughters, this store in Campo Largo is a family-run business integrated into the same building where the family lives, merging domestic space and commercial architecture into a single, everyday structure.
Series Name: Everyday Structures
Series Description: This ongoing project documents small neighbourhood grocery stores on the outskirts of Curitiba, in southern Brazil. These modest structures form an architecture of resistance that persists even as large retail chains reshape the city. Often family-run and linked to domestic spaces, the stores merge work, memory and dwelling into a single building. While the city centre undergoes gentrification, the periphery remains culturally dense and visually vibrant. This series reflects a belief that architectural beauty exists in ordinary, overlooked places.
Image Description: There is no record of the first disappeared woman in Mexico, but official figures state that 23 per cent of cases correspond to women.
Series Name: The Black Album
Series Description: With more than 130,000 individuals currently reported missing in Mexico, and a new disappearance occurring approximately every 40 minutes, The Black Album transforms archival imagery into a haunting collective portrait of absence, loss, and unresolved grief. Rather than documenting disappearance directly, this photographic essay reinterprets the past to question the future. Through an intervention in a photographic archive, the project constructs a symbolic 'album' of Mexico's disappeared — an unsettling reflection of a country living through a prolonged dark era in which absence has become routine and invisibility systemic.
Series Description: The Palm, On Piru is a photographic series exploring the spiritual connections and collective identities of rappers from South Los Angeles with Pirus/Bloods gang affiliations. The work focuses on the people and places central to the origins of West Coast hip-hop's G-funk music genre, and California's parallel gang culture, examining the interplay of their environment, community and artistic expression. The series was shot on colour infrared film, with its distinctive red and pink tones creating links between the environment and the artists, members, and families that form the Red side of the cultural divide, and the backbone of West Coast Hip Hop.
Image Description: Darwin, a young Venezuelan coca leaf picker (raspachín), rests on freshly harvested coca leaves in Putumayo, Colombia, before they are processed. The raspachíne's work is physically demanding, but the shifts are usually only half a day and are paid in cash. For many migrants, coca harvesting is one of the few reliable sources of income.
Series Name: Under the Shadow of Coca
Series Description: In the southern Colombian department of Putumayo, coca cultivation remains one of the few economic options for rural families in this neglected border region. This project follows farmers and families whose livelihoods depend on an illicit economy shaped by poverty, weak state presence, and armed control, as well as members of Comandos de la Frontera, the armed group that controls the territory and the cocaine trade. While some families try legal alternatives, coca often provides the only stable income. Under the Shadow of Coca shows that many of the local producers are not traffickers, but campesinos (farmers), and that it is usually armed groups who profit from the trade of coca.
Image Description: The photograph happened quickly. The flowers, the same colour as the detainee's sneakers and cap, immediately motivated him to pose. Many young people have experienced a similar scenario: drug dealing, then prison. He tells the photographer his story with ease: 'I started at 10 o'clock, in a small park, with a bag. Inside, there was really a big package. A lot of money.'
Series Name: Sixteen and a Half: Eight Months in a Juvenile Prison
Series Description: Over a period of eight months, Alexandre Bagdassarian documented the daily lives of young detainees in one of France's six juvenile prisons, one of the country's least visible institutions. The photographer sought to understand what it means to be young and confronted with prison, not from the perspective of legal texts or institutional discourse, but by observing the trajectories, voices, and bodies of those living this reality. Often relegated to silence or the margins, their stories are rarely told, and when they are, they reach us through a media or political lens, the photographer explains, sometimes 'shaped by security driven ideologies.'
Image Description: A family footing turf for domestic use. Ticknevin, County Kildare, Ireland.
Series Name: Beneath | Beofhód
Series Description: Beofhód — 'life beneath the sod' in Irish — evokes the primal significance of bogs in Celtic tradition. The series examines the cultural and environmental aspects of bogs in Ireland and contemplates themes of social and environmental justice, topographical mapping and the evolving perception of peatlands in an era of de-industrialisation. Although urgent ecological imperatives have ended large-scale peat extraction, they have also created tension with small-scale harvesting for domestic use, which still persists. Referencing Joseph Beuys' assertion that bogs are 'the liveliest elements in the European landscape' and 'preservers of ancient history,' this work reflects on the endangered status of these habitats in the artist's post-industrial surroundings. In this project, bogs are used as 'a metaphor for Ireland and the Irish psyche, and for local, human and personal exploration of a global issue.'
Image Description: Jinwar is an eco-feminist village founded during the Syrian war as a refuge for women. The village, powered in part by solar energy, was built collectively and inaugurated in 2018. Amal arrived here a year ago and says that 'the relationships among women are beautiful; I love everything here. I hope to be reborn here, with a clear mind, and to live in peace — here it's possible.'
Series Name: Jinê Land: Where Women Keep the Earth Alive
Series Description: Jinê Land: Where Women Keep the Earth Alive tells the story of women shaping the ecological and social future of Rojava in northeast Syria. In a region that is still recovering from war and fragmentation, women lead the fight for environmental restoration, sustainable agriculture, and community self-governance. Since 2012, Kurdish, Assyrian, Arab, and Armenian communities have self-organised under a model inspired by democratic confederalism, integrating women's liberation and ecology. Women manage schools, cooperatives, health centres, and local councils, ensuring their leadership in both social and ecological spheres. Villages such as Jinwar embody this vision: female-led, sustainable, and resilient, offering a space for education, self-reliance and communal life. Through photography, this project captures the intersection of freedom, ecology, and community, revealing a radical social experiment where women are both the stewards of the land and the architects of a new society.
Image Description: The first mountain climb ever traversed by the Tour de France has earned its mythical status as one of the hardest cycling climbs.
Series Name: Mountain Roads
Series Description: Mountain Roads is a series of photopolymer etchings of iconic European mountain roads. This ongoing project aims to document the greatest cycling roads spanning the Alps, the Pyrenees, the Dolomites, the Picos and the Spanish Islands. It celebrates the permanence of mountains and the feats of engineering and construction required to navigate and build a route through and over these formidable climbs.
Series Description: This series of abstract landscapes depicts oyster farming on the French coast of Normandy and Brittany, where the farms stretch along the entire coastline, shaping the character of the landscape. With a tidal range of up to 12 metres, the oyster beds disappear from view at high tide but are fully exposed at low tide. Yet it is only from a bird's-eye view that the vastness of these abstract landscapes, reminiscent of Roman legions, can be appreciated.
Image Description: Sheriff Knight (centre), the 'Dancing Cowboy,' leads the line dance during International Cowboy Day.
Series Name: Country Music in Kenya
Series Description: This series was photographed over an 11-month period, with the highlight being the International Cowboy Day festival, in Nairobi, Kenya. The festival drew around 3,000 country music fans to Ngong Racecourse in the final week of July. Country Music has been played on the radio in Kenya since colonial times and the popularity for the genre is growing, with shows being held by various artists in local bars a few times per week.
Series Description: 'My wife and I lost our child to stillbirth at 18 weeks of pregnancy. In the days leading up to the cremation we spent time together at home, during which time I took many photographs. In contemporary society, photographs are easily shared, generated and consumed, and with the rise of social media and artificial intelligence, the meaning of photography as a medium continues to shift. However, pressing the shutter in front of my child brought a renewed awareness of photography's fundamental qualities — its relationship to time and to the body. These photographs were not taken for the purpose of record or explanation. They are made simply to face the time that undeniably existed in that place. For me, looking at these photographs is an act of reaffirming the sensation of being alive.'
Image Description: A priest distributes communion during Pope Francis's funeral mass. Some 4,000 priests concelebrated the mass for approximately 200,000 mourners. Ritual persisted through the institutional transition, with the Eucharist administered regardless of papal presence.
Series Name: The Faithful
Series Description: Between the death of one pope and the election of the next, crowds gathered in St. Peter's Square, Vatican City, for an event that functions simultaneously as sacred ritual and global spectacle. The photographers explain that pilgrimage took on the traits of fandom, as rosaries, flags and prayer gestures were performed with full awareness of the attendant cameras and media. Individual devotion unfolded 'within a choreography shaped by mass attendance and global broadcast.' The portraits in this series capture that 'doubled consciousness': believers performing acts of faith within a mediated public space, where personal conviction merges with stadium-scale performance.
Image Description: The K-pop group Blue Flame, established in 2023, during a rehearsal in the Bucheon University gym. Bucheon University in Tashkent is a branch campus of a Korean university and has become one of the main meeting points for this scene, bringing together young people from different backgrounds who share the same enthusiasm.
Series Name: Koryo-Saram: How Descendants of Deported USSR Koreans Are Rediscovering Their Roots in Uzbekistan
Series Description: Koryo-saram are the descendants of ethnic Koreans from the former USSR who were forcibly deported to Uzbekistan through Stalin's ethnic cleansing policies. Over time, they became an integral part of Uzbek society, but their connection to Korea gradually faded, and by the 1990s, few could even read or write Korean. Today, most Koryo-saram identify as Uzbek citizens, with only faint traces of Korean cultural heritage remaining. However, a new generation, influenced by the 'Korean Wave,' is rediscovering its roots through music, film, dance and language, particularly in Tashkent, where this revival also includes many young Uzbeks.
Image Description: Taken during the same buzkashi match, this series shifts from a strict documentary approach towards an 'emotional truth grounded in real events.'
Series Name: Buzkashi
Series Description: Buzkashi (literally meaning 'goat pulling' in Persian) is the fierce, ancient sport of Tajikistan. It is similar to polo, but there are no teams and no boundaries. The ball is the eviscerated, headless carcass of a goat and the aim is brutally simple: seize it, hold it, break free. The game was born among the nomadic horse cultures of Central Asia, where strength and horsemanship were measures of identity. For centuries, chapandaz (riders) have hurled themselves into this churning mass of hooves and bodies, fighting for honour and a moment of clear sky among the dust.
Series Description: In the shadowed arch of an underpass in Lagos, Nigeria, far from the gleam of professional rings, a raw and resonant rhythm of ambition pulses. Beneath the Bridge documents a makeshift gym where amateur boxers — boys and girls alike — forge their discipline and dreams with nothing but tyres, rope, water and willpower. The project creates an intimate, visceral portrait of grassroots aspiration, exploring universal themes of resilience, gender equality in traditionally male spaces, and the profound human need to carve a place of purpose from the margins. Photographed in the natural light of the underpass, shadows and hard light sculpt the boxers' bodies, as textures of rust, rope and sweat become central to the narrative. This is not a story about winning or losing, but of preparing; a testament to the unadorned, potent moments where character is built before a single punch is ever thrown.
Image Description: A pistachio remains encased in its natural husk, left on the fruit beyond its ideal time. The husk has gradually darkened and started to break down, showing wrinkles, irregularities, and the first signs of decay. The contrast between the pale shell and the darkened husk highlights the pistachio's natural transformation, from fresh to weathered by time.
Series Name: The Bronte Pistachio
Series Description: For almost a year, Daniele Vita photographed the pistachios of Bronte, Sicily, from the trees to the harvested nuts. Studying them one by one, he realised that although they seemed alike, each was unique. This experience became a reflection on a society 'that tends to standardise and erase differences', and the photographer set out to capture the individuality of every natural element. In the final stage presented here, the pistachio stops being immediately recognisable and becomes an open image, where anyone can find their own perspective and meaning.
Series Description: Talking Without Speaking is a series of photographs of everyday objects that have become symbols of protest. Each of the objects can be connected to a specific historical period, a particular rights struggle or a particular country. Some have been intentionally brought to the streets to support a cause, while others have unexpectedly found their place in the public sphere, revealing their symbolic power over time.
Image Description: All of the images in WILD were taken with wildlife cameras set up in forests and along rivers in the UNESCO Rhön Biosphere Reserve in Northern Bavaria, Germany. The image titles indicate the time at which it was captured.
Series Name: WILD
Series Description: The photographs in this series were taken by a wildlife camera. Exposures were made when animals activated the camera via motion sensors, in the absence of the photographer and without his intervention. He was responsible for the preparation and follow-up work; installing the wildlife cameras in carefully selected locations and evaluating and processing the images that were generated over a period of months. The finished work is thus a co-production with the wild animals, whose decisive part — the moment the image is created — was not chosen by the photographer.
Image Description: Passengers in a car watch a capybara eating grass by the side of a road running through the private city. The animals attract attention, and many people stop during the day to take photographs of them.
Series Name: Capybaras at the Forefront of the Dispute and Resistance in Buenos Aires
Series Description: Nordelta is one of the best-known private developments in Buenos Aires, Argentina. It was built on a wetland, an ecosystem in which the land is covered by water, which is the main factor controlling plant and animal life. In recent years, the development's 45,000 upper-class residents have seen numerous capybaras enter the neighbourhood. Social media has been flooded with videos and photographs of the area's original inhabitants in swimming pools, crossing the street, or, more tragically, run over or trapped in drains or sewers. In a little over three years, the capybara population tripled to 1,000, leading the Buenos Aires government to approve population control plans that include selective sterilisation and contraception. At the same time, the presence of capybaras has divided the community, with neighbours arguing for and against the capybaras; for the rights of nature and against uncontrolled urban growth on natural land.
Canon EOS 5D Mark III | 135mm | F7.1 | 1/1600 sec | ISO 200 Photo: DianeMiller
DPReview community member DianeMiller (Diane D. Miller) is an active participant in our wider community and a talented self-taught photographer. Although she earned a Ph.D. in biochemistry and pursued a career in science, she always had a love of photography.
Her life took a different turn early on, though, after meeting her future husband, a pilot and adventurer. For their honeymoon, the couple flew around the world in a single-engine Beechcraft Bonanza – the first around-the-world flight not intended to set a record.
After years spent on aviation adventures and raising two daughters, Diane returned to working on her photography. Today, she is rooted primarily in nature, from studies close to home to expansive and beautiful landscapes and stills of the quiet night skies.
Favorite camera and lens: Canon R5 with the Canon RF 100-500mm – her favorite for its remarkable, handholdable reach.
Typical photo scenes: Nature close to home, birds, flowers, landscapes, and, increasingly, astrophotography including the Milky Way, deep-sky objects and celestial events.
“I've been playing with cameras since I was 10 or younger. I love being able to capture things I see and things beyond what I can see," she says.
Diane describes herself as a self-taught photographer who prefers to work alone or with a very small group of like-minded people. While she has traveled around the globe, she has found deep satisfaction in exploring familiar places, discovering beauty in nearby wetlands and in mystical views of the night sky.
Over the last decade or so, she has become much more serious about astrophotography, building a deep-sky setup while also experimenting with wide-angle Milky Way scenes. Recently, she developed a method of using astrophotography software to overcome limitations of shooting with regular cameras – a tutorial she is publishing on her website.
M31, the Andromeda Galaxy, shot with my astro rig.
Bag: A well-worn LowePro backpack (model long discontinued)
DianeMiler's camera bag.
Photo: DianeMiller
What other gear makes a difference?
"For my birding expeditions, I find the Spider hip belt holster and Olympus EE-1 dot sight for fast aiming at extreme focal lengths especially useful," she says.
Diane admits that her bag is usually packed to capacity. “Maybe I'm too ‘focused’ on photography and I can barely lift the bag as configured for most shoots, so not much else goes along except water.”
Recently fledged Western Bluebird.
Canon EOS R5 | 726mm | F13 Photo: DianeMiller
How do you adapt your setup to outdoor challenges?
Diane frequently repacks and reconfigures her bag depending on whether she is heading out to capture birds, flowers, macro shots or landscapes. For wildlife, the long lens and teleconverters dominate. For flowers and insects, macro tools and specialized lighting take priority. For landscapes and night skies, wide-angle lenses or her full astrophotography rig come along.
“It depends on the season and on what I am doing," she says. "If I travel alone like an explorer, I reduce everything to the minimum. If I have to photograph an organized event and stay in one place for three or four hours, I bring what makes the wait comfortable."
"My strength is that I always have the right focal length ready. The cameras are set in manual mode, usually with the aperture wide open. If necessary, I close it, but I like to isolate the subject and react quickly.”
Laguna de Santa Rosa on a foggy morning.
Canon EOS 5D Mark III | 170mm | F10 | 1/320 sec | ISO 200 Photo: DianeMiller
Diane's advice for other photographers
Diane’s philosophy is simple and ongoing: “The paint never dries.” She embraces photography as a lifelong process of refinement, curiosity and discovery. She also jokes that she loves her “dimroom, Lightroom and Photoshop!” where the creative process continues after the shutter is pressed.
If you’d like to share your photography setup, tell us about your main camera, lens choices, key settings and photography strategies. You could be featured next!
Editor's note: This article continues a series, 'What's in your bag?', highlighting DPReview community members, their photography and the gear they depend on. Would you like to be featured in a future installment? Tell us a bit about yourself and your photography by filling out this form. If you're selected for a feature, we'll be in touch with next steps.
When you use DPReview links to buy products, the site may earn a commission.
Updated March 5th, 2026
Well over a decade after Panasonic introduced the first mirrorless camera, it's a design that now dominates the interchangeable lens camera market. They include cameras designed for a wide range of photo and video pursuits and models at everything from budget to professional price points.
We've used and tested just about every current mirrorless camera on the market and picked out what we think are the stand-out models. We'll start with the most affordable models, then work our way up from there. In general terms, as you move up the price ladder, you'll see larger sensors with better image quality, higher resolution, faster burst rates, and more capable video specs. We'll explain why we've chosen each camera and try to explain the advantages and disadvantages of each choice.
Rolling shutter 'jello effect' present in 4K video
Crop when recording 4K/30p video
The Sony a6100 is an entry-level APS-C mirrorless camera. While it's one of the older cameras still available, its 24MP sensor, touchscreen for easy focus placement and Sony's excellent autofocus tracking, which especially excels at focusing on people and pets, still make it an excellent value for its price.
It's happiest if you prefer to point-and-shoot in an auto mode. The wide range of lenses available for it provide room to grow if you find yourself catching the photography bug and, if you shop smart, you can get the body and a lens for around $1000 (though we'd recommend staying away from Sony's default 16-50mm F3.5-5.6 II kit option).
The a6100 is the most basic model in the a6000-series and doesn't feel quite as robust as its step-up siblings. It offers a lower-resolution electronic viewfinder, and twin control dials that are both thumb-operated. Its touchscreen flips upward 180-degrees for easy selfie framing and vlogging.
Sony's autofocus system has been trained to recognize people and pets as subjects, and will follow them flawlessly throughout the frame. Coupled with the ability to touch the screen to place a focus point, it's a system that will serve beginner users very well, whatever they're shooting.
"The a6100's autofocus can effortlessly track whatever you point it at"
The a6100 makes it easy to record 4K footage or slow-motion 1080 video. There's a socket to connect an external mic but no way to connect headphones for monitoring. It can be set up for tap-to-track autofocus in video, too. There's significant 'jello-effect' distortion in the 4K footage though, especially in 24p mode.
The a6100 is a good entry-level camera with a very powerful, easy-to-use autofocus system. We're not huge fans of the kit zoom and the interface isn't especially welcoming, but with a few settings changes, it can help you get excellent shots, easily.
The Nikon Z50II is an entry-level APS-C mirrorless camera, built around a 21MP CMOS sensor. It features Nikon's '3D tracking' autofocus system, and can recognize nine subject types.
It represents a step up over the a6100, offering similarly powerful autofocus (though with more autofocus subject recognition types) and much more welcoming controls for when you want to be more involved in the photo-taking process. Nikon places some restrictions on what lenses third parties can make, but there are increasingly more sensible options; if the ones you want are available for it, the Z50II is the best option at this price point.
It has a solid grip, twin top-plate control dials, and a wide variety of customizable buttons, including one that, by default, controls color mode. Focusing is handled using the touchscreen or four-way controller.
Autofocus is very good with subject detection being especially good. However, human detection doesn't seem as sticky and 3D Tracking isn't as dependable as on Nikon's higher-end models. Otherwise, the camera is snappy and can even do 30fps pre-capture, though it's JPEG only.
The Z50II delivers on the basics without breaking the bank.
The Z50II can shoot Log or HLG video and has a waveform monitor to help set correct exposure. A headphone socket helps maintain audio quality but the lack of in-body stabilization counts against its use for video.
The Z50II is a solid hybrid camera, with several features from Nikon's higher-end cameras. The lack of a stabilized sensor is the one mark against what are otherwise very good video specs, and you may find the lens selection limited if you want a camera to grow with you.
The Fujifilm X-T5 is an enthusiast-level APS-C mirrorless camera built around a stabilized, 40MP BSI CMOS sensor with the company's X-Trans color filter array. It has plenty of features for both photo and video shooters.
What really lands it on this list, though, is how lovely it is to use. There are physical controls for all your exposure settings alongside configurable top-plate command dials, a big, bright EVF, and its JPEG colors are especially pleasing with a wide range of sensible (and more out-there) "Film Simulation" color modes. Though there are more technically capable APS-C cameras on the market, for a lot of photography, we'd give up a bit of AF tracking performance and speed for the X-T5's user experience.
The X-T5 features dedicated control dials for ISO, shutter speed and exposure compensation, along with a film-era SLR-style low-profile front grip. Its rear screen tilts up and down but also hinges outward for portrait-orientation shooting.
The X-T5 can detect a variety of subjects from animals to vehicles, and tracking performance is quite good with these. Tracking for unrecognized subjects is less dependable and eye detection is prone to false positives. Buffer depth while shooting at 15fps is reasonable.
The X-T5 foregoes some of the X-H2's video features to offer a more photo-centric experience with classic styling
Video performance can be either full width but less detailed, or oversampled from a crop of the sensor. The use of SD cards means it doesn't share the X-H2's high-data-rate ProRes options. There's no headphone jack but audio can be monitored through the USB port with an included adapter.
Having the X-H2 and X-H2S available to meet the needs of videographers allows the X-T5 to fulfill photographers' desires for stills-centric handling and features. For photographers who enjoy Fujifilm's traditional dial-based controls, there's no more capable body than the X-T5.
This widget is not optimized for RSS feed readers. Please open this article's permalink in a browser to view this content.
What are my other APS-C options?
The Sony a6700 is the most capable APS-C camera on the market, with extremely strong autofocus performance, image quality and video capabilities. Sony's E-mount also has the most complete array of APS-C lenses after Fujifilm's, largely thanks to support from third parties. However, we don't find it as pleasurable to use as the X-T5 – its viewfinder is smaller and lower-res, and the lack of an AF joystick makes picking a focus point a bit more of a chore – but if technical prowess is what you seek, the a6700 is your best bet.
Fujifilm's X-T50 is also worth considering if you're looking at APS-C cameras
Photo: Richard Butler
Finally, if you were enticed by the X-T5 but are on a budget, we'd suggest considering the Fujifilm X-T50. It packs the same sensor and processor into a smaller, lighter design. While the viewfinder isn't as nice, and the controls are a little more fiddly, in return, you get the film simulation dial, which encourages you to play with different looks. It can also be kitted with the excellent 16-50mm F2.8-4.8 OIS zoom, which is significantly better than the lenses bundled with other companies' APS-C offerings
Full-frame cameras (those with image sensors the same size as traditional "35mm" film) offer the potential for better image quality than smaller formats, simply because they have a larger area on which to capture light. However, you don't get something for nothing: even if you can find an affordable, compact full-frame camera at a good price, the lenses needed to make the most of it will be larger and will typically cost more than those for APS-C or Four Thirds sensors. Broadly speaking, there's a balance to be struck between image quality, size and price, which is worth contemplating before you make the assumption that full-frame is the best (or even 'better') format.
The Nikon Z5II is a full-frame mirrorless camera built around a 24MP BSI CMOS sensor.
Don't be scared by the "value" part of this pick; the Z5II doesn't feel cheap, and there aren't obvious features cut for cost. In fact, we suspect most photographers would struggle to push its limits, and unless you must absolutely have faster or higher-resolution shooting or top-end video, it's hard to argue that most people truly need anything better.
The Z5II is a solid camera with a deep grip and plenty of customizable buttons. It's comfortable to use, even for long sessions using a relatively large lens.
The autofocus is very good, especially in subject recognition modes. It's not quite as dependable at recognizing people in low light, but it's very competitive and light-years better than even higher-end cameras from just a few years ago.
The Nikon Z5II is almost unimaginably good for a camera priced under $2000.
Video quality is good, though with a decent amount of rolling shutter, and it offers advanced options like Log, HLG HDR and N-Raw capture. Autofocus isn't as dependable as it is in stills.
Image quality is excellent, and the Z5II can capture HLG HDR images using HEIF files for a more life-like viewing experience.
The Z5II is an impressive all-rounder that delivers excellent image quality and good video, underpinned by very good autofocus in a body that's well-designed and comfortable to use. It's hard to see what more an enthusiast photographer could want from a camera.
This widget is not optimized for RSS feed readers. Please open this article's permalink in a browser to view this content.
What are the other entry-level full-frame options?
We also think the Canon EOS R8 is worth considering if you're looking for a comparatively affordable full-frame camera. Like Nikon's Z-mount system, Canon's RF lens ecosystem is also somewhat short on affordable lenses to pair with an entry-level camera.
Its usability is what keeps it from topping this guide; it has shorter battery life and a smaller viewfinder than the Z5II, and lacks in-body image stabilization, a second SD card slot and an AF joystick. However, it can shoot 4K60 video without a crop, which could be interesting to videographers, though, unlike the Z5II, it doesn't offer any Raw options.
Good autofocus tracking with auto subject recognition mode
Extensive choice of video resolutions and codecs
What we don't:
Peak dynamic range lower than peers
N-Raw video format has limited support
Nikon controls 3rd-party lens options
The Nikon Z6III is Nikon's third-generation full-frame enthusiast mirrorless camera, with a 'partially stacked' 25MP CMOS sensor.
The Nikon Z6III is a significant step up for the Z6 series, and is a very capable camera for both stills and video. Its main benefit over less expensive models are its sensor readout speeds – and, therefore, rolling shutter performance in video. At its MSRP, at least in the US, it's not quite as good as its similarly priced rivals, but it's routinely available for hundreds of dollars off, a price that makes it a bit more attainable as this category gets increasingly expensive.
The Z6III has an ample grip and easy-to-use control scheme. Nikon's menus and touchscreen layout are also well-refined, but the camera lacks the company's traditional AF mode button or front-corner switch.
The Z6III is a genuine do-anything camera with excellent video and photo capabilities.
Autofocus is generally reliable, and the camera includes Nikon's 3D-tracking system and plenty of subject recognition modes. It can shoot 20 raws per second, or 60fps in JPEG mode.
The Z6III shoots many video formats, including Raw, and has dependable subject-tracking autofocus and a waveform display. Its 4K and 5.4K modes produce excellent detail, even in 60p, and its rolling shutter performance is outstanding.
Image quality is very good, with lots of detail and acceptable amounts of noise. There is a recognizable dynamic range tradeoff for that speed, but it's only noticeable in extreme situations.
The Z6III is a significant step-up from its predecessor and is to-date the most all-round capable camera in its class. It excels in both stills and video.
Full suite of video recording modes and assist features
What we don't:
Overheating in ambitious video modes
Dynamic range isn't as strong as its best competitors'
Hitting buffer's limit slows camera down
The Canon EOS R6 III is a full frame enthusiast camera, with a 33MP sensor.
It earns its place on this list by being a complete package that's enjoyable to use. Its image quality, burst rates and autofocus are capable of helping you tackle pretty much any subject, and it's also a powerful video camera. No matter what your needs it's hard to imagine you'll find that the EOS R6 III holding you back.
It has plenty of customizable buttons and a decent range of settings for them. It's comfortable to hold, but its viewfinder and display aren't the nicest around.
The EOS R6 III has very dependable autofocus across its selection of tracking and subject recognition modes. It can shoot at bursts up to 40fps (though with reduced dynamic range), and supports pre-capture for up to 0.5 sec before you press the shutter.
Rather than "jack of all trades, master of none." It's a master of most.
Images from the EOS R6 III have very good levels of detail and pleasing colors. The camera's peak dynamic range can't match the best of its competitors, and it'll struggle a bit more in e-shutter mode, but it's good enough for most use cases.
The video quality from the camera's open gate, Raw and oversampled 4K modes is quite good at 24p, though its higher-framerate and subsampled modes suffer a bit. Its rolling shutter performance is great, and it's quite nice to use for shooting video. However, its overheating performance could limit its most ambitious modes in hot shooting environments.
The EOS R6 III is an abundantly capable camera for most kinds of stills and video shooting. It pairs great performance with excellent ergonomics and a refined user experience.
This widget is not optimized for RSS feed readers. Please open this article's permalink in a browser to view this content.
The enthusiast rivals
The category of mid-range enthusiast full-frame cameras is perhaps the most competitive in the industry: each option is very capable, but with different strengths and weaknesses. Depending on your needs, the Sony a7 V or the Panasonic S1II may be slightly better options than the EOS R6 III or Z6III, but for most users, it's hard to go wrong with any of them. For more info on the subtle differences between them, check out our full best cameras under $3000 buying guide.
Some other notable mentions: if you shoot outside a lot and need a compact system with excellent weather sealing, the OM System OM-1 II is worth considering; outside of that use case, it's probably worth considering other options unless you're heavily invested in Micro Four Thirds lenses.
Sony'sa7C II is also a reasonable choice, as its high-resolution sensor is good for stills, though its slow readout speeds limit its video capabilities. Its autofocus isn't quite as advanced as that of the a7 V, but it's appreciably smaller than its rivals. This does mean that the viewfinder is small, and there's no AF joystick, though, which are the main reasons it's not one of our main picks: it's better on paper than in the hand.
Best high-end mirrorless camera: Canon EOS R5 II
45MP Stacked CMOS sensor | Eye-controlled AF subject selection | Up to 30fps continuous shooting
Slight reduction in dynamic range in extreme scenarios
Temperamental eye control
Temperature limits in heaviest video modes
The Canon EOS R5 II is one of the most capable cameras we've ever tested and will almost certainly be up to any task that most photographers can throw at it. It shoots at high resolution, has an excellent autofocus system and sports plenty of video features.
The grip is very well-shaped and proportioned, and the controls are all well-placed and comfortable to use for extended periods. Eye Control for autofocus is excellent when it works, which isn't always
The EOS R5 II has excellent tracking and subject-tracking autofocus performance. The subject detection is effective without getting in your way. It can shoot Raws at up to an extremely rapid 30fps.
The EOS R5 II does a vast range of things, most of them extremely well: it's impressive for action, landscapes, video, you name it.
It has plenty of video options up to Raw 8K/60p, offering high levels of detail, though it can overheat when shooting in its most impressive modes. Its rolling shutter rates are generally quite good.
The 45MP Raws are highly detailed, and the JPEG sharpening and noise reduction are sensible. It can't quite match higher-resolution cameras like the A7R V, but performs well in its own right.
The EOS R5 II excels at almost everything it tries to do, and that's a long list. It's hard to imagine what photo or video need it won't support you in.
This widget is not optimized for RSS feed readers. Please open this article's permalink in a browser to view this content.
A worthy competitor
The strongest competitor to the EOS R5 II, besides the original EOS R5, is Nikon's Z8. And, frankly, there's very little to choose between them. Canon's high-end model has some features that could be useful to certain photographers, like Action Priority AF and Eye Control, but outside of that, your choice should again be dictated by lens selection, as they're both supremely capable cameras.
The Sony a7CR takes most of the features of the more expensive a7R V and provides them in a smaller package. The viewfinder is disappointing for such an expensive camera, but nothing gives you so much image quality in such a small, capable package.
The a7CR is impressively small for a full-frame camera. The addition of a front control dial improves handling significantly. Notably, there’s no joystick for positioning the AF point, and the viewfinder is small and very low resolution for a camera costing this much.
Autofocus performance on the a7CR is very good and is helped by a dedicated processor for crunching complex machine learning-trained algorithms. Subject recognition is quick, and the AF system tracks subjects tenaciously around the frame in either stills or video. 8 fps burst shooting with continuous AF results in a dependably high hit rate.
"If you're looking for maximum resolution in a travel-sized body, the a7RC is tough to beat."
The a7CR captures 4K video at up to 60 fps. The most detailed, oversampled footage results from a 1.2x crop of the sensor, which makes it challenging to maintain wider focal lengths. Auto Framing mode uses AI algorithms to mimic the way a camera operator might punch in on subjects, keeping them framed and in focus.
The a7CR's 61MP sensor can capture a lot of detail, putting it ahead of most full-frame rivals; though it is a little noisier in low light. JPEG colors are pleasing, and excellent sharpening makes the most out of the 61MP sensor. Raw files provide plenty of latitude to pull up shadows at base ISO.
The a7CR delivers impressive results for its size. It essentially provides the same level of image quality, and most of the same features, as Sony's a7R V, but in a smaller package. In exchange for the small size, you make a few compromises, like no AF joystick, but if you're looking for maximum resolution in a travel-sized body, the a7CR is tough to beat.
The Fujifilm GFX 100S II is a 100MP medium format mirrorless interchangeable lens camera with built-in image stabilization.
This camera is perhaps the most specialized pick on this list: it's not especially fast or versatile, but in terms of image quality, it essentially offers the best levels of detail we've ever seen. It's a true step up over even the best of its full-frame rivals (some of which comes from its lenses - the GF primes often being particularly good).
Sample gallery
This widget is not optimized for RSS feed readers. Please open this article's permalink in a browser to view this content.
What are the other high-end options?
Just about all the cameras that cost $3000 and up are, unsurprisingly, rather good. We go into a little more detail about their relative merits in our High-end camera buying guide. As with any budget, the key things to consider are what types of photography you plan to do (and hence, which features and capabilities are most important to you), and whether the lenses you need are available at a price you're willing to pay.
Why you should trust us
This buying guide is based on cameras used and tested by DPReview's editorial team. We don't select a camera until we've used it enough to be confident in recommending it, usually after our extensive review process. The selections are purely a reflection of which cameras we believe to be best: there are no financial incentives for us to select one model or brand over another.